
COMPUTER SOFTWARE – INTRODUCTION
A computer software/program is a sequence of instructions (machine-readable)
that tell the computer hardware what to do.
There are two major categories of software: system and application software.
SYSTEM SOFTWARE
Systems software consists of programs that co-ordinate the activities of
hardware and other programs. System software is designed for a specific CPU
and hardware class. The combination of a particular hardware configuration
and operating system is called a computer platform. These programs manage
the “behind the scenes” operation of the computer.
TYPES OF SYSTEM SOFTWARE
1 . Operating systems (OS) – This is a collection of software that manages
computer hardware resources and provides common services for computer
programs.
Examples of operating systems include:
DOS – Disk operating system
Windows 3.1 , 95, 98, NT, 2000, ME, XPLinux, Windows Server 2003
Unix
MAC OS X
System 7/Mac OS 7
Solaris
2. Utility Programs – This is system software designed to help analyze,
configure and maintain a computer. Utility programs often come installed on
computer systems or packaged with operating systems. Utilities can also be
purchased individually. Examples of utility programs include:
a. Language processors – Compilers and interpreters.
b. Disk cloning- Refers to the process of copying the contents of one
computer hard disk to another disk or to an “image” file. Unlike standard
copying functions, disk cloning involves copying hidden and in-use files,
and thus presents special challenges, as those types of files are typically
not available for copying. Examples include Disk Copy by Apple and
DriveClone by Farstone Technology.
c. Disk Compression – A type of data compression that works by storing
compressed versions of files on the hard disk. A disk compression utility
sits between the operating system and the disk drive. Whenever the
operating system attempts to save a file to disk, the utility intercepts it
and compresses it. Likewise, when the operating system attempts to
open a file, the disk compression utility intercepts the file, decompresses
it, and then passes it to the operating system.
d. Antivirus software
e. Backup software
f. Disk checkers can scan operating hard drive.
g. Disk Defragmenter
h. Disk partitioning for dividing an individual drive into multiple logical drives
i. Disk Cleaner
j. Debuggers
k. Registry cleaners clean and optimize the Windows registry by removing
old registry keys that are no longer in use.
Types of Operating Systems
Multi-user: Allows two or more users to run programs at the same time.
Some operating systems permit hundreds or even thousands of
concurrent users. All mainframes and minicomputers are multiuser systems, but most personal computers and workstations are not.
Multiprocessing: Supports running a program on more than one CPU. The
system has two or more processing units (multiple processors) each
sharing the main memory and peripherals, in order to simultaneously
process programs. This is also called parallel processing and is made
possible by multithreading programs such that several threads of the
same program run on the same CPU.
Multitasking/Multiprogramming (vs. Singletasking): Allows more than
one program to run concurrently thereby ensuring that system resources
are utilized effectively. A single-tasking system has only one running
program.
Multithreading: Allows different parts of a single program to run
concurrently. The technology can be applied to a single process to enable
parallel execution on a multiprocessor system. This means that a
single process can have many different “functions” executing concurrently,
allowing the application to better use the available hardware (multiple
cores/processors).
Real time: Real time systems are usually dedicated, embedded systems.
They typically read from and react to sensor data. The system must
guarantee response to events within fixed periods of time to ensure
correct performance. Real-time responses are often understood to be in
the order of milliseconds, and sometimes microseconds. Responds to
input instantly. The predictability of the system behaviour is the most
important concern in these systems. General-purpose operating systems,
such as DOS and UNIX, are not real-time.
The main characteristics of this type of real time systems include:
o Direct connection between input/output devices and the central
processor.
o Fairly fast response time
Typical examples of real-time systems include Air Traffic Control Systems,
Command Control Systems
Distributed: A distributed operating system manages a group of
independent computers and makes them appear to be a single computer.
The computers are geographically dispersed but linked by communication
lines. This seamless integration of individual nodes into a global system is
referred to as transparency.
Embedded: Embedded operating systems are designed to be used in
embedded computer systems and dedicated to handle a particular task.
An embedded system is a computer system with a dedicated function
within a larger mechanical or electrical system, often with real-time
computing constraints. They are designed to operate on small machines
like PDAs with a limited number of resources. They are very compact and
extremely efficient by design. Examples include Windows CE and Minix 3.
Embedded systems range from portable devices such as digital watches
and MP3 players, to large stationary installations like traffic lights, factory
controllers and large complex systems like hybrid vehicles, MRI,
and avionics.
Batch operating system: these execute a series of programs (“jobs”) on a
computer without human interaction. Batch jobs are set up so they can be
run to completion without human interaction i.e. programs and data are
collected together in a batch before processing starts. This is in contrast
to “online” or interactive systems which prompt the user for such input.
Examples of areas where batch processing is used include:
a. Producing bills
b. payroll
c. stock control
d. processing bank cheques
e. marking multiple choice examination papers
Spooling batch systems use the concept of spooling which is an acronym
for Simultaneous Peripheral Operations online.
Spooling refers to putting data in a buffer, a special area in memory or on
a disk where an output device such as a printer can access them when it
is ready. Spooling is useful because devices access data at much slower
rates than the CPU. The buffer provides a waiting station where data can
rest while the slower device catches up.
The most common spooling application is print spooling. In print spooling,
documents are loaded into a buffer and then the printer pulls them off the
buffer at its own rate.
Interactive/on-line: User is online with computer system and interacts
with it via an interface and the results of data processing are available
immediately. It is typically composed of many short transactions where
the result of the next transaction may be unpredictable. Response time
needs to be short since the user submits and waits for the result.
Functions/Features of an Operating System
The main features of an operating system can be thought of as functions of the
operating systems. They are the qualities that an operating system should strive
to achieve.
i) Managing Resources – These programs coordinate all the computer’s
resources including the processor, keyboard, mouse, printer, monitor, storage
devices and memory.
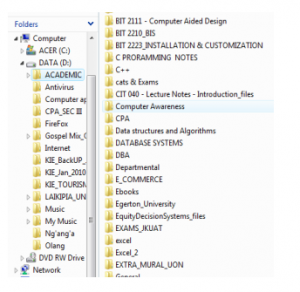
An operating system creates a file structure on the computer hard drive where
user data can be stored and retrieved. When a file is saved, the operating system
saves it, attaches a name to it, and remembers where it put the file for future use.
The way an operating system organizes information into files is called a file
system. Most operating systems use a hierarchical file system, which organizes
files into directories (folders) under a tree structure. The beginning of the
directory system is called the root directory e.g. C:\. The figure below shows a
screenshot of tree structure when using Windows Explorer.
Providing a user interface – Users interact with application programs and
computer hardware through a user interface. The user interface controls
how you enter data or instructions and how information displays on the
computer screen.
Almost all operating systems today provide a windows-like Graphical User
Interface (GUI) in which graphic objects called icons are used to represent
commonly used features. Some operating systems, however, provide a
command-line user interface such as MS-DOS, CP/M, Unix, and Apple DOS.
System software serves as the interface between a user, the application
software, and the computer’s hardware
Running applications – These programs load and run applications such
as word processors and spreadsheets. Most operating systems support
multitasking, or the ability to run more than one application at a time.
When a user requests a program, the operating system locates the
application and loads it into the primary memory or RAM of the computer.
As more programs are loaded, the operating system must allocate the
computer resources.
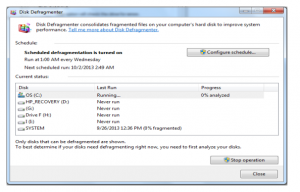
iv) Support for built-in utility programs –The operating system uses utility
programs for maintenance and repairs. Utility programs help identify
problems, locate lost files, repair damaged files, and backup data. The
figure here shows the progress of the Disk Defragmenter, which is found
in Programs > Accessories > System Tools.
Control of the computer hardware – The operating system sits
between the programs and the Basic Input Output System (BIOS). The
BIOS controls the hardware. All programs that need hardware
resources must go through the operating system. The operating
system can either access the hardware through the BIOS or through
the device drivers.
vi) Security – A computer being secure depends on a number of
technologies working properly. A modern operating system provides
access to a number of resources, which are available to software
running on the system, and to external devices like networks via the
kernel.
The operating system must be capable of distinguishing between
requests which should be allowed to be processed, and others which
should not be processed.
vii) Reporting errors during program execution
APPLICATION SOFTWARE
Applications software includes programs designed to help end users solve
particular problems using the computer or to perform specific tasks beyond the
operation of the computer itself.
Sources of application software
Advantages of proprietary software
You can get exactly what you need in terms of reports, features etc.
Being involved in development offers a further level in control over results.
There is more flexibility in making modifications that may be required to
counteract a new initiative by a competitor or to meet new supplier or
customer requirements. A merger with another firm or an acquisition will
also necessitate software changes to meet new business needs.
Disadvantages of proprietary software
It can take a long time and significant resources to develop required
features.
In-house system development staff may become hard-pressed to provide
the required level of ongoing support and maintenance because of
pressure to get on to other new projects.
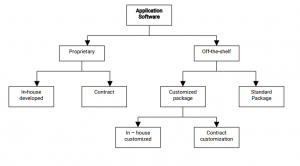
The software makes the business owner too heavily dependent upon the
Application
Software
Proprietary Off-the-shelf
| In-house developed |
Contract | Customized package |
Standard Package |
| In – house customized |
Contract customization |
developer.
It is difficult to adapt the software to changes in the marketplace.
Advantages of off-the-shelf software
The initial cost is lower since the software firm is able to spread the
development costs over a large number of customers.
There is lower risk that the software will fail to meet the basic business
needs – you can analyze existing features and performance of the
package
Package is likely to be of high quality since many customer firms have
tested the software and helped identify many of its bugs.
Due to its wide distribution you may be able to gain help from a large
number of users especially online.
Disadvantages of off-the-shelf software
An organization may have to pay for features that are not required and
never used.
The software may lack important features, thus requiring future
modifications or customisation. This can be very expensive because
users must adopt future releases of the software.
Software may not match current work processes and data standards.
Application software is further classified into general-purpose software and
special purpose applications. General purpose application software is a type of
software that can be used for a variety of tasks. It is not limited to one particular
function. For example a word processor could be classed as general purpose
software as it would allow a user to write a novel, create a restaurant menu or
even make a poster.
Special purpose application software, on the other hand, is a type of software
created to execute one specific task. For example a camera application on your
phone will only allow you to take and share pictures.
Functions of various General-purpose software
Word processing – Create, edit and print text documents. E.g. MS Word,
Word Perfect, OpenOffice Writer.
Spreadsheets – Provide a wide range of in-built functions for statistical,
logical, financial, database, graphics, data and time calculations. E.g.
Lotus 1 -2-3, Excel, Quattro Pro.
Database management systems (DBMS) – Store, manipulate and retrieve
data. E.g. Access, FoxPro, dBase, Oracle, MySQL etc.
Online Information Services – Obtain a broad range of information from
commercial services. E.g. America Online, CompuServe
Communications applications- Ms Outlook for email
Browsers e.g. Internet Explorer, Mozilla Firefox, Eudora, Netscape’s
Navigator, Opera Browser, Torch, Google chrome.
Graphics – Develop graphs, illustrations and drawings. E.g. PaintShop,
FreeHand, Corel Draw etc.
Project Management – Plan, schedule, allocate and control people and
resources needed to complete a project according. E.g. Project for
Windows, Time Line.
Financial Management – Provide income and expense tracking and
reporting to monitor and plan budgets. E.g. Quicken, Quick-books, Sage
Desktop publishing – Used to create high-quality printed output including
text and graphics; various styles of pages can be laid out; art and text
from other programs can also be integrated into published pages. E.g.
PageMaker, Publisher.
Presentation packages like MS PowerPoint, Apple Keynote, Corel
Presentations Lotus Freelance Graphics, OpenOffice, NeoOffice,
StarOffice Impress
Note: Some application software come in suites. A software suite refers to
related but independent programs and packages that have a common user
interface or shared data format, such as Microsoft Office. The programs in a
software suite are designed to be used together. In addition, the commands,
the icons and procedures are the same for all programs in the suite
.
CHOOSING APPROPRIATE COMPUTER SOFTWARE
There are six key software evaluation criteria that should be considered in an
organization’s software decision.
(i) Functionality – Software should have the right functionality to fit your
industry specific requirements. Just because the software is well known,
does not mean the vendor has the specific functionality you need to run
your business.
| (ii) | Technology – The software must be a match for the platform and database that you are running and the expertise of the IT staff that you have in-house. Software Vendor – The software vendor is a critical part of the software selection process. You are not just buying a static software solution; you are |
| (iii) |
actually buying a relationship with that software vendor. You will be paying
annual maintenance so that they will continue to develop, enhance, and
improve the product.
(iv) Value Added Reseller (VAR) – If you are acquiring software from a VAR, the
company needs to have experience with the software product that you are
implementing and the industry that you are in. You have many
VAR/Implementation Partner options available to you. Make sure you get
one that has a focus in your industry.
A Value Added Reseller is a company that adds features or services to an
existing product and then resells it usually to end-users. The added value
can come in form of integrating, customizing, consulting, training and
implementation.
(v) Maintenance & Support – You can expect to pay between 1 8-25% of the
license cost for maintenance. This entitles you to upgrades and some level
of support. You should make sure that this investment you will be making
on an annual basis will be appropriate.
| (vi) | Total Cost of Ownership – You need to consider the total cost of ownership |
of the software solution and not just the big discount that the vendor may
be offering for the up-front license cost. There are 3 main components of
out-of-pocket cost that should be considered. These components include
the software license, software maintenance, and implementation services.
You should look at the cost for the next 5-7 years in order to get a good idea
of the long term cost to your organization.
OPERATING SYSTEM ENVIRONMENT
Using an operating system
Start Button
A single click of left-hand mouse button on the Start button will invoke the Start
menu. The Start button allows a user to access his/her work or application with
the least amount of fuss in a way that is “discoverable” to the first time user.
Actions such as double clicking are not discoverable.
A single click of the right-hand mouse button will invoke a small, powerful and
object control menu containing the options Open, Explore, Search and properties.
Their functions are described as follows:
| Item | Function |
| Open | Here, the contents of the Start menu can be viewed. Folders and icons can be deleted, copied and moved using drag and drop techniques. |
| Explore | It will invoke the powerful Windows XP Explorer. The Explorer displays a hierarchical representation of the entire system and permits further manipulation and configuration of Desktop. |
| Search | It will invoke Windows XP file searching utility. It helps in searching a file either by its name or by its actual content. |
| Propertie s |
Opens the taskbar and start menu properties. It is important in customizing the start menu and setting the appearance of taskbar. |
The Start Menu
The Start menu contains the various categories where various applications and
work are stored. You can move further into various sub-categories by positioning
mouse over the category you are interested in. It will automatically open the next
sub-category. You do not even have to click the mouse.
Tip: If you drag an object either from Desktop or from Windows Explorer and drop
it
directly onto the Start button, a link to that object will automatically appear in
Start menu.
To display Start menu using a mouse, click on the Start button located at the
bottom left of a screen.
Windows compatible keyboards have two extra keys. To display the Start menu
using this keyboard, press the windows logo key. It will open the Start menu.
To close the Start menu using a mouse, point the mouse at the Desktop (not at
the start menu) and click the left mouse button.
To close the Start menu using a key, press the Esc key.
The following are the sub-menus of the Start menu:
1 . All Programs
The All Programs allows one to access all sub-groups that one has created,
or which may be created automatically by application installation routines.
Note
Sub-categories can easily be added to the Programs category by initially
clicking the Start button with the right-hand mouse button and selecting
the Open command. The view will now expand to display the contents of
each category as a window. The creation of additional folders and
program icons can be performed easily whilst in this view.
Finally, when complete, close the windows and click on the Start button
with the left hand mouse button. Your newly created folders and icons will
now appear within the Start menu itself.
2. Control Panel
By selecting Control Panel from the Start menu, one can directly access the
Control Panel and Printers folders. Being able to access the core system
configuration utilities in this way is particularly useful when an application is
already in the foreground and you want to make a quick change. In this case,
simply press “Ctrl+Esc” or the windows logo key to invoke the Start menu over
the top of your application and click on “Settings.”
3. Search
The Search utility permits searching of all system resources. Within this category,
you can perform searches for distinct types of search which are described as
follows:
i) Files or Folders
Here, you may perform a highly powerful file name and actual file
content search. By using the search program, it is possible to
specify a text string that will occur within a file even if the file is a
binary file. This kind of search has always been useful for users of
the UNIX operating system and is more commonly referred to as a
GREP search. You may also search for a particular type of file, such
as searching for all wave sound files (ending in an extension of
.WAV).
To find the location of a file, follow the following procedure:
• Click on the Start button
• Click on the Search command
From the sub-menu displayed, select For Files or Folders (refer to figure 5.1 )
Make sure that the Name and Location tab is selected. Follow the following
procedure:
• In the Named section, enter the name of the file you wish to locate. In this
example, we have entered “wordpad.exe”
| • Ensure that the correct drive Drive C |
to be searched is selected, in this case it is |
• To search the whole disk, make sure “Include subfolders” box is ticked
• To start the search, click on the “Search” button. In this case, the results
will be displayed
To open the file that has been found, double click on it.
ii) On the Internet
This command will start Internet Explorer and will display a page enabling you to
search the Internet.
iii) People
This command will display the “Find People” dialog box (refer to figure 5.4). You
can use this command to search your personal address book or you can search
for someone on Internet by selecting one of the directory services from the “Look
in” drop down list.
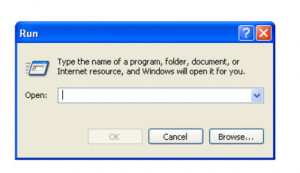
The Run option provides a text entry box for you to type the name and location of
the file you wish to run. Clicking on Browse will allow you to search all local and
network drives for files. This is particularly useful if you are unsure of the exact
filename or path. You can also run executable files.
Running document files will run the associated program and then display the
document within the correct program. In some cases, you may try running a
document file and see the following message. (Refer to figure 5.6)
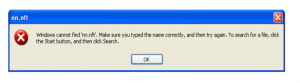
This indicates that Windows XP does not understand the file extension and no
association has been set up between a file name extension and a particular
program.
To use the keyboard to open the Run dialog box, follow the following procedure:
• Press the “Ctrl+Esc” keys
• Release the keys and then press R
To open folders using the Run command, follow the following procedure:
a. The Run command is normally used to run programs, or to open
documents within programs. However, you can also use it to open
folders. For instance, to open the “\WINDOWS” folder and display
its contents, you would enter “C:\WINDOWS” in the Run dialog box
and then click the OK button.
5. Turn off
The Turn off option allows a user to close the Windows XP operating system. It
also
ensures that all running processes can halt cleanly and are given a chance to
flush any
data that may be in cache memory out to the disk.
Several options are available when shutting the system down. These are
summarized as
follows:
It places your computer in power saving stand by mode. To re-awaken
your computer, simply press a key or move the mouse. It should be
noted that all PCs support this feature.
a) Turn off
It flushes all unwritten data to disk and close a system.
b) Restart
It flushes all data from memory and totally restarts a system.
Creating a New File Directly From the Desktop
To create a new document icon on your Desktop, follow the following procedure:
• Right-click on an empty part of the Desktop to display the Desktop
popup menu
• Select the New command
• From the sub-menu displayed, select the type of new file you wish
to
Create.
• The list will vary depending on what is installed on your PC
• In the case illustrated, clicking on “New Microsoft Document” will
create
the above icon on your Desktop.
Double clicking on this icon will either switch to Microsoft Word (if
it is already running) or start Microsoft Word or create a new
document
within the program.
Folder Creation
To create a new folder within the Windows XP Explorer, follow the following
procedure:
• Open the Explorer by right clicking on my computer icon.
• Click on Explorer
• Click on the portion of the directory tree where you would like to create
a
Subordinate folder (refer to figure 5.8).
• Click on the File drop down menu and move the mouse pointer to New
• In the sub-menu displayed, click on Folder
• The folders will appear, being given a name determined by Windows XP
• In figure 5.9, the folder names are New Folder, New Folder (2) and New
Folder
(3)
Figure 5.9– Names of folders
To create a folder directly from the Desktop with the help of pop-up menu, follow
the
following procedure:
• Click the right-hand mouse button anywhere on an empty part of the
desktop
surface
• The Desktop pop-up menu will be displayed
• Move the mouse pointer to New and from the sub-menu, select Folder
– New Folder 1
– New Folder 2
– New Folder 3
– – –
– New Folder n
(refer to
Figure 5.1 0)
77777
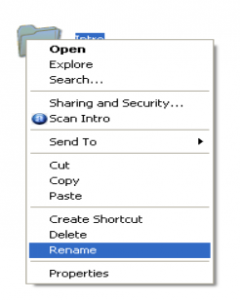
Renaming Files or Folders
To rename files or folders using the Explorer, follow
the following procedure:
• Select the file or folder to be renamed
• From the File drop down menu, select the
Rename command, or click once using the right
-hand mouse button to display the pop-up
menu and click on the Rename command,
• Enter the new name and press Enter key to
confirm the change
Figure 5.1 1 — Renaming files
or folders
Another way to rename files or folders is as follows:
• Within the Explorer, click once on the file or folder to select it
• Wait a few moments and then single click on the file or folder
(using the left-hand mouse button)
• A box will appear around the file or folder allowing you to directly
edit the name.
It should be noted that there is no need to make the second click too soon after
the first click as Windows XP may interpret this as a “run this file command.”
Deleting Files or Folders
Files or folders can easily be deleted from the Windows Explorer. Many files that
you can see using the Explorer are vital to the correct functioning of Windows XP.
It should be remembered that the Explorer program in common with many
Windows XP
programs has an “Undo Delete” command located under the “Edit” drop down
menu. Unlike
Word for Windows, however, this is limited to one level of undo, not 1 00 levels.
To delete a file or folder, follow the following procedure:
• Click on the Start button and move the mouse pointer to Programs
• From the sub-menu displayed, click on “Windows Explorer”
• Select the file or folder that you wish to delete
• Click on the right-hand mouse button to display the pop-up menu
• From the pop-up menu, click on Delete which displays the dialog box
(refer to
Figure 5.1 2)
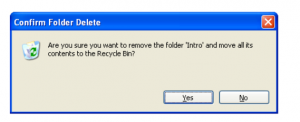
Confirm your deletion
It should be noted that all files deleted via the Windows Explorer move to the
Recycle Bin before being finally purged and so remain salvageable for quite a
long time.
To physically delete a file without first being sent to the Recycle Bin, follow the
following procedure:
• Select the file you wish to completely delete from your computer
system
• Press Shift+Del which will display a warning dialog box (refer to figure
5.1 3)
Figure 5.1 3– Confirm file delete dialog box
Click on the “Yes” button and the file will be physically removed from
your hard disk It should be noted that this dialog box does not send the
file to the Recycle Bin. It deletes the file from disk.
The Windows XP Accessories
The Accessories are a collection of useful utilities and applications included in
Windows XP.
Following are some of the accessories:
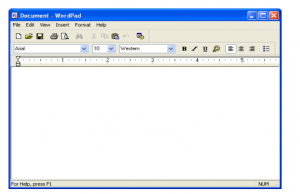
1 . WordPad
The WordPad accessory is the Windows XP equivalent to the Write program
found in Windows 3.x. This new accessory offers some new features for text
manipulation and formatting which are not found in the older program as shown
in Figure 5.1 4 in the following page.
The Following are some of the text manipulation features:
• The ability to change the color of a given font as well as the usual font
attributes
• Full paragraph manipulation and indentation control
• The ability to define tabs
• An “insert today’s date” feature
• Full print preview
• A case-sensitive “find”
To start WordPad, follow the following procedure:
• Click on the Start button
• Move the mouse pointer to Programs and select Accessories from the
sub-menu;
• Click on WordPad
2. Paint
Paint is the Windows XP version of the Paintbrush program found in Windows 3.x.
The Paint program offers an ability to generate and manipulate graphics and
pictures and store them in a “.BMP” format (refer to figure 5.1 5). The program
offers a rich tool selection and all standard graphical functions, such as airbrush,
freehand line draw, shapes and the ability to zoom. Paint no longer supports
“.PCX” files.
The Paint application notably differs from the older version in its following
features:
• Four different levels of zooming
• Support for 24 bit (true color) encoded files
• A palette capable of accessing a 24-bit color spectrum

It should be noted that if you use a 24-bit color format to store your pictures, you
can end up with very large files on your disk.
To start the Paint program, follow the following procedure:
• Click on the Start button
• Move the mouse pointer to Programs and then from the sub-menu
select
Accessories
• Click on Paint
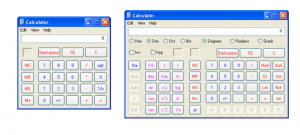
3. Calculator
The Calculator program is very useful for adding your expenses, or other vital
activities. It has a Scientific mode which, inter alia, allows you to convert from
Decimal to Hexadecimal and Binary. (Refer to figure 5.1 6)
There was a famous error in the Microsoft Windows 3.1 Calculator. 2.1 1 – 2.1 = 0.
To start the Calculator, follow the following procedure:
• Click on the Start button
• Move the mouse pointer to Program and then from the sub-menu select
Accessories
• Click on Calculator
To see what a key does in the Calculator, follow the following procedure:
• Right-click on a button within the Calculator and a “What’s This?” button
is
displayed
• Click on this button and the function of the button is explained
To switch to Scientific mode, follow the following procedure:
• Click on the View drop down menu and click on the Scientific command
The Clock
The Clock program is not located in the Start menu.
To view the Clock, simply look at the right-hand bottom of the Windows XP
Taskbar.
To view the Date, move the mouse pointer to the Clock, as displayed in the
taskbar. After
a few moments, the date would be displayed.
To change the date or time, double click on the Clock which displays the
Date/Time
Properties dialog box and modify the time or date.
Object Linking and Embedding (OLE)
Object Linking and Embedding (OLE) is the mechanism whereby an application
can hold a link to a piece of data or object within another application.
As an example of OLE, a spreadsheet may hold a graph containing weekly sales
figures, each week new figures are input and the graph changes.
With the help of OLE, it is possible to place a link to the graph from a word
processing
application which contains a weekly status report. As the figures changes, the
linked graph automatically updates itself with the new values. (Refer to figure
5.1 7)
Figure 5.1 7– OLE link
Linking vs. Embedding
To Link Data
To create an OLE link, select “Paste Special” from the Edit drop down menu.
From the dialog box, choose which data type you want to use for the object you
are pasting.
When a data item is linked into an application, there is only one true copy of that
piece of data, each time it is updated. The information can be discovered via the
link.
OLE links can be highly “processor intensive” as the link constantly needs to
check for updates. It is recommended that fast machines with a powerful
processor be used if many OLE links are present. Alternatively, the link may be
maintained, so that updates can be made on manual instruction only. The
mechanism to do this may differ from one application to another but is often
contained under the Edit drop down menu in a command called Links.
To Embed Data
To embed an object, simply select Paste from the Edit drop down menu. If an
item is embedded, it is merely copied and then pasted in its entirety into the
target application (such as a graphic being pasted into a word processing
document). If the original data item is updated, the update is not replicated to the
embedded data item. Embedding does not have the high performance overhead
associated with linking.
Benefits of Using OLE
By using OLE, you start to move away from application-based computing and
more toward data (or document)-based computing. Most of the PC users have
an interest in data not in the individual applications used to create data in the
first place.
By using OLE, you can combine the best elements from each application to
produce a desired effect. For instance, you may want to produce a report in Word
for Windows and incorporate graphs produced in Excel. (Excel has far better
graph handling facilities than Word) If an Excel graph is embedded, it can easily
be manipulated and edited in Word.
You can save disk space by linking objects. It should be noted that one can use
an object in a document while it is stored in another document. This saves one’s
time in duplicating the storage space for an object.
By using OLE, you can print or transmit data without having an application that
originally created the data installed on your particular PC. You can update linked
objects dynamically.
New Features of OLE
1 . In-place Activation
This allows direct activation of embedded objects within an application
without a need to switch to a different application window for facilities
such as editing, displaying, recording, or playing.
2. Adaptable Links
This enables the maintenance of links between objects during certain
types of move or copy operations.
3. Drag and Drop
Objects may be dragged from one application window and drop to another.
4. Improved Disk and Memory Usage
Objects may be stored on disk and only loaded into memory when actually
required and not simply when the object is opened.
5. Logical Pagination of Objects
Unlike OLE, if an embedded object (such as an Excel spreadsheet
embedded in Word) is larger than a page, the embedded object will break
at the end of the page just as normal data would.
6. Nested Object Support
This allows direct manipulation of nested objects. Also, links may be
established to nested objects.
7. Object Conversion
This allows an object to be converted from one object type to another.
8. Storage Independent Links
This is a feature that allows a link among embedded objects that are not
stored as files on disk.
9. Version Management
Embedded objects contain information about an application that is used
to create it and its version.
Adding New Hardware Devices
To install a new hardware, follow the following procedure:
• Go to Control Panel
• Click on the Add New Hardware icon
• Add New Hardware Wizard will be launched
• The Wizard can automatically detect new hardware or you may
enter the
new device from a hardware selection list
Note
When a new device is installed, Windows XP will decide how settings, such as
IRQ
(interrupts), Memory regions and DMA (Direct Memory Access) etc., should be
configured.
Although the values that Windows XP chooses may be different from the current
configuration yet you should use these settings as they will be the optimum ones.
Installing New Application Programs
To add or remove programs, follow the following procedure:
• Go to Control Panel
• Click on the Add/Remove Programs
Installing an application this way has an added benefit to install an application
directly from a floppy diskette or CD-ROM. The Installer application tracks the
entire installation process and places the newly installed application into an
installed program list. (Refer to figure 5.1 8).From this list, applications can be
removed as easily as they were added.
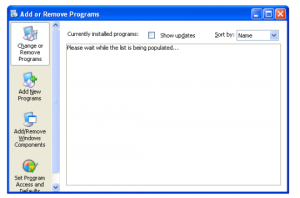
At present, many set-up and installation programs can be tracked via an installer.
After installing an application, it is possible that the program may not appear in
list. As more set-up and installation programs are written with Windows XP, the
situation will change.
Notes
1 . Following are the sub-menus of the Start menu:
• Programs
• Documents
• Settings
• Search
• Help and Support
• Run
• Turn off
1 . Object Linking and Embedding (OLE) is the mechanism whereby an
application can hold a link to a piece of data or object within another
application.
MANAGING DISKS
1 . Disk Formatting
This is the process of preparing a data storage medium such as a hard disk drive
for initial use or storage of files. Formatting creates a file system on the disk and
also makes it visible to the operating system.
Steps
1 . Connect or insert the storage media to the computer if it is external
2. Go to my computer by clicking on it on the start menu or on the desktop
3. Right click on the drive that you want to format e.g. Removable Disk E
4. On the menu, click on “Format” on the pop-up menu
5. On the format window, leave the capacity as it is
6. Choose the file system that you want the drive to be formatted e.g. FAT,
FAT 32 or NFTS (NFTS is a fast system while FAT 32 maximizes the disk
space within your drive. FAT is the most basic for storing files and most
compatible but is slow.)
7. Tick the box next to the Quick format if you want a fast format that does
not check for bad sectors. A full format will take time but check for bad
sectors apart from removing files on the disk
8. Click start button at the bottom
9. Confirm your action by pressing the ok button in the warning message box.
WORD PROCESSING
Specific objectives
By the end of this topic, the trainee should be able to:
a) describe how to open a word processor
b) explain how to create a document
c) discuss how to edit a document
d) describe how to format a document
e) describe how to create columns/rows
f) describe how to create tables
g) describe how to use graphics
h) explain how to use mail merge
i) explain how to print a document
How to open a word processor
Definition of Word processing
Word processing is the creation, input, editing and formatting of documents and
other text using some application software (Word processor) on a computer
system. Examples of Word processors in the market include Word perfect,
OpenOffice.org Writer and Microsoft Word. Microsoft Word is the most popularly
used and therefore will be adopted in this manual. You can use a Word
processor to type letters, reports, and other documents.
Opening a Word processor
Open Microsoft Word 2007 by clicking on the sections labeled 1 to 4 found on
your computer desktop.
Five ways of Starting Ms-Word Program
Step 1
Click the Start button. Type “word” without quotation marks into the search box.
Click “Microsoft Word 2003” in the list that appears.
Step 2
Click the Start button. Hover the mouse pointer over “All Programs.” Scroll down
to the Microsoft Office folder and click it. Select “Microsoft Word 2003.”
Step 3
Press the Windows key and “R” on the keyboard at the same time to bring up the
Run dialogue. Type “WinWord.exe” without quotation marks into the box and then
click OK or press Enter Key.
Step 4
Right-click on an empty area of the desktop. Hover the mouse pointer over “New”
in the menu that appears. On the sub-Menu that appears click on Microsoft Word
Document to launch the program.
Step 5
Open an MS Word file on your computer by double-clicking it. If you are asked to
choose an application to open the file with, select “Microsoft Word.” You may
close the file you have opened if you do not want to use it now and open another
one instead.
PARTS OF WORD WINDOW
Please see the picture below for a visual image of parts of an active window has:
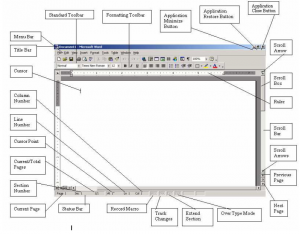
Menu bar
This is the traditional windows style drop-down menu. When you point to any
menu title and click once with the mouse, the menu will open displaying all the
commands available under this menu. Clicking on the desired command would
tell Word to execute that command. Some commands have ellipses (…) in front
of them.
These commands have further sub commands. Commands appearing in dim
mode cannot be executed unless the prerequisite functions required by that
command have been performed, e.g. you cannot use the Copy or Cut command
from the Edit menu unless you have selected a piece of text first. Many
commands also have keyboard shortcuts specified against their names.
Standard toolbar
Toolbars contain buttons, drop-down menus and other controls that help you to
quickly alter the appearance and arrangement of documents by executing a
variety of word commands. Toolbars are very helpful and convenient in quickly
executing commands without having to go through menus. The standard toolbar
contains icons for basic functions like opening files, saving files, printing files,
cut, copy, paste etc.
Formatting toolbar
This contains icons for changing the look of your text (called “formatting” in
computer jargon); for example, there are icons for changing fonts, styles, font
sizes, text alignment etc.
Ruler
The Ruler lets you make changes to margins and indents, and helps you create
document as per dimensions required.
If your ruler is not visible, follow the steps listed here:
1 . Click the View menu to choose it.
2. Select the Ruler by clicking on it.
Scroll tools
These help you travel within your document. You can go anywhere, up and down,
right and left in your document mainly by two ways: Using the horizontal and
vertical scroll bars with the help of the
mouse; Or using the keyboard to press PgUp, PgDn, Home, End and arrow keys.
Status bar
Also called the Status Area, this is the normally the last line on your screen. This
gives the following information about your work—
· Current Page
· Section Number
· Current/Total pages in the document
· Current Cursor Position (where the cursor is presently located)
· Current Line Number
· Current Column Number
· Record Macro-whether macro recording is On or not
· Track Revision-whether revisions have been made or not
· Extend Selection
Cursor
Also called the Insertion Pointer, this denotes the place where text, graphics or
any other item would be placed when you type, overwrite or insert them. This
looks like a tall, skinny toothpick and keeps blinking so that you can locate it
easily.
Mouse pointer
When your mouse pointer looks like an I-beam you should be able to move it
freely on the screen. This is used for either placing the cursor at the desired
place (take the mouse pointer there and click) or choosing any command either
from the menu or from toolbars. The mouse pointer changes shape when in the
process of doing certain tasks and the cursor disappears.
Editing Word document
When you enter your text, you are likely to make typographical mistakes.
Typographical errors include error of omission, addition and transposition. The
correction of these mistakes is called editing. Editing involves cutting, copying,
pasting, use of AutoText, use of spell checking and use of Finding and Replacing.
Cutting and Pasting
These options will allow you to Cut or Copy a piece of text from one location and
to paste at a new location.
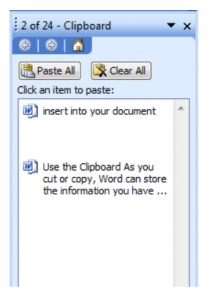
Use the Clipboard
As you cut or copy, Word can store the information you have cut or copied on the
Clipboard in a hierarchy. Then each time you cut or copy, the data you just cut or
copied moves to the top of the Clipboard hierarchy and the data previously at the
top moves down one level. When you choose Paste, the item at the top of the
hierarchy is the item Word pastes into your document. The Clipboard can store
up to 24 items. You can paste any item on the Clipboard into your document by
placing your cursor at the insertion point, displaying the Clipboard pane, and then
clicking the item.
The Clipboard pane includes an Options button. You can click the Options button
to set the Clipboard options described in the following table.
| Option | Description |
| Show Office Clipboard Automatically |
Shows the Clipboard automatically when you copy items. |
| Show Office Clipboard When Ctrl+c Pressed Twice |
Shows the Clipboard when you press Ctrl+c twice. |
| Collect Without Showing Office Clipboard |
Copies to the Clipboard without displaying the Clipboard pane. |
| Show Office Clipboard Icon on Taskbar |
Displays the Clipboard icon on your system taskbar. |
| Show Status Near Taskbar When Copying |
Displays the number of items copied on the taskbar when copying. |
Place the cursor at the point at which you want to insert your text.
Choose the Home tab.
Click the Clipboard dialog box launcher to open the Clipboard.
1 . Click the item on the clipboard you want to insert into your document. Word
84
pastes the Clipboard item into your document at the insertion point.
Create AutoText
Cut and Copy both store information on the Clipboard. Information you store on
the Clipboard is eventually lost. If you want to store information permanently for
reuse, use AutoText. AutoText permanently stores information for future use.
Type some text e.g.
AutoText information is stored permanently
Select the text typed
On the AutoText toolbar, click on “New….”
Create AutoText dialog box appears
Give your selection a name
Click OK. The dialog box closes.
Click anywhere in the text area to remove the highlighting.
Type the name you gave the saved AutoText anywhere.
Press F3. and your text should appear
Use Spell Check
Word checks your spelling and grammar as you type. Spelling errors display with
a red wavy line under the word. Grammar errors display with a green wavy line
under the error. In Word 2007, you can use the Review tab’s Spelling & Grammar
button to initiate a spell and grammar check of your document.
Type the following:
Monica is from Easton. She lives on the east side of town. Her daughter attends
Eastern High School.
Select: “Monica is from Easton. She lives on the east side of town. Her daughter
attends Eastern High School.”
Choose the Home tab.
Click Find in the Editing group. A menu appears.
Click the Find option on the menu. The Find and Replace dialog box appears.
Insert and Overtype
While creating your document, you may find you need to insert text—place new
text between existing texts. Suppose, you type the sentence, “Zuriel bought a
car.” After typing it, you decide you want to change the sentence to “Zuriel
bought a blue car.”
Alternatively, you may want to overtype text—replace old text with new text. For
example, suppose you type the sentence, “Zuriel bought a blue car.” After typing
it, you decide you want to change the sentence to “Zuriel bought a black car.”
With Microsoft Word, overtyping the word blue with the word shining is also easy.
You can then use the insert to switch between Insert and Overtype mode. When
you are in Insert mode, you can insert text. When you are in Overtype mode, you
can overtype text. By default, Microsoft Word is in the Insert mode.
Document Views
Document views are found on the right side of the status bar. In Word 2007, you
can display your document in one of five views: Draft, Web Layout, Print Layout,
Full Screen Reading, or Online Layout.
Draft View
Draft view is the most frequently used view. You use Draft view to quickly edit
your document.
Web Layout
Web Layout view enables you to see your document as it would appear in a
browser such as Internet Explorer.
Print Layout
The Print Layout view shows the document as it will look when it is printed.
Reading Layout
Reading Layout view formats your screen to make reading your document more
comfortable.
Outline View
Outline view displays the document in outline form. You can display headings
without the text. If you move a heading, the accompanying text moves with it.
Nonprinting Characters
Nonprinting characters do not print and will not appear in your printed document
but do affect your document layout. You can decide to see these characters on
the screen as you type or you can decide to have them remain invisible. The table
describes most of them:
| Character | Denotes |
| A tab | |
| . | A space |
| ¶ | The end of a paragraph |
| Hidden text |
Task 2: Creating a document
How to Create Sample Data
If you type =rand() in your Word document and then press Enter, Word createsthree paragraphs.
Type =rand().
Press Enter. Three paragraphs appear in your document.
What is a word paragraph?
Continuous typing of text before pressing the enter key is referred as word
paragraph. The end of a paragraph is indicated by the symbol
Typing, Backspace, and Delete operations
In Microsoft Word, you create documents by typing them. For example, if you
want to create a report, you open Microsoft Word and then begin typing. You do
not have to do anything when your text reaches the end of a line and you want to
move to a new line—Microsoft Word automatically moves your text to a new line.
If you want to start a new paragraph, press Enter. Microsoft word creates a blank
line to indicate the start of a new paragraph. To capitalize, hold down the Shift
key while typing the letter you want to capitalize. If you make a mistake, you can
delete what you typed and then type your correction.
You can use the Backspace key to delete. Each time you press the Backspace
key, Microsoft Word deletes the character that precedes the insertion point.
The insertion point is the point at which your mouse pointer is located. You can
also delete text by using the Delete key. First, you select the text you want to
delete; then you press the Delete key.
Formating a document
Formatting is changing the physical appearance of the document. You can
format a document in various levels; character, word, paragraph and document
formatting.
Printing a Document
Previewing and Printing Documents
In Word, You can preview your document before you print. In the Preview mode,
you can review each page, view multiple pages at the same time, zoom in on a
page, and access the Size, Orientation, and Margin options.
If you press the Zoom button while you are in Preview mode, the Zoom dialog
box appears. In the Zoom dialog box you can set the sizes of the pages that
display as well as the number of pages that display.
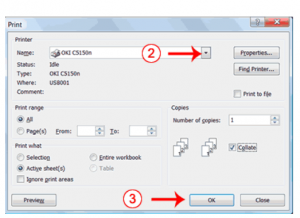
When you are ready to print, you use the Print dialog box. In the Print Range area,
choose All to print every page of your document, choose Current Page to print
the page you are currently on, or choose Pages to enter the specific pages you
want to print. Type the pages you want to print in the Pages field. Separate
individual pages with commas (1 ,3, 1 3); specify a range by using a dash (4-9).
Go to the file menu.
Click Print Preview. The Preview window appears, with your document in the
window.
Click One Page to view one page at a time. Click Two Pages to view two pages at
a time.
To view your document in normal size, click 1 00%.
Click the Zoom Button. The Zoom dialog box appears.
Select an option and then click OK. Perform this task for each option and note
the results.
Print
Click the Print button. The Print dialog box appears.
Click the down arrow next to the Name field and select the printer to which you
want to print.
Choose all as the page range.
Click OK. Word prints your document.
SPREAD SHEETS
Specific objectives
By the end of this topic, the trainee should be able to:
(a) define spreadsheet
(b) discuss areas where spreadsheets are used
(c) demonstrate worksheet layout
(d) open a spreadsheet package
(e) create a worksheet
(f) edit a worksheet
(g) format a worksheet
(h) perform calculations
(i) create charts
(j) print worksheets
Unit tasks
Task 1 : defining spreadsheet
A spreadsheet is a document that stores data in a grid of horizontal rows and
vertical columns. Rows are typically labeled using numbers (1 , 2, 3, etc.), while
columns are labeled with letters (A, B, C, etc). Individual row/column locations,
such as C3 or B1 2, are referred to as cells. Each cell can each store a unique
instance of data. By entering data into a spreadsheet, information can be stored
in a more structured way than using plain text. The row/column structure also
allows the data to be analyzed using formulas and calculations.
Typical spreadsheet packages in the market include Lotus 1 23, Open Office,
Microsoft Excel (MS Excel) and several packages not mentioned here. The
application package used in the instruction is MS Excel 2007.
Advantages of Electronic Spreadsheets over Manual
Spreadsheets
1 . Automatic recalculation of formulae when data is changed.
If the contents of a cell change, and that cell is used in a formula, the result in
the dependant cell changes
2. Ease of data sharing: Another benefit is the data can easily be shared with
others.
3. Ease of data management and analysis:
Users can manipulate the data stored in spreadsheets, using dozens of
functions available at one click of the mouse: basic mathematical processes,
sorting, creating tables and charts, printing reports, and even reviewing and
comparing several spreadsheets at once.
4. Presentation capabilities
Spreadsheets allow users to easily create compelling presentations, complete
with full-colour graphs and charts. Their target audience can quickly grasp the
important themes of their report simply by reviewing the relevant data on the
charts, not wading through pages of numbers and text. Various types of
charts can be created. Furthermore, column width can be adjusted to suit
data.
5. “What-If” Analysis
Perform “what-if” analyses by changing independent values in the
spreadsheet to help in decision making and planning. The user can combine
figures in different ways and immediately see the results on business.E.g.
How will a change in the cost of a raw material affect profits?
How changes in interest rates are going to affect repayments?
6. Support good design and accurate results
7. Program can quickly edit and format data and perform calculations
8. Formulae based on cell references, so easy to update results
9. Easy to store, retrieve and print results
1 0. Virtually unlimited size
1 1 . Ability to replicate formulae
1 2. Ease of correction of errors
Standard Features of Spreadsheets
Columns and Rows
A spreadsheet is a grid consisting of columns and rows. Rows are labeled with
numbers, and columns are labeled with letters, giving each cell a unique address
consisting of a number and a letter. If you are familiar with the old game
“Battleship”, you’ll be quite comfortable with cell addressing.
A cell may contain labels or values. A label is a text entry, such as TOTAL,
that can not be manipulated by the spreadsheet. A value can be a number,
a date, a formula, or the answer of a formula.
A single “grid”, or page, is usually referred to as a worksheet.
Formulas: A formula is an entry performing a calculation
Formulas are used to express mathematical relationships between cells.
For example, C1 =A1 +B1 would calculate and display the sum of cells A1
and B1 into cell C1 . It could also be a simple mathematical formula, such
as (1 00 * 3) / 40. Formulas are not displayed on spreadsheets. What you
see in the cell is the result of the formula.
Don’t forget about order of operations; anything inside parenthesis
happens first, followed by multiplication and division, followed by addition
and subtraction. When in doubt, use parenthesis to say exactly what you
mean.
Functions – Functions are used as shortcuts when performing mathematical
calculations. They are pre-programmed formulae that give power and flexibility to
spreadsheet calculations. They prevent the user from having to continually enter
long and cumbersome expressions. Some examples are SUM, AVERAGE, MAX,
and MIN. Ranges A range is a block of cells. Formulas can act on single cells or
be directed to act on a range of cells. For example, the range A1 :D1 includes the
cell A1 , B1 , C1 and D1 . Any calculation performed in A1 will also be performed in
B1 , C1 and D1 . Graphs and charts
Data in spreadsheets can be displayed in a graphic form. Spreadsheets
allow theÊ numerical data in the cells to be displayed as a graph or chart.
These graphics, which illustrate the meaning of the numbers in the
spreadsheet in different ways, can be used to stimulate interest and help
make a point.
There are several different types of graphs that can be made. Area graphs,
bar and column graphs, line graphs, pie charts, scatter plot diagrams and
3-D graphs are some examples.
Relative, Absolute AND Mixed Cell References in
Spreadsheets
In working with spreadsheets, you need to know about relative vs. absolute cell
references. Here is the issue: when you COPY A FORMULA that contains cell
references, what happens to the cell references?
RELATIVE CELL REFERENCE
Usually the CELL REFERENCES will CHANGE! If you copy formula 2 rows to the
right, then the cell references in the formula will shift 2 cells to the right. If you
copy formula 3 rows down and 1 row left, then the cell references in the formula
will shift 3 rows down and 1 row left. These are called “relative” cell references,
since they change relative to where you copy the formula.
ABSOLUTE CELL REFERENCE
If you do not want cell references to change when you copy a formula, then make
those cell references absolute cell references. Place a “$” before the column
letter if you want that to always stay the same. Place a “$” before a row number if
you want that to always stay the same. For example, “$C$3” refers to cell C3, and
“$C$3” will work exactly the same as “C3”, expect when you copy the formula.
Note: when entering formulas you can use the F4 key right after entering a cell
reference to toggle among the different relative/absolute versions of that cell
address.
Mixed references
A mixed reference has either an absolute column and relative row, or absolute
row and relative column. An absolute column reference takes the form $A1 , $B1 ,
and so on. An absolute row reference takes the form A$1 , B$1 , and so on. If the
position of the cell that contains the formula changes, the relative reference is
changed, and the absolute reference does not change. If you copy the formula
across rows or down columns, the relative reference automatically adjusts, and
the absolute reference does not adjust. For example, if you copy a mixed
reference from cell A2 to B3, it adjusts from =A$1 to =B$1 .
TYPES OF ERROR MESSAGES IN MS EXCEL 2003
1 . ##### – Sometimes referred to as “Railroad tracks”, this error can be
caused by several conditions:
a) A number in a cell is too wide for the cell to display it.
b) The formula in the cell produces a result that is too wide for the cell.
c) There is a negative number in the cell that has been formatted for dates
or times. Dates and times in Excel must be positive values.
Solution:
a) Widen the column containing the problem cell.
b) Change the format of the problem cell to something other than a
date/time format.
c) Correct the negative number in a date/time formatted cell.
2. #REF! – Invalid Cell Reference Errors
Invalid cell reference errors occur when a spreadsheet formula contains
incorrect cell references. This happens most often when:
a) Columns or rows containing data used in the formula are accidentally
deleted.
b) A formula has been moved or copied to another cell and the cell
references are incorrect.
c) Data used in a formula has been moved, leaving the function or formula
with incorrect cell references
Solutions:
a) Use the undo feature to recover lost data
b) If the data cannot be recovered, re-enter the data and adjust the cell
references if needed
c) Correct the cell references for formulas that have been copied or moved
) Correct the cell references for formulas when the data has been moved
3. #NULL! – Null Error
#NULL! errors occur when the two or more cell references are separated
incorrectly in a formula. Such as:
a) If multiple cell references in a formula are separated by a space instead
of a mathematical operator such as a plus sign ( + ).
b) if the start and end points of cell ranges are not separated by a colon ( : )
Solution:
a) Separate multiple cell references correctly.
b) Use a comma is correctly used to separate cells in a function e.g. =
SUM(D1 , D2, D3, D4)
c) The start and end points of a range in a function are correctly separated
by a colon ( : ) e.g. = SUM(D1 :D4).
d) A mathematical operator, such as a plus or minus sign is used to
separate cell references in a formula e.g. = D1 + D2 + D3 + D4.
4. #DIV/O! – Divide by Zero Error
Divide by 0 errors occur when:
a) A formula attempts to divide by zero.
b) While dividing, a formula references a cell that is blank.
Solution:
a) Check that you have the correct data in the cells referenced in the
formula.
b) Check that your data is in the correct cells.
c) Check that the correct cell references were used in the formula.
5. #NAME? Formula Error
The most common reason why you see this error is because you misspelled a
formula or named range. For example if you write =summa (a1 :a1 0) in a cell, it
would return #NAME? error. There are few other reasons why this can happen. If
you forget to close a text in double quotes or omit the range operator:. All these
examples should return #NAME? error. =sum (range1 , UNDEFIED_RANGE_NAME),
=sum (a1 a1 0)
Solution:
Make sure you have mentioned the correct formula name. In earlier versions of
excel, if you use correct formulas, they will be automatically capitalized. For
example, if you type =sum (1 ,2,3) in a cell and press enter, it will be changed to
=SUM(1 ,2,3). You can use this feedback to correct formulas.
Make sure you have defined all the named ranges you are using in the formula.
6. #NULL! Formula Error
This is rare error. When you use incorrect range operators often you get this
error. For example the formula =SUM (D30:D32 C31 :C33) returns a #NULL!
error because there is no separator between range 1 and range2.
Solution
Make sure you have mentioned the ranges properly.
7. #VALUE! Formula Error
Value error is shown when you use text parameters to a function that accepts
numbers. For eg. the formula =SUM(“ab”,”cd”) returns #VALUE! error.
Solution
Make sure your formula parameters have correct data types. If you are using
functions that work on numbers (like sum, product etc.) then the parameters
should be numbers.
Task 2: discussing areas where spreadsheets are used
Spreadsheets are commonly used to automate financial statements,
business forecasts, transaction registers, inventory control, and
preparation of accounts. The package provides statistical, analytical and
scientific functions. In engineering environments, it is used to analyze
numerical data and present findings.
Using Common Functions.
The AVERAGE Function.
Returns the average (arithmetic mean) of the arguments provided. The
arguments must be numbers or names, arrays, or references that contain
numbers.
For instance, you may want to calculate the average marks for students for all
the subjects they have done.
1 . Position your cell pointer where the average is to be inserted.
2. Click the Paste Function button.
3. In the Function category select Statistical and then choose AVERAGE under
Function name.
4. Select the range of figures to be averaged by clicking on to temporarily
hide the dialog box, select the range and then click on
To get back to the dialog box.
5. Click OK.
Notes
1 . Using the AVERAGE function, you can find the average for upto 30 numeric
arguments.
2. When averaging cells, keep in mind the difference between empty cells and
those containing the value zero.
Empty cells are not counted, but zero values are.
The MIN Function.
This function finds the smallest number in a selected range.
Select the cell where you want to enter the function.
Click the Paste Function button.
Select the Statistical category and then select MIN function.
The MIN function requires that you specify the arguments that are numbers,
empty cells, logical values, or text that can be translated into numbers.
Arguments that are error values or text that cannot be translated into numbers
cause errors.
Select the range of figures to represent the argument by clicking on to
temporarily hide the dialog box, select the range and then click on again.
If an argument is an array or reference, only numbers in that array or reference
are used. Empty cells, logical values, or text in the array or reference are ignored.
If the arguments contain no numbers, MIN returns 0.
Click on OK in the next screen.
You can use the MIN function for upto 30 numbers.
The MAX Function.
This function finds the maximum value in a selected range. It is similar to MIN.
1 . Select the cell where you want to enter the function.
2. Click the Paste Function button.
3. Select the Statistical category and then select MAX function.
The MAX function requires that you specify the arguments that are numbers,
empty cells, logical values, or text that can be translated into numbers.
Arguments that are error values or text that cannot be translated into numbers
cause errors.
4. Select the range of figures to represent the argument by clicking on to
temporarily hide the dialog box, select the range and then click on again.
If an argument is an array or reference, only numbers in that array or
reference are used. Empty cells, logical values, or text in the array or reference
are ignored. If the arguments contain no numbers, MAX returns 0 (zero).
5. Click on OK in the next screen.
6. You can use the MAX function for upto 30 numbers.
The IF Function.
IF evaluates a condition and returns one of two values, depending on the result of
the evaluation. If the condition is true, IF returns one value, if the condition is
false, it returns the other value. The IF function has the following format:
=IF(Condition, Action-to-be-taken-when-condition-is-true, Action-to-be-taken-when
-condition-is-false).
The condition is usually a logical formula. However, you can use any formula,
number, or address of a cell as a condition. Excel evaluates any condition that
does not equal zero as true and any condition that is equal to zero as false.
The arguments can be values, text enclosed in quotation marks, or the addresses
or names of cells that contain values or labels.
Example:
Suppose the formula =IF(Balance>=0,Balance,”Overdrawn”) is entered in cell B5.
Then B5 will contain the value in the cell named Balance when the value in
Balance is 0 or positive; Otherwise, it will contain the text “Overdrawn” (when the
value in Balance is negative).
The PMT Function.
PMT calculates the payment on a loan (principal) at a given interest rate for a
specified number of payment periods (term). Principal and term are values.
Interest is a decimal or percentage value greater than
-1 . The PMT function has the following format: =PMT(Principal-Amount, InterestRate, Term).Example:
You are considering taking out a KShs. 800,000 loan for 4 years at an annual
Interest Rate of 26%, compounded monthly. Payments are due on the last day of
each month and you would like to determine your monthly payment.
PMT(800000,0.26/1 2,48) = 26973.85 is the monthly installment.
Note: The Interest is divided by 1 2 in order to get the monthly rate, and term in
years is also multiplied by 1 2 to convert it into months.
The LOWER, UPPER, PROPER Functions
Converts text to lower, UPPER and Title Case respectively.
Example:
=LOWER(A1 :A23) converts the contents of the range A1 to A23 to lower case
=UPPER(A1 :A23) converts the contents of the range A1 to A23 to upper case
=PROPER(A1 :A23) Capitalizes the first letter in each word of text value in the
range A1 to A23
Task 1 0: printing worksheets
The simplest way to print is to click the Office button, highlight Print on the
menu that appears, and then click Quick Print in the Preview and Print the
Document pane. Dotted lines appear on your screen, and your document
prints. The dotted lines indicate the right, left, top, and bottom edges of
your printed pages.
You can also use the Print Preview option to print. When using Print
Preview, you can see onscreen how your printed document will look when
you print it. If you click the Page Setup button while in Print Preview mode,
you can set page settings such as centering your data on the page.
If your document is several pages long, you can use the Next Page and
Previous Page buttons to move forward and backward through your
document. If you check the Show Margins check box, you will see margin
lines on your document. You can click and drag the margin markers to
increase or decrease the size of your margins. To return to Excel, click the
Close Print Preview button.
You click the Print button when you are ready to print. The Print dialog box
appears. You can choose to print the entire worksheet or specific pages. If
you want to print specific pages, enter the page numbers in the From and
To fields. You can enter the number of copies you want to print in the
Number of Copies field.
1 . Click the Office button. A menu appears.
2. Highlight Print. The Preview and Print The Document pane appears.
3. Click Print Preview. The Print Preview window appears, with your
document in the center.
Center Your Document
1 . Click the Page Setup button in the Print group. The Page Setup
dialog box appears.
2. Choose the Margins tab.
3. Click the Horizontally check box. Excel centers your data
horizontally.
4. Click the vertically check box. Excel centers your data vertically.
5. Click OK. The Page Setup dialog box closes.
Print
Click the Print button. The Print dialog box appears.
2. Click the down arrow next to the name field and select the printer to which you want to print.
3. Click OK. Excel sends your worksheet to the printer