
What is a word processor?
A word processor is an application software that enables a person to create, save, edit, format and print text documents. Word processing is the act of using a word processor.
Examples of word processors
Examples of word processors include, Microsoft Word, Corel WordPerfect, WordStar, Lotus WordPro and many others.
A word processor has a number of advantages over he type writer that include:
- A document can be stored in the computer for future reference in computer files that do not occupy physical space like the one on paper. This creates a paperless document-processing environment.
- Typing using a word processor is easier and more efficient because some actions are automated. For example, word-wrap feature automatically takes the cursor to the beginning of the next line once you reach the end of the current. Another automatic features common in most word processors is automatic insertion of a new page after reaching the end of the current page.
- Most word processors have special editing tools such as spelling and grammar checkers and thesaurus that help the user to easily Correct grammar and spelling mistakes. A thesaurus helps to find a word or phrase with similar meanings.
- With insert and type over modes available in most word processors, one can easily insert or replace a word or a phrase without affecting the structure and neatness of the document.
- Word processors have superior document formatting features. Formatting refers to the art of making the document more attractive and appealing to the eye. Such features include, underlining, boldfacing, italicization, applying different colors etc.
- While a typewriter may require that we retype the entire document when we want many copies, with a word processor, printing lets you produce as many copies per session as needed.
- Using the cut, copy and paste commands, you can incorporate other text without having to retype it.
Basic word processing features and concepts
- They allow the user to create a file, save it and open it again and again for reuse, editing or formatting.
- They have almost similar document windows with the following Features:
- Most are designed to look like a piece of paper with a few
- Most of the screen is blank before typing of text.
- There is a cursor, which blinks at the position where you can Begin entering text.
- There is a status bar or line that provides the user with current status information such as saving operation, the name of the file in use, the current page, the current imaginary horizontal-line and column cursor position.
- Word wrap: The feature that automatically moves a word or cursor to the beginning of the next line if it does not fit at the end of the current line.
- Scrolling: This is the vertical movement of text document on the screen. We can scroll through a text document using the up or do n arrow keys, page up and page down keys and also using, a mouse in windows based word processors.
- Help: Sometimes we get lost, confused or need more information on how to use an application. Help contains instruction, tips, pointers, explanations and guidance. You can get help by either pressing F 1 on the keyboard or clicking Help from the menu.
- Editing Modes: Word processors have two editing modes, insert and type over mode. In insert mode, every character typed between words, lines or characters is placed at the cursor position. This pushes all the text in front of the cursor away without deleting it. However in type over mode every character typed deletes what was there before and replaces it with new text at the cursor position.
- Nearly all word processors have a spelling checker, thesaurus (Dictionary of synonyms) and grammar checker.
- They provide for the use of headers and footers, indexing, footnotes and references, typefaces (fonts) and character set.
- Most word processors have ability to create and import tables, text and graphics from other programs.
Mostly, word processors are used for writing letters, reports, projects, books, essays, memos curriculum vitae etc.
Factors to consider when choosing a word processor
The choice of a word processor depend on:
- The type of operating system. For example, most microcomputers are currently running on Windows based operating system such as Microsoft Windows. This means that you should consider acquiring a graphical user interface based Word Processor,
- Its user-friendliness, i.e. ease of use.
- Its formatting and editing features. They should be good and varied.
Using a word processing package
Microsoft Word
Microsoft Word is one of the components of Microsoft Office. Microsoft Office is integrated software with a number of interrelated programs. The programs include Microsoft Word, a spreadsheet called Microsoft Excel, and a database management system called Microsoft Access, communication software called Microsoft Outlook, and a presentation package called Microsoft PowerPoint among others.
Although there are several versions of Microsoft Word, the most common are Word 97, Word 2000, WordXP and Word 2003. These versions of Microsoft Word are found in Microsoft Office 97, 2000, XP and 2003 suites respectively.
Starting Microsoft Word
There are a number of ways you can start Microsoft Word. However the
Simplest is by using programs start menu.
Starting Microsoft Word from the start menu
- Click the start button.
- Point to programs/ all programs if you are using Windows XP
- Click from the programs menu
Microsoft Word screen layout
Once you start Microsoft Word, it provides you with a blank document window referred to as the new document template where you can create your document.
However you may need to use other specialised templates such as Faxes and letters, Memos and Web page. How? Click File then select New from the menu. The New dialog box in Figure 1.3 that appears enables a person to select a template by activating templates tab then double clicking its icon.
With Windows multitasking capability, you can have more than one document window at the same time sharing one application window. However, each document window will have its own title bar but both will share other facilities like the menu bar of the application window.
However only one document window will be visible on the desktop at a time while others remains minimized or covered. This window is referred to as the active document window. To switch between document windows, click their buttons on the taskbar.
Parts of a window
Title bar
A title bar is mostly a blue strip at the top of the window that displays the title of the currently running application or task. However it is possible to change the color of the title bar using the display properties.
The title bar also enables the user to move the window around the desktop. This is possible by pointing to it then dragging using the mouse.
On the right of the title bar are three tiny buttons called minimize, restore/ maximize and the close buttons.
The minimize button reduces a window to become a button on the taskbar.
The restore/maximize button stretches the window to cover the entire desktop or restore it to its original size respectively.
The close button is used to close and exit a window.
Menu bar
Provides a drop down list of commands that one can use to perform a task. Examples are File, Exit, Window and Help. Figure 1.4 shows the File drop down menu.
Too/bars
These are rows of buttons or icons that represent commands. The command buttons are shortcuts to the same commands you can access from the menu bar. There are various toolbars available in Microsoft Word but the most common are the Standard and Formatting toolbars (Figure 1.5 and 1.6)
To see what other commands are, just point to the icon on the toolbar and a text tip will be displayed showing the function of the icon.
Most of these commands will be discussed later.
Hiding and displaying the toolbars
- Click the View menu option.
- Position the pointer on Toolbars.
- Click the type of tool bar required to select it.
Selected toolbars have ticks or check marks next to them as shown in Figure 1.7.
Rulers
Microsoft Word provides the user with vertical and horizontal on screen rulers that helps the user position text or objects in the right position.
If the ruler is not visible on the screen, then display it using the following procedure.
- Click the View menu option.
- On the drop down menu that appears, click Ruler. A check mark or tick will appear next to it showing that the ruler is displayed on the screen.
Work area
This is the working area where you can enter text or graphical objects. All windows based application programs provide the user with a unique working area suited to that particular application.
Status bar
This is an interactive strip at the bottom of the screen that acts as a communication link between the user and the program. It displays interactive activities like saving, opening, background printing, cursor position etc.
Scroll bars/button_ and scroll arrows
Scroll bars or buttons are horizontal and vertical bars on the borders of a window that the user drags to scroll upward, downwards, to the right or left of a document. Scroll arrows are arrows at the end of the scroll bars that the user clicks instead of dragging the scroll button. Using scroll bars or arrows is equivalent to using the arrow keys on the keyboard
Running the program
Creating a document
When you start a new document, you will see a blinking vertical bar called an insertion pointer. You can move your insertion pointer by using the arrow keys or the mouse.
In case you are in Microsoft Word and you want to create another new document, you should proceed as follows:
- Click the File menu,
- Choose new, from the resulting dialog box, click Blank Document Or select template by clicking any template’s tab
- Click the OK button.
Saving a new document
1. From the file menu, click save or Save As or simply click the save Button on the Standard toolbar. The difference between save and save as is that although both give the save as dialog box when saving for the first time, Save allows the user to save document without the opportunity to change the file name or the location. Figure 1.9 below shows a save as dialog box.
2.In the file name box, type a unique name for the document
3.Select a the location or drive you want to save in, by clicking the down arrow on the right of save in list box,
4.To save the file in a different format or type such as Word 6.0, Word for Macintosh etc. click the down arrow on the right of Save as type list box and choose a file type.
5.Click the save button. The file will automatically be saved as a Microsoft Word document.
Opening an existing document
1.From the file menu, click Open command or on the Standard toolbar, click the Open button. Alternatively press Ctrl + 0 key combination on the keyboard. The Open dialog box shown appears.
2.Select a drive or folder where the file is saved.
3.In the file name box, type or select the name of the document you want to open.
4.Click the open button
To open a document created in another program, click the file format you want in the files of type box, and then double click the document name in the folder list. You can also use wildcards in the file name box for example, type *. Document to find Microsoft Word files.
NB: Microsoft Word keeps a list of shortcut links to recently used files on the file drop down menu. If the list of recently used documents is not displayed, you can configure Microsoft Word to be displaying them by doing the following:
- Click the Tools then Options command. This displays the options Dialog box.
- On the general tab, select the recently used file list check box as Shown in Figure 1.11.
Protecting a document with a password
A password is a combination of characters that prevents other users from opening and changing a document without permission. If a document is protected by a password, only the person who knows the password can open the document or edit it.
To save a document with a password
- Create or open the document you want to protect
- From the file menu, choose Save As.
- Click the down arrow on the Tools button in the save as dialog box
- Click General options.
- Type in a password in the password to open. This prompts the user to enter password when opening a document.
- Type in a password in the password to modify. This prevents the user from making changes to a document unless the user enters the correct password.
- Finally click OK.
Closing a document
Closing a document means unloading the current active document from memory so that the user can create or open another without necessarily exiting from Word.
To close a document:
- Click the File menu.
- Choose Close.
Exiting from Word
- To exit from Word, make sure all open documents are saved.
- Click File menu,
- Click Exit command.
NB: You can exit from Microsoft Word by pressing Alt + F4 keys or by double clicking the application icon at the left most comer of the title bar. If you have not saved any of the open documents, Microsoft Word prompts you to save the document first.
Editing and formatting a document
Editing
Editing refers to making necessary changes to an existing document. Apart from manual editing using delete, insert and overtype/overwrite commands, Microsoft Word provides the user with inbuilt tools such as the spelling and grammar checker, thesaurus, undo and re-do, find and replace etc.
Block operations
Selecting (highlighting) a block of text
The purpose of selecting text is to enable the user perform a number of editing or formatting operations on the selected block of text. Microsoft Word presents the user with a number of ways for selecting a block of text. You can either select a block of text using the mouse or keyboard.
Selecting with a mouse
- To select a word, place the insertion pointer on the word then, double Click it.
- To select a sentence, positions the mouse pointer at the left margin until it changes to a right arrow, and then click once.
- To select a paragraph, place the pointer at the beginning or end of the paragraph. Notice that the pointer changes to I-beam. Now drag the I-beam over the text to be selected and release the mouse button at the end of the text you wish to work on.
Selecting with the keyboard
- To select one word, move the insertion pointer to the beginning or End of the word then press Shift+Ctrl+Right or left arrow.
- To select one line, press Shift+Up or Shift+Down arrow key. Alternatively, move the insertion point to the end or beginning of The line then press Shift+Home or end keys respectively.
- To select an entire page; press Shift+Page Down or Shift+Page Up. 4. To select the entire document, press Ctrl+A or place the cursor at the beginning of the document then press Shift+Ctrl+End.
Deleting text
- To delete a character or a word from the right to the left, place the insertion pointer on the right of the word then press the backspace key.
- To delete a character to the right of the cursor position, place the Insertion pointer on the left of the word then press the Delete key.
To delete a block of text
- Highlight the text to be deleted.
- Press the Delete key.
Restoring deleted text
To restore text that has just been deleted in the current word processing session: click the Edit menu, then the Undo command
Copying and moving text and objects
Copying means creating a duplicate of text or an object while moving means changing the position of text or an object in a document. In Microsoft Word, you can copy or move a block of text.
To copy a block of text:
- Highlight the text,
- Click Edit, then Copy or simply click the Copy button on the standard Toolbar.
- Position the insertion pointer where you want to copy the text,
- Click Edit then Paste or simply click the Paste button on the standard toolbar.
NB: To use the keyboard shortcut keys, press Ctrl + C to copy, then Ctrl + V to paste
To move text and objects
- Highlight the text,
- Click Edit, then Cut or simply click the Cut button (whose icon is a Pair of scissors) from the standard toolbar.
- Position the insertion pointer where you want the text to be placed,
- Click Edit then Paste or click the Paste button on the standard toolbar.
NB: To use the keyboard shortcut keys, press Ctrl + X to cut, then Ctrl + V to paste
Typing modes
There are two typing modes in a word processor that assist the user in typing or editing text documents. These are:
- Insert mode.
- Overtype/typeover mode.
Insert mode
This is the default mode in most word processors. In this case when text is inserted between words or characters it pushes the existing text away without replacing it.
Typeover mode.
In this case, when text is typed between existing words or characters, the new text automatically replaces the existing text by deleting it. To switch between typeover and insert mode, simply press the insert key on the keyboard or double click the OVR label on the status bar.
Find and replace
When you need to search for a word or phrase in a large document, use the Find command. In case you wish to replace a word or phrase, use the Replace option.
Find
- Click Edit menu, then click Find command. The find dialog box appears.
- Type the text or phrase you want to search for then click FindNext
- Step 2 can be repeated if you wish to find other occurrences of the same word or phrase. Click OK when a message appears telling you that Microsoft Word has finished searching the document. Click Cancel to close the dialog box.
NB: You can use the keyboard shortcut Ctrl+F to find. Some search options:
You can specify search options by clicking the more buttons to display them. They include:
- Match case: This identifies only text that matches in case with that in the find what box e.g. it will not find the word DEEN if you typed deen and selected the match case option.
- Whole Word: Searches for a word or phrase that is whole. If it is part of another word it will not be found, e.g. the word ever will not be found in words like however, whenever etc. during the search.
- Use wildcards: Wildcards are special symbols such as * and? That are used to represent a set of words with certain characters in common e.g. names like Jeff, Joe, Jane can be represented using a wildcard as J* which means all names starting with J.
- Like: Searches for words, which are similar in pronunciation e.g., fare and fair.
Replace command
Click Edit menu then Replace command. The dialog box appears.
Type the name you want to replace in the Find what box and the one that will replace it in the Replace with box. Click the Find next button to find the next occurrence of the word then click Replace button to replace it. To replace all the occurrences of the word in the document at once, click the Replace all button.
Proofreading
Proofreading refers to checking whether the document has typographical or grammar errors. Microsoft Word has tools for proofreading e.g. spelling and grammar checker, Thesaurus, Autocomplete and Autocorrect.
Spelling and grammar checker
The spelling and grammar checker is an inbuilt tool that helps the user to correct spelling errors and incorrect grammar structures. However, the checker can only recognise errors of those words whose correct spelling is in its dictionaries. A correctly spelt word used wrongly cannot be detected hence the document should be proofread just before and after printing. To check the accuracy of spelling and grammar:
- Click Tools menu option.
- Click Spelling and grammar on the drop down menu. The spelling
And grammar checker dialog box appears as shown in Figure 1.14.
Words that do not match in the custom dictionary are highlighted for correction. The lower plane of the dialog box suggests to the user with a list of suggested correct words.
- Either choose one of the following buttons:
- Change to correct only the highlighted incorrect word.
- Change all to correct all the occurrences of the misspelled word.
- Ignore to retain the highlighted and continue. For example, although a word like jembe may not be in the custom dictionary, in the Kenyan context, the word is acceptable therefore if highlighted, click Ignore.
- Ignore all to retain all the occurrences of the same word or phrase in the document from another language e.g. a Kiswahili
- Click Add to add the word into the custom dictionary.
In case you want to undo the changes made, click on the Undo button at the lower bottom of the spelling and grammar dialog box.
NB: You can close the spelling and grammar dialog box even if the process is not complete by choosing Close.
Using the thesaurus
This is an editing tool that helps the user find words or phrases with similar meaning (synonyms) or opposite meaning (antonyms) to the one selected.
To use the Thesaurus:
- Select a word or a phrase.
- Click Tools, and then point to Language.
- Click Thesaurus to see Figure 1.15 displayed on the screen.
- For synonyms, under the heading Replace with Synonym, choose an alternative word phrase you intend to use as replacement for the selected text.
- To replace a word or a phrase with an antonym, select the word or phrase with antonym enclosed in brackets.
- Click Replace.
Autocomplete The auto complete feature displays a complete word when the user types the first few characters of the word. This enables the user to type faster by simply accepting the suggested word if indeed he/she intend to type it. To accept the suggestion, simply press the Enter key, and continue typing other word or phrases
The figure shows an auto text that automatically completes Dear sir or Madam text entries.
To turn auto complete on/off
- Click Insert menu and point to Auto text. A dropdown list is displayed.
- Click AutoText.
- Select or clear the Show AutoComplete tip for AutoText and dates Check box
- Type in an Auto text in the Enter AutoText entries here text box then Click Add.
- Click Close.
Autocorrect
The auto correct feature automatically detects wrongly spelled or capitalised words and replaces them with the correct word. However, the settings of auto correct are user defined e.g. if a person keeps on typing the word certain as certain, set the auto correct feature to replace the later with the former. Figure 1.18 shows the auto correct feature.
To turn auto correct on/off
- Click Tools menu, then AutoCorrect.
- To turn on the spelling checker corrections, select the Replace text as you type check box, and then select the Automatically use suggestions from the spelling checker check box.
- To turn off the spelling checker corrections, click Automatically use suggestions from the spelling checker check Box at the bottom of the dialog box
- Click OK to close the dialog box.
Undo and redo
Undo: It reverses the last command that was issued in Order to revert back to the previous state. To undo, click Edit then Undo command.
Redo: It does the last undone action. To redo, click Edit, then Redo Command.
Formatting a document
Formatting refers to applying various styles or features to enhance the document’s appearance. You can format text, a paragraph or a page.
Text formatting
Text formatting refers to features such as changing fonts (type, style and size of characters), changing text color, underlining, bolding Italicising etc. You can use either the formatting tools bar or the Format menu to underline, bold, etc.
To format existing text using the format menu
- Highlight the text to be formatted
- From Format menu, click the Font command. A dialog box with all Text formatting features is displayed
- To change font type and size, where necessary scroll down the Font list box then click the font required, for example Verdana font style would appears as Verdana. To increase the font size, where necessary, scroll down the Size list box and select the required size e.g. 12 points (pt). A point is 1/72 of an inch in height. 72 points i.e. 72/72 is equivalent to 1 inch For example “Verdana” is in Times New Roman 16 points and “Verdana” is in Verdana 16 points.
- Bolding text: Bolding makes the selected text appear darker than the rest of the text. To bold text:
- Activate the font dialog box.
- From the font dialog box, select Bold.
- Underline text: Underlining refers to placing a line at the base or bottom of a word or a phrase. To underline:
- Activate the font dialog box.
- Click the down arrow at the right of Underline style and select. The underline style required e.g. single, double, dashed etc.
- Italicising text: To italicise is to make the text slant forward.
- To italicise activate the font dialog box.
- Click Italic.
- Changing the font color: In most cases, the font default color is black. However you can change the font color for example to red, green, blue etc. To change the font color,
- Activate the font dialog box
- Click the down arrow at the right of font color list box and
Select the color of your choice.
Using formatting toolbar
As mentioned earlier, the formatting toolbar lets the user easily format text by clicking the required format button. To format some text, highlight it first then click a command on the toolbar.
For example to bold text, highlight it then click then bolding command (B) on the formatting toolbar.
Paragraph formatting
Text alignment
Text alignment refers to how text is lined up on the page relative to the left, right or center of the page. There are four ways in which text can be aligned namely left aligned, centered, right aligned and justified.
Left alignment
Lines of text are lined up evenly along the left margin but unevenly at The right margin. This is the default alignment. To align left,
- Highlight your text.
- Simply click the left alignment button. Alternatively click format, Paragraph. And select left from the alignment list box as shown in Figure 1.20.
- Click OK. To apply the choice.
Right alignment
This is opposite of left alignment. Lines of text are lined up evenly along the right margin but unevenly at the left margin. To align right,
- Highlight your text
- Simply click the right alignment button. Alternatively click Format, Paragraph. select Rigl1t from alignment list box, then click OK..
Center alignment
The lines of text are centered unevenly between the left and right margins.
To center text,
- Highlight your text,
- Simply click the Center, button. Alternatively click format, paragraph,
Select centered from alignment list box, then click OK.
Justification
Lines of text are arranged evenly along the left and right margin.
To justify text,
- Highlight your text
- Simply click the Justify alignment button. Alternatively click Format,
Paragraph, select Justify from Alignment list box, then click OK.
Change case
When typing a text, there are a number of cases the user may intend to apply in order to create contrast within the text. These are:
- Sentence case: All the first characters in a sentence are in uppercase (Capitalised).
- Lowercase: All characters appear in lowercase.
- Uppercase: All characters appear in uppercase.
- Title case: All the first characters of each word in a sentence appear in uppercase.
- Toggle case: It changes upper cases to lowercases and vice versa.
Figure 1.21 shows a dialog box for change case.
To change case in an existing text;
- Highlight the text.
- From the format menu, click Change case.
- From change case dialog box, select the case type to be applied.
- Click OK.
Drop caps
There are times when you wish to attract the reader’s attention by making the first character in a sentence large, taking more space in the next line. Such kind of a character is said to be “dropped”.
To apply drop cap;
- Highlight the first character in the sentence
- From the Format menu, click Drop Cap. Drop cap dialog box appears
- Click Dropped or In Margin
- Select font in case you wish to apply a certain font to the dropped Cap
- Specify the number of lines to drop.
- Click OK
Indenting paragraphs
Indentation refers to moving the text away from the margin. You can indent the first sentence in a paragraph (first line), the whole paragraph (full indent) or the rest of the text except the first line (hanging indentations).
First line indent
- Select the paragraph to be indented
- From the format menu click paragraph. Paragraph properties dialog box appears
- Click the down arrow in the list box under Special and select First Line.
- Specify by how far the paragraph is to be indented from the margin
In the by text box
Click OK to apply the indent and close the dialog box. The paragraph will be indented
NB: You can also indent the first line by positioning the cursor at the beginning of the paragraph then press the Tab key.
Hanging Indent
- Select the paragraph to be indented
- From format menu, click Paragraph.
- Click the down arrow in the list box under Special and select Hanging. 4. Specify by how far the paragraph is to be indented from the margin In the by text box
- Click OK to apply the indent and close the dialog box. The paragraph will be indented
Full indent
- Select the paragraph to be indented or position the cursor anywhere in the paragraph
- From the formatting tool bars, click the Increase or Decrease indent Button
Setting tabs
Tabs are used to indent the first line of a paragraph or create columnar data. By default the tab stop is set at 0.5 of an inch. To change the default setting:
- From the format menu, click Tabs
- Enter a new value for tab stop in the Tab stop Position box.
- Choose the type of tab either left, center or right.
- If need be specify the Tab leader option
- Click the Set button then OK.
Setting tabs using the ruler
The easiest way to set tabs is by using the ruler. On the left comer of the horizontal ruler is a tab alignment button that lets the user select the type of tab. Figure 1.28 shows various tab alignment buttons, while Table 1.1 gives an explanation of each button.
To set the tab using the ruler;
- Click on the tab button to choose the required tab type. Notice that the tab type keeps on changing as you click the tab button.
- Set the tab stop by clicking where you want it to be on the ruler.
- Drag the tab stop
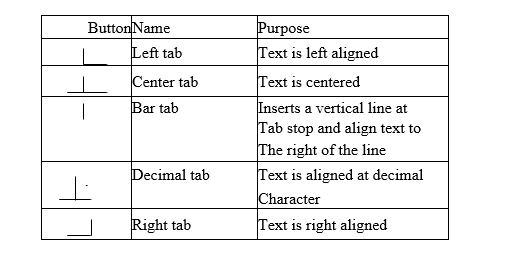
Table 1.1 Examples of tabs
Line and character spacing
Line spacing refers to the vertical distance between lines of text. The default line spacing is single spacing. This type of spacing accommodates the characters in a text leaving a small extra space between lines. Character spacing on the other hand refers to the space between the characters in the text.
To change line spacing:
- Highlight the text,
- From format menu, click Paragraph to display the paragraph dialog Box.
- Click the down arrow from the Line Spacing list box and select the Type of spacing required e.g. double, 1.5, at least etc.
- Click OK to effect the changes. To change character spacing:
- Highlight the text
- From Format menu, click Font.
- Click the Character Spacing tab
- Adjust the spacing as required
- Click OK.
Bullets and numbering
Bullets and numbers are used to mark steps in a procedure or items in a list.
To apply bullets and numbers in a list:
- Select the list.
- From the Format menu, click Bullets and numbering. A dialog box appears.
- Do one of the following;
- To apply bullets, click the Bulleted tab.
- To apply independent numbers click the Numbered tab.
- To apply outlined numbered list, click Outline Numbered. Tab
- Click OK to effect the changes and close the dialog box.
Section breaks
A break is used to identify where a section, a column or a page ends and the beginning of next. This allows the user to apply more than one paragraph or page format in the same document especially when it comes to page layout, size, different margins etc.
To insert a section break
- Position the text cursor in the document where the break is to be inserted.
- Click Insert then. Break.
- From the Break dialog box select the type of section break to insert e.g. page break.
Click OK.
Formatting pages
Inserting page breaks
A page break identifies the end of one page and the beginning of the next. NofQ1ally, Word automatically inserts a new page after the current. One is full. However, there may be a need to start a new page even if the. Current one is not full.
To insert page breaks:
- Position the pointer where the break is to be inserted.
- Click Insert then Break.
- From the Break dialog box
- Click Page break then OK.
Creating columns
To, create columns on existing text:
- Highlight the text
- From Format menu, click Columns to display the dialog box
- In the columns dialog box, select the number of columns or type in the Number of columns text box
- In the Width and spacing boxes, specify the column widths and space between columns
- Click OK
Page setup
Page setup options let the user specify the size of the margins, paper size, paper source and layout.
Setting margins
Margins are blank spaces around the edges of the page. Only text and objects inside the margins are printable.
To set up margins:
- Click the File menu then Page setup. Page setup dialog box appears
- Click the Margins tab.
- Enter the values for the left, right, top and bottom margins in the respective boxes.
- Click OK.
Setting the paper size
By default, the paper size may be either Letter or A4. An A4 paper has dimensions 210 mm x 297 mm
To specify a different paper size
- From the File menu click Page setup
- In the page setup dialog box click the Paper size tab.
- Select the size of paper required from the paper size list. If your size is different from the ones provided, click Custom size and enter dimensions in the height and width boxes.
- Click OK.
Specifying page orientation
The term page orientation refers to the positioning of the page in relation to the text. The two available orientations are:
Portrait: text and graphics are printed with the longest side vertically upright. For example, on an A4 piece of paper, the 210 mm edges are at the bottom and top.
Landscape: With landscape, text and graphical objects are placed with the longest side of the page placed horizontally and the lines of text printed parallel. For example, to create a timetable on an A4 page, the 297 mm side should be horizontal.
To select the orientation:
- From File menu, choose Page setup.
- Click on the Paper size tab and a dialog box comes on the screen.
- Select the orientation required then clicks the OK button.
Page layout
This option lets the user specify how text will be placed on the page from the margins. By default, text starts from the top margin.
To change the layout
- From File menu, choose Page setup. The dialog box Appears.
- Click on the Layout tab.
- From the Vertical alignment tab, select the alignment required then click OK.
Inserting headers and footers
Headers, footers and page numbers make it easy to locate information. Headers are few words placed at the top of every page while footers appear at the bottom. To insert headers and footers:
- Click on the. Headers and Footers from the View menu
- In the text boxes that appear, type a header using the top text box or a footer using the bottom text box or even both if you are to insert both a header and footer.
Inserting page numbers
To give your document page numbers:
- From the Insert menu, click Page numbers to display the dialog box
- In the Position box, specify where you want the page numbers to be inserted.
- In the alignment box, specify whether the number is to be on the right, left, center, inside or outside
- Use the Format button to choose the number format, i.e. 1,2,3,…, A,B, C etc. You can start from any page number by using Start at box
Creating and editing tables
Creating tables
A table is a feature in Microsoft Word made up of rows and columns that is used to organise and enhance display of information.
Creating a new table . .
You can create a table either by using the Insert Table command from tables menu, or by using Draw Table tool that resembles a pencil to create more complex tables.
To create a table using the insert table command;
- Click Tables menu, position the pointer on Insert, then click Table
- In the Insert table dialog box displayed, specify the number of rows and columns.
- Click OK. The table will be displayed on the screen and you can start entering data in it.
NB: You can insert a table by clicking the table button on the standard toolbar, then drag to select the number of rows and columns.
To create a table using the drawing tool:
- Click Tables menu, then Draw table or simply click the Draw table button from the standard toolbar. The mouse pointer changes to a pencil symbol
- Drag the pointer to draw the outline of the table
- Fill in the table with rows and columns by dragging the pointer as you would draw using an ordinary pencil.
Formatting and editing a table
Inserting rows and columns
To insert a row:
- Place the cursor where you want to insert a row
- Click Table, point Insert then click Row above or Row below.
To insert a column:
- Place the cursor where you want to insert a column
- Click Table, point Insert then click Column to left then Column to the Right.
Adjusting the column width:
- Position the mouse pointer on the row or column boundary until the mouse pointer changes to an arrowed cross.
- Drag the boundary to the required size.
Deleting rows, column or cells
- Select the rows or columns to be deleted.
- From Table menu, point Delete, then Columns, Rows or Cells.
Merging cells in a table
This refers to combining more than one cell in a table. To merge cells:
- Select cells to be merged
- From Tables, click Merge cells.
Splitting cells in a table
This refers to subdividing a cell or cells into more cells. To split cells:
- Select cells to be split
- From Tables, click Split cells. A dialog box appears that lets you specify the number of rows and columns that the selected cells will be split.
Formatting table borders and shading
Word provides the user with automatic formatting feature that lets you choose border styles and shading.
To format a table:
- From Table menu, click Table AutoFormat.
- In the formats list box, select the format you want. Note that the format you choose applies to borders, shading font and colour.
- Click Ok to apply the effects.
NB: You can also format a table by using the table’s toolbar. If the toolbar is not displayed, click view point to toolbars then click tables and Borders.
Table conversions
With convert feature in Microsoft Word, you can convert a table to lines of text and vice versa.
To convert a table to text
- Select the entire table or row and columns you want to convert to text.
- From table menu, point to convert then click table to text. A dialog box is displayed that requires you to specify how the text will be separated after conversion
- In the separate text with box enter or select the character to be used as a separator.
- Click ok
To convert text to table:
- Select the text that you want to convert to a table.
- From table menu, point convert then click text to table .A dialog box is displayed that requires you to specify the number of rows and of columns
- From Separate text at, specify whether the table will be defined by paragraphs, commas, Tabs or other characters.
- Click OK. .
Importing tables
Microsoft Word lets you import tables from other applications or an existing file. To import a table,
- Click the Insert menu then Objects. A dialog box appears
- From the Object type select the type of object to insert e.g. Adobe table.
- The program in which the table was created in starts and lets you choose a table from it and return back to Microsoft Word. Alternatively click Create from file. This lets you browse for a file that contains the table you wish to insert.
- Click OK to insert the table.
Performing arithmetic calculations in a table
It is possible to perform mathematical calculations such as sum, product and count, if a table has numerical figures.
To perform calculations:
- Click the cell in which you want the result to be placed.
- From the Table menu, click Formula. A formula dialog box is displayed.
- Type the formula you want or select from the Paste function box. For example, to add figures in a row or column, click SUM. The function in Table 1.2 below that calculates the total is =SUM(ABOVE). The word “ABOVE”. in brackets is called the argument of the formula and tells Microsoft Word which cells in the table are to be worked on.
Sorting
In Microsoft Word you can sort a list of text, numbers and dates in ascending or descending order.
To sort a list or table:
- Highlight the text list or table you want to sort.
- From the Table menu, click Son.
- Select the type of data to be used when sorting i.e. Text, Number or Date.
- Click either Ascending or decending
- Click OK.
Mail merge document
Mail merge is the process of generating personalised letters or documents by combining a main document, e.g. a letter, with an existing data source such as the address book. Therefore in mail merge, the three files created are:
- The primary file (main document)
- The secondary file (Data source)
- Merged file
To create the main document,
1. From the file menu, select New to create a new document. You can also open or retrieve an existing document.
2. On the Tools menu, click mail merge to display a dialog box.
3. Click create button, to select the type of document needed e.g. form .letters. Select the active window as the main document this means that the currently running document will be the form letter that will be later merged with a data source to produce individualised letters.
The next step is now to create a data source.
4. Click Get Data. To use an existing list of names and addresses, click
Open Data. Source To use existing addresses from an electronic address book, click on Use Address Book. To create a new list of names and addresses, first choose the necessary fields from the create data source box then save the record structure. A message appears asking you whether you want to edit the data source or the main document choose one then the Next.
5. With the main document open, spot the mail merge toolbar on the screen. Position the text cursor where you want to insert merge fields. Use the insert field’s button to insert merge fields in the document
Merging the document
Once you finish inserting merge fields from the data source in the main document, you are now ready to merge. There are several merge options:
To merge to a new document
Click the Merge to new document icon on the mail merge toolbar.
Merging to printer
Click the .Merge to printer, icon on the mail merge toolbar. Before you merge to a printer or other device, you may want to preview the appearance of the merged documents. For example, you can preview the merged documents one at a time. You can also collect the merged documents into a new document, so you can review and personalise the documents.
Preview merged documents
Before you print the documents, ensure that you’ve inserted merge fields in the main document and selected a data source. To preview, click anywhere in the main document, and then click View Merged Data on the Mail Merge toolbar.
Microsoft Word displays information from the first data record in place of the merge fields.
Send merged documents via e-mail or fax
Click the merge button on the Mail merge toolbar Select e-mail or fax in the merge to box. Click the Setup button to specify the e-mail addresses or faxing number then click the merge button. The internet connection wizard starts and if your computer is properly configured, the mail merged document will be sent.
Inserting graphics
Working with graphics
The term graphics refers to non-text images generated by a compute! This includes photographs, drawings and graphs. Graphics present information in a form that is easy to understand.
You can insert a graphical object from Microsoft Clip Gallery, a scanner or by using drawing tools available in Microsoft Word.
Inserting a clip art or a picture from clip gallery:
- Position the insertion pointer where you want your object to be inserted,
- On the insert menu, point to picture then click clipart Click on the tabs to select on the category of objects i.e. clip art, pictures, sound or videos. See Figure 1.42.
- Double click on the object you want or click it once then click the insert button.
- Use the object place holders to resize your object. If you place the mouse pointer on one of these holders, it turns into a two headed arrow, hold down the mouse button and drag to increase or reduce the object size
- Click anywhere outside the object to remove the holders.
- To move you object to another position, click inside the object. The pointer turns into an arrowhead cross. Hold down the mouse button and drag your image to a new location.
Inserting an image from a scanner
The computer must be connected to a scanner to complete this procedure. A scanner is a data capture device that transforms a hand copy or real graphical object into digital form.
To scan an object:
- Position the insertion pointer where you want your picture to appear,
- from the insert menu, point to Picture and then click from scanner or Camera.
- To scan, follow the instructions that come with your scanner.
- When the image appears on the screen you can edit and format it as required the same way you would with a clipart.
Inserting a picture from another file
- Position the insertion pointer where you want your picture placed,
- From the insert menu, point to Picture, then click “From file
- Locate the file that contain the image you want to insert eg from your floppy disk, from a compact disk etc.
- Select the object you want to insert
- Then click the Insert button.
- When the image appears on the screen you can edit and format it as required the same way you would with a clipart.
Editing and formatting pictures
To format or edit a picture:
Microsoft Word provides the user with a picture editing toolbar that lets you adjust the brightness, contrast, change it to black and white or grayscale and crop the image. Cropping refers to hiding the unwanted details so that they do not come out when printing.
To display the picture toolbar, click on View menu, point to toolbars then select Picture. The picture toolbar has buttons that enable a person to format a picture to format a picture, click it to select it then use the commands on the picture toolbar.
Drawing an object using MS Word drawing tools
Microsoft Word provides the user with basic drawing tools such as polygons, lines, a circle, stars and banners, call outs and many others. If the drawings toolbar is not displayed, click on View menu, toolbars then click on Drawing. The toolbar will be displayed which a button has labeled Auto shapes, an arrow, a line, square and a circle
To draw a line, a circle an arrow or a rectangle:
- Click on the appropriate shape button. The pointer changes to a plus sign.
- Place the pointer where you want to draw that shape and drag to the required size.
To draw an object using the Auto shapes:
- Click the Auto shapes button. A menu is displayed showing categories of shapes you can choose from
- Point to the category required then select the type of object you wish to draw
- Place the pointer where you want to draw that shape and drag to the required size.
Editing and formatting a drawn object
You can resize, move, fill color and change the drawing outline.
To resize or move a drawing.
- Click anywhere inside it. The place holders appear.
- To move it, hold down the mouse button and drag.
- To resize it, place the pointer at one of the place holders and drag.
To fill the object with color and fill effects:
- Click the object. The place holders appear.
- Click the down arrow of fill color button, the one that looks like a bucket pouring ink.
- Select the color you want applied. To fill the drawing with texture, gradient or pattern, click the Effects button. From the resulting dialog box, select the appropriate fill effect.
Printing a document
Printing in Microsoft Word
Because the main purpose of any word processor is to prepare documents for printing, this cannot be accomplished without a printer. The choice of a printer depends on the quality of hardcopy desired. Before you print, it is very important that you preview you document to confirm that no details are outside the printable area and that the document layout is okay.
Using print preview
In Microsoft Word, to view your document before printing proceed as follows:
- From file menu, select print preview the mouse pointer changes into a symbol that resembles a magnifying glass. You can click on the mouse button inside the document to increase or reduce the size of the view.
- Click the close button or Esc key to return to your document.
To print:
From file menu click on print A dialog box appears where you can specify:
- The type of the printer installed in your computer other than the default printer.
- Whether to print the whole document or a range in the Page range box,
Number of copies to print per page in the Number of copies box then,
Click OK to start printing.