
Word processors are programs that enable you to Create, Edit and Format documents. Examples of word processors are, Microsoft Word, Word perfect, Word star.
Microsoft Word (MS-WORD)
Ms Word is a powerful word processing program that helps the user create, edit, format and save documents.
5.1 Loading Ms-Word
Click start button at the task bar
Point at programs
Click at Microsoft word
Loading can also be achieved by clicking the Ms Word icon on the Microsoft shortcut bar (only if it is available)
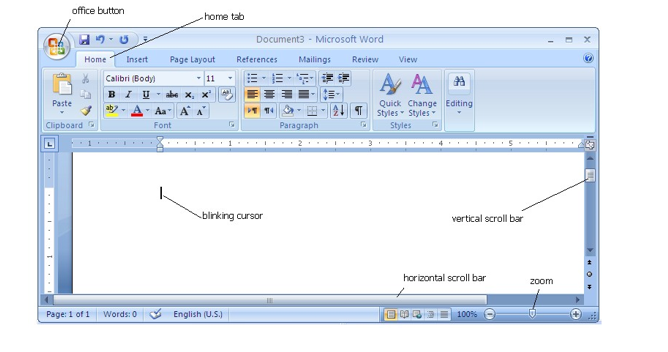
5.2 The Ms-Word Screen
The Ms Word screen contains various features. The common ones are:
- TITLE BAR: This bears the name of the application followed by the name of the current document or the file.
- OFFICE BUTTON: It contains commands such as new for creating a new file, open, save, save as etc and commonly used commands.
- TABS: There are seven tabs in word 2007, Home, insert, page layout, references, mailings, review, view each of them has a ribbon with a set of commands.
Ms-Word Screen
When the program starts, the following document window will be displayed on the screen.
5.3 Creating, Saving and Closing Documents
Creating
Option 1
- From the office button, click New then double click the Blank Document icon.
Saving
To save a new document
On the office button click Save As.
Type the file name on the File name box that appears.
Chose the location to save the file in the Save in box e.g. floppy (A), hard disk(C) etc
Click the Save button.
Closing
Click close button on the Ms- Word desktop or
From the file Menu click Exit.
Selecting Text/Block of Text
1. SELECT DO THIS
A word Drag over the word or Double click it
A graphic Click anywhere within the graphic
A line of text Drag over the text or Double click at the start of line
A sentence Hold Down Ctrl key and click anywhere in the Sentence
A paragraph Triple click anywhere in the paragraph to select
Entire document From Edit, click Select All
5.4 Formatting

To bold text
Select or highlight the text. In the home tab click bold.
To Italicize text
Select or highlight the text. In the home tab click italics
To underline text
Select or highlight the text.
In the home tab click underline.
To change Font size
Select or highlight the text.
In the home tab click font size.
Under font size choose and click the font size desired.
To change Font type of text
Select or highlight the text.
In the home tab click font type.
Under font choose and click the font type desired. Click Ok.
To change the font color
Select the text.
In the home tab click font color.
Under color box, choose the color desired.
Formatting Paragraphs
Word displays text, as it will appear when printed.

About line spacing
Line spacing determines the amount of vertical space between the lines and text. Word uses single line spacing by default.
Inserting line spaces
In the home tab.
Under line spacing, choose and click the desired line spacing.
Aligning text
Select or highlight the text. In the home tab.
Under alignment, choose and click alignment desired i.e. left, right or
center.
Click Ok.
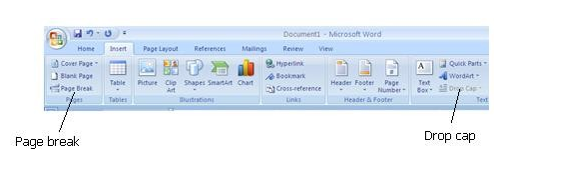
Creating drop caps
Place the cursor at the beginning of the line/paragraph you want to have a drop cap on.
In the insert tab, click drop cap. Chose the desired option
Change case
Highlight or select the text.
In the home tab choose and click the desired case option e.g. upper, lower, title or sentence cases.
Adding bullets and numbers
Select the items, which you want to add bullets or numbers. In the home tab click on the Bulleted or Numbered tab. Choose and click Bullet or Number format desired.
Remove bullets or numbering
Select the items, which you want to remove bullets or numbers. On the format menu, click Bullets and Numbering.
Choose none. Click Ok.
Page Break
- Position the cursor where you want the page break to appear.
- From the insert tab click on page break.
Add a background
You can add different backgrounds to Word documents.
Select the option that you want.
Note: To remove a background, click NO FILL option.
Using SmartArt
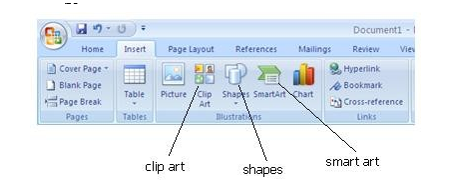
This feature enables you to create visually compelling text affects e.g. slanting, curving text in a document.
- From the insert tab, select smartart and click the smart art graphic desired.
Shapes
The insert tab has a variety of features used to create different shapes in a document.
- From the shapes icon, select a tool that you will use to draw a certain shape e.g. a rectangle.
- Click and drag to the desired position.
Insert a picture
You can insert a clip art or a picture from the clip Gallery.
- Position the insertion point(cursor) where you want to insert a clip art or a picture.
- From the Insert tab, click the clip art icon.
- Click a clip art category then choose a clipart and click insert clip.
To resize the objects
- Click inside the object i.e. clipart, word art or a drawing.
- Position the mouse pointer in either of the placeholders.
- Click and drag to the desired size.
- Release the mouse button.
5.5 Editing Your Document
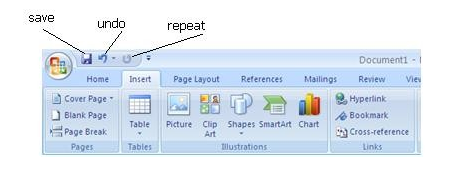
To undo mistakes
Next to the office button, click undo or click the Undo button.
To undo several actions
- Click the arrow next to the Undo button to see a list of the most recent actions.
- Click the action you want to undo. If you don‟t see the action, scroll through the list.
5.6 To insert page numbers
Select insert, page numbers from the insert tab
Choose the position of page numbers
Choose alignment of page numbers
Removing Page Numbers
Select the page numbers icon to see the remove page numbers option as the last option in the list.
Adding Headers and Footers
A header is the text that appears repeatedly at the top of a document while footers is that text that repeatedly occurs at the bottom of a document.
To add a Header and Footers
Under the Insert tab chose either the header or the footer
Type the header/footer text
You can switch from the header to the footer by clicking the switch button to move to the footer
Click close button to return to the document.
To remove a header /footer – refer to removing page numbers
Copying and Pasting Text
An existing piece of text may be required in a different document. Ms word allows the user to copy this text rather than retype then paste it to the required area. when text or graphic is copied or cut, it is stored in the clipboard and can be pasted into as many documents as desired.
To copy and paste text
Select the text to copy.
Select Copy or copy icon on the home tab. Position the cursor where the text is to be placed. Select Edit, Paste or Paste icon on standard toolbar.
Moving text
Select the text to move.
Select Cut or click cut icon on the home tab.
Position the cursor where you want the text placed. Select Edit, Paste or click paste icon on standard toolbar.
Note: When you cut, the text is completely removed from the original location.
To spell check a Document
Select Spelling and Grammar… on the review tab.
Follow the instructions as given to replace a word, ignore, edit etc
Click Ok button when spelling and grammar is complete.
To find text
On the home tab, click on Find.
In the find what box, type the word/text being sought
Click find next button
To close the dialogue box, click cancel button
To Replace Text
You can find and replace test at the same time
On the home tab, click on replace
In the find what box type word / text as above
In replace with box type the word/ text to replace the sought word / text
Click replace all button
To close the dialogue box click cancel button
Changing Page Setup
Depending on the size of the paper required and / or paper orientation and layout,
Ms –word will allow changing of the default to users requirement.
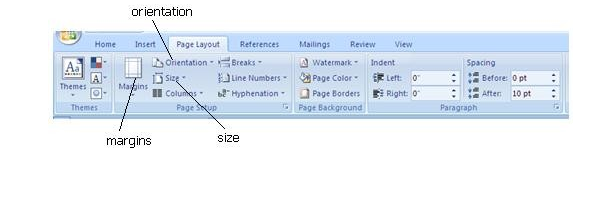
To change page setup
On the page layout tab, click size to change the paper to A4, A5, DL etc
Under orientation check the circle for either portrait or landscape
Working With Tables
A table is made up of rows and columns that can be filled with text and graphics. You can sort and perform calculations on them. Tables make it easy to read information that would otherwise have to be written in a representative and lengthy fashion. Use tables to organize information and create interesting page layouts with side-by-side columns of text and graphics.
The simple table:
- In the insert tab click table.
- In the no. of columns box enter the number of columns.
- In the no of rows box enter the number of rows.
- Click Ok.
Creating a table with a different format
- In the insert tab click table
- Choose a table format of your choice under quick tables
- Click Ok.
Merging cells in a tab
- Select the cells to be merged.
- Right click to see the merge cells option.
Splitting the cells
- Select cell to be split
- From the shor tcut menu obtained by right clicking choose split cells
- Type the number of columns and rows each cell is to be cell splitted
To delete rows and columns in a table
- Select the row or the column to be deleted
- From the shortcut menu choose deleted cells
- In the deleted cell dialog box choose an option i.e. entire row or column
- Click Ok
Adjusting column width
- Position the mouse pointer over the column boundary until it changes shape
- Drag the column boundary to the right or left
Adding rows to a table
- Select the row to row as above which you want to insert a new row
- From the table menu choose insert cells
- In the insert cells dialog box choose an option e.g. insert the entire row.
- Click Ok.
To delete cells in a table
- Select the cells you want to delete
- From the layout tab choose the delete cells option
5.7 Columns
Newspaper style columns
You can format text into multiple newspaper style columns. This is best applied when creating documents like newspaper, newsletters or brochures.
Option 1
Using the columns button on the page layout tab
- Highlight the text to be columned.
- Select the number of columns you want.
Templates
A template is a document that contains predefined settings. The use of templates ensures that there is consistency between documents.
- From the office menu choose new.
- Click on the relevant tab depending on the type of document you want to create e.g. letters and faxes, legal document, menus etc.
- Select the template that you want to use.
- Click Ok.
- Delete the default text and type your own.
To Print a Document
- From the office menu, click print.
- In the name box select a printer.
- Choose an option for the number of pages to be printed i.e.
ALL: -Prints the entire document
CURRENT PAGE: -prints the current page
PAGE: -you can select certain pages within a document
- .In the number of copies box, specify the number of copies you want in each page.
- Click Ok.
Mail Merging
If you had to type the same form letter 100 times, you know what boring and back breaking work it can be. Never again, by setting up the form letter as a Ms Word merge documents, you need type the letter only once.
STEP 1
- From the mailings tab click Mail Merge and choose letters
STEP 2
Select recipients
One can select from an existing file or by creating a new data source
Creating a new data source
- Choose get data type new list
- Create data source dialogue appear as shown below
- Remove the fields not needed and / or create new field
- When you have finish creating the fields click ok
- Type the data to be stored
STEP 3
- Place the cursor to position of field insertion
- From the mail merge toolbar click insert merge field
- Repeat field insertion until all the fields have been inserted
- Choose Finnish merge