
Introduction
Have you ever asked yourself how newspaper and book publishing companies manage to produce publications that are attractive with creative layouts and graphics in large volumes? They do this through a special process called publishing. Publishing is the process of producing publications like newspapers, cards, pamphlets, pictures, calendars etc. that have special text and graphical layouts and designs. The traditional method of publishing involved drawing and writing manually on wooden or metallic boards. The artwork would then be painted with ink and pressed on papers to produce a printout. This was a very tedious work.
Today the art of publishing has changed because of the advent of personal computers and smaller printers that are able to print high quality text and graphics even in an office or at home.
Definition of desktop publishing (DTP)
Desktop publishing refers to the process of producing publications like cards, newspapers etc. by designing their text and graphics layout and inserting, editing, formatting and printing of text and graphical objects using a special desktop publishing software installed on computers. The term desktop means that all the publishing processes can now be done on a desk in the office or at home using a personal computer! The difference between a desktop publisher and a word processor is that a desktop publisher software gives the user more tools and control of the page layout, text manipulation and graphic design than a word processor.
However it is important to note that some word processors today have also been incorporated with text and graphic formatting and editing tools. Hence a thin line exists between them and the desktop publishers. For example you can design a full publication in Microsoft Word by using the available drawing and picture tools, create columns etc.
Examples of desktop publishers include Adobe PageMaker, CorelDraw, Microsoft Publisher and Ventura. This book will use Adobe PageMaker to demonstrate the concepts of desktop publishing.
Purpose of desktop publishing software
Desktop Publishing programs are very popular in publishing because they give the person designing publications (typesetter) a lot of control on:
Graphic design: Using desktop publishing software, a typesetter can create and edit very complex text and graphical objects like pictures to the finest details. For example, the software provides the user with rulers and ruler guides that can be used to place an object in exactly the correct position.
Page layout design: With a desktop publisher, the user can be able to design a page layout by setting consistent picture and object locations, dividing a page in a number of columns and creating layers. A layer can be viewed as the arrangement of objects on top of each other with the one on top being on the first layer e.g. text can be on one layer while graphical objects on another. Therefore the text layer can be manipulated separate from the graphical object layer like for example text moves separate from the objects. Another good example is you can make the graphical object layer transparent in order to make the text in a layer behind the object visible.
Printing: Because the main purpose of any desktop publisher is to produce publication s, this cannot be accomplished without printing. Desktop publishing software therefore helps the user prepare what is referred to as an artwork in commercial circles for printing.
Types of desktop publishing software
There are two main types of desktop publishing software:
Graphical based: They are specifically developed to edit and format graphic objects like pictures. Examples are Adobe Photoshop, Corel Draw, harvard graphic etc. This desktop publishers have superior image handling capabilities like setting resolution, brightness, contrast, cropping and filling images of all types with colour.
Layout based: These types of desktop publishers are specifically developed to create different page layout designs for text and pictures. Have you ever wondered how the complicated front page of a newspaper is developed? It is difficult to achieve such without a good layout based DTP. Good examples of layout based desktop publishers are Adobe PageMaker and Microsoft Publisher.
Designing a publication
Publications vary in design and formatting. For example, a card has a particular design layout that is different from a newspaper. Therefore, publication designs determine how they are classified.
Types of publications
It is possible to produce different types of publications using a desktop publishing software. There are several types of publications that can be published namely:
Cards: These may be for weddings and other special occasions like graduations and for congratulations.
Certificates: To show completion of courses and special events. These type of publications are very sensitive because they must be designed to discourage any type of duplication or counterfeits.
Newspapers, magazines, pamphlets and newsletters: Have news targeting a group of people. They may have many text and graphical layouts and designs.
Books: Are bulky publications with many pages bound together in the same publication.
Calendars: Apart from showing dates, they are used by companies to advertise their products hence most of them have heavy catchy graphics.
Running Adobe PageMaker
Currently PageMaker versions 6.5 and 7.0 are the most common desktop publishing software developed by Adobe PageMaker. Other Adobe products includes Adobe Photoshop mainly used for editing and formatting photographs, Adobe illustrator used for creating complex freehand artwork such as drawings and logos etc.
Starting Adobe PageMaker
- Click the Start button and then point to Programs
- From the programs sidekick menu, point to Adobe group then select PageMaker. Figure 4.1 shows how to start PageMaker in a typical Windows environment.
- The PageMaker program starts and provides the Document Setup dialog box. If the Document setup dialog box is not displayed, then click File menu and select the New command.
- In the Document Setup dialog box similar to the one in Figure 4.5 specify the publication setup options.
- Click OK to apply the selected options. A publication window similar to the one in Figure 4.2 is now displayed.
PageMaker screen layout .
The PageMaker application window looks like most application windows for programs you have used before. It also has a title bar, menu bar and scroll bars. However, you will note that unlike most of the Microsoft applications you have used before, Adobe PageMaker does not have a status bar on its application window. The most notable difference between a desktop publishing software such as PageMaker and a word-processing software such as Microsoft Word is that a desktop publishing software has its printable work area centered on a pasteboard as shown in Figure 4.2.
The PageMaker publication window is made up of the following layout components:
- The pasteboard.
- The toolbox.
- Rulers
- The printable area.
- Master pages.
- Control pallete.
The pasteboard
A pasteboard is a large blank area where you place text and graphical objects before arranging them neatly on the printable work area enclosed with margins.
The printable area
It is the area that looks like a page surrounded by margins on the pasteboard. Any object or text that is placed on the printable area will be printed by the printer.
The Toolbox.
This is a set of buttons that contains various tools you can use to create and manipulate your publication it has the following tools
Line tool
Rectangle tool
Ellipse tool
Polygon tool
Hand tool
Pointer tool
Rotate tool
Text tool
Cropping tool
Constrained tool
Rectangle frame tool
Ellipse frame tool
Polygon frame tool
Zoom tool
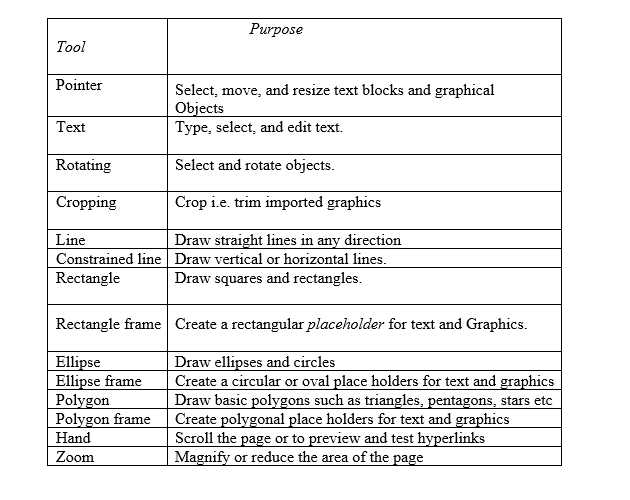
The function of each tool can be summarised as follows:
Master pages icons
At the bottom of the publication window is a bar that holds icons representing each page in the publication. These icons are called page thumbnails. To move to a page, just click its thumbnail. When you click the master page thumbnail(s), the master page(s) are displayed. A master page is used to design the general layout that needs to be applied in all other pages of the publication. (Figure 4.4)
Rulers
Each publication window can include horizontal and vertical rulers. They extend along the top and left borders of the window. You can display rulers when you need them and hide them when you want more room on the screen to view a publication. The rulers must be visible to help the user to manually create ruler guides, which are nonprinting extensions of the ruler as well as measure an object size.
Control pallete
It is a shortcut toolbar mainly having text and paragraph formatting command icons.
Setting up a publication
Sometimes, it is necessary to change the setup options of a publication e.g. page size, margins, orientation etc.
To change publication’s setup:
- From File menu, click Document Setup. A dialog box such as the one shown in Figure 4.5 appears.
- Select the following page set up options:
In the Page size list box, select the appropriate size. When you select a page size, its dimensions appear in the Dimensions text boxes. Alternatively select custom size then use the dimensions text box to specify a custom page size of up to 1065 by 1065 mm.
Select page orientation by either clicking Tall for portrait or Wide for landscape orientation.
Click Double-sided to set inside and outside margins to accommodate binding on pages that will be printed on two sides.
Click Facing pages if you want left and right pages displayed together as a two-page spread on the screen.
Enter the number of pages you initially plan for-the publication.
Click OK to effect the changes.
Setting up a publication using master pages
If you are creating a publication that will have several pages such as a book or a project report, it is important that you layout a common layout foundation for all pages for the sake of consistency and cohesiveness. These pages used to design a common layout to be applied in the other pages of the publication are called master pages or a document master. You can create, modify, and delete objects on master pages just like any other objects, but you must do so from the master pages themselves.
The document master applies to all pages in the publication until you’ specify otherwise, and cannot be renamed or removed from the publication. To switch to master pages, simply click the master page icon(s) then:
- Place non-printing ruler guides on the master pages to help you place text and graphics accurately and consistently throughout your publication. Non-printing ruler guides are vertical or horizontal lines. you place on printable area. You place the guides by positioning. the mouse pointer on the ruler then dragging the guide to the required position.
- Create basic design elements on the master pages, including text and graphics that you want to appear on each page in your publication.
Setting up margin guides
Margin guides are very important because they define the printable area of your publication.
To change margin settings;
- From File menu, click Document Setup
- In the Setup dialog box
For a double sided document enter the values for inside and outside margins to accommodate binding for a document that will be printed on both sides. For Single sided pages, set the left and right margins.
Enter the value for the Top and Bottom margins.
- Click OK to close the setup-dialog box and effect the changes.
Saving the layout
Once you complete setting up your publication layout, it is important you save it before you start entering text and graphics.
To save the layout:
- To save the publication for the first time, from the File menu, click Save As or click the Save button on the toolbar.
- In the Save As dialog box, specify the name of the file and the storage location of your publication then click Save button
- To save changes made to a publication, from the File menu, click Save.
Displaying and hiding rulers
If the rulers are not displayed, click the View menu, then Show rulers to display them. To hide the rulers, click the View menu then Hide rulers.
Selecting ruler measurement units
It is possible to set different measurements on both rulers. For example, you can set the vertical rule in millimetres and the horizontal in inches. Therefore if you want to use common units, you must set each ruler measurement independently.
To set the measurement units,
- Right click a ruler separately. A drop down list displays available measurement systems that is inches, decimal, millimeters, picas and Ciceros as shown in Figure 4.6 below. If you are not familiar with some of these units, it is advisable you use millimeters.
- Select the measurement system option you want to use.
Manipulating text using the toolbox
Manipulating text
Using text tool
To create a text block with the text tool:
- Click the text tool from the toolbox. The pointer turns into an I-beam.
- On an empty area of the page or pasteboard click or drag a rectangular area to define a text block or frame. If you click without dragging, a text block the width of the column or page will be created. It is the text frame that defines the space you want the text to occupy. The borders of a text block remain invisible until you click the text with the pointer tool.
- Type the text you want.
Using text frame
You can create text by using a frame tool or by converting any object you have created with the drawing tools except a line into a frame. Text frames do not change height or width as you add or remove text.
To add text into a frame:
- Draw a frame using any of the frame tools that defines the shape you want the text block to take. Alternatively select a drawn shape, from Elements menu, point to Frame then click Change to Frame.
- Do one of the following:
Click the text tool, click in the frame, and then type or paste text from the clipboard
From the File menu click Place, double-click the file that contains the text you want to place in the text frame. When the cursor becomes a loaded icon, click inside the text frame to place the text.
You can also add text into a text frame by:
- Selecting a text block, hold down Shift, and then select an empty frame.
- From the Element menu, point to Frame and click Attach Content. The text flows into the frame and the text block disappears.
Manipulating graphical objects using the toolbox
The toolbox has several graphic drawing tools. For example, the polygon tool helps a person to draw polygons and the ellipse tool is used for drawing circular objects. All these tools enables a person to apply stroke and fill patterns. For more complex graphics, PageMaker allows a person to import pictures from other applications and to place them in the publication. A stroke refers to a line style while a fill refers to applying patterns such as shading. Figures 4.7 (a) and 4.7(b) shows examples of fill and stroke respectively applied to simple rectangular graphical objects drawn using the polygon tool.
Applying stroke and fill
Once you create a graphical object, you can enhance it by applying stroke and fill. To apply stroke or fill:
- Select the object you want to apply stroke or Fill.
- From the element menu either point to stroke to apply a line style or fill to fill the object with a background colour or pattern. Alternatively, click the fill and stroke command to set the fill and stroke options in the dialog box as shown in Figure 4.8.
Moving and resizing text and graphical objects
Once you create text and graphical objects, you can adjust the size, shape, or location of an object.
To move a text or graphical object:
- Click the object to select it then position the pointer tool anywhere inside the text or object.
- Drag the text or object to a new position.
To resize text or object:
- Select the text or object with the pointer tool. Selection handles are displayed at the comers of the text block or the object. 2. Position the pointer on the selection handle and drag to the required size.
Editing a publication
The term edit means making changes to a publication. In most cases, editing would include the process of correcting spelling mistakes, replacing words etc.
You can search for specific occurrences of a word or group of words in your publication and make the necessary changes. PageMaker comes with two special editing tools namely the Find and Change tool and the Spelling tool.
Before editing the publication, you must open it in the story window. PageMaker defines each text block as a story. Once text is in PageMaker, it is part of a story. A story is a text block that PageMaker recognizes as a single unit. A story can be one letter or several hundred pages of text, and can be contained in a single text object or threaded through many different ones.
Find and change tool
This editing tool helps a person to search for a particular word or a phrase and replace it with another one. To find and change a word and or a phrase in the publication:
- Using the text tool, click an insertion point in a story, or select a range of text if you want to limit your search to that section.
- Click Edit menu then select Edit story command. The publication now opens in the story window showing only the text but not the graphical objects.’
- Click Utilities then Find or Change. A dialog box such as the one shown in Figure 4.9 is displayed.
- In the Find What text box, type or paste the text you want to find. To change the text, type new text in the Change To text box. To search for formatting only, leave the text boxes blank.
- Select Match Case and Whole Word as appropriate.
- In the dialog box, specify the formatting to search for and, if appropriate, how you want to change it, and click OK
- Select options to determine the scope of the search e.g. in all open publications or only the current one. If you search the current publication only, select Search Story option.
- Click Find to begin the search.
- Click Find Next to continue with the search operation
- Once you are through, click Story menu then Close Story. Alternatively press Ctrl+W.
Spell checking
To check spelling in one or more publications:
- Click the insertion pointer anywhere in the publication or select the range to be spell checked.
- From the Story Editor menu, choose Utilities then Spelling. A dialog box as shown in Figure 4.10 appears.
- Specify the scope of the search either as:
In selected text.
In the current story only.
In all stories in the publication.
- Specify spell checking options:
Checking alternate spellings lets you see suggested replacements for misspelled words.
Checked show duplicates displays/repeated words.
- Click the start button and spell checking begins.
Formatting a publication
This refers to applying special attributes to text, graphical objects and pages in order to make them attractive and appealing to the eye. Therefore, formatting may include things like font sizing, bolding, changing text colour, adjusting picture brightness and contrast and formatting columns on the page.
Text and paragraph formatting
To format your publication, you can either use commands available in the Type menu or a control palette. The Control palette is a strip that contains command buttons and list boxes that let you assign attributes to text and graphical objects:
To display the control palette
From Window menu, click show control pallet The Control palette appears floating on top of your publication (Figure 4.11). You can move it by dragging the bar at the left edge of the palette.
The contents of the Control pallete vary. Depending on which tool is selected from the toolbar or from itself. The two types of control palettes are the object mode and text mode. The text mo e can be selected by clicking the Character view or paragraph view button. There are two types of text modes namely;
- The character view that is, when the T tool on the pallete is selected. This means that you can apply character attributes to selected text. Character attributes determine how text looks on the page. such as font type, size, or style (bold, italic or regular).
- The paragraph view that is, when you select a paragraph and you click the button below the T on the control palette (labelled M) in Figure 4.11. Figure 4.12 is displayed. You can apply paragraph styles, select alignment options, and other paragraph attributes.
In object view i,e. when a graphical object is selected, it lets you apply attributes related to the object such as rotating, moving, resizing etc.
To format text:
- Using the text tool, select the text you want to format.
- From the Type menu of the Control palette, choose the formatting attribute you want.
To format several text attributes at once
- With the text tool, select the text you want to format.
- From the type menu, click character command
- In the Character Specifications dialog box select text attributes such as font, size, type, colour, position (normal, subscript, superscript etc.) then click ok
The simplest way to format text attributes is by using the control palette. In character view the control palette has the following main formatting sections
- Font list box and style buttons
- Font size and leading list box
- Tracking and Horizontal scale
Changing text colour
- Select the text.
- From Window menu choose Show Colors.
- In the colors dialog box, click the Colors tab.
- Select the colour you wish and it will apply on the selected text.
Changing case
As with Microsoft Word you can also change text case to upper or lower case, sentence case e.t.c.
To change case:
1. Select the text you want to change case.
2. Click Utilities menu, point to Plug-ins, and then click Change case. Change case dialog box will be displayed as in Figure 4.1
3. Select the case you want
4. Click Apply to preview the change
5. Click OK to close the dialog box.
Formatting text to superscript and subscript
Superscript refers to text that is positioned slightly higher than the rest on the same line e.g. the power of 3 in 103 while subscript refers to text slightly below the same line such as the number 2 in H2O. To format text to superscript or subscript;
- Select the text you want to style as superscript or subscript.
- From Type menu, click Character and the dialog box in Figure 4.14 appears
- In the Character dialog box, select either superscript or subscript from Position list box as shown then click OK.
To remove superscript or subscript format:
- Repeat step 1 and 2 above
- In the character dialog box, select Normal from Position list box, and then click OK
Drop cap
Drop cap refers to text formatting where the first character in a line is bigger and drops down to occupy the space in the next lines as shown by the first letter D in this paragraph.
To apply drop cap:
- Select the character you want to drop
- Click Utilities menu, point to Plug-ins, and then click Drop cap.
- Specify the number of lines you want the character to occupy in the Size box as shown in Figure 4.15.
- Click Apply to preview the format and then OK to close the dialog box.
Paragraph formatting
You can use either the Control palette to format a paragraph or Paragraph command from the Type menu. However the later lets you apply formatting that is not available on the Control palette.
Setting indents and tabs
Indents and tabs are powerful tools for positioning text. Indents move text inward from the right and left edges of a margin while tabs position text at specific positions. You can set indents by moving the indent markers in the Indents/Tabs ruler, typing indent values in the Paragraph dialog box or type indent values on the Control palette in paragraph View.
To set tabs using the Indents/Tabs ruler:
- Select the paragraph or paragraphs you want to indent.
- From Type menu, click Indents/Tabs.
- On the Tab ruler, click a tab-alignment icon (left, right, center, or decimal) for the first tab you want to set. See Figure 4.16.
- Drag the new tab marker along the ruler
- If you want the tab leader, click the Leader button then choose the type of leader you want.
To set indent using the Control palette:
- Select a paragraph or paragraphs you want to indent.
- On the Control palette, click the paragraph-view button.
- Type values for the indents in the Indent text box then press the Enter key.
To set an indent using the Paragraph command:
- Click an insertion point in a paragraph, or select a group of paragraphs.
- From Type menu, select Paragraph.
- Type values for the Indents options, and then Click OK.
Adding space above or below paragraphs
You can control the vertical space between paragraphs by specifying the amount of space before or after selected paragraphs or all paragraphs of a certain style.
NB: PageMaker never inserts space before a paragraph set to begin at the top of a column or page (using the Page Break Before or Column Break Before attribute). For those cases you must add the extra space manually by typing one or more paragraph returns.
To increase or decrease space before or after a paragraph:
- Select the paragraph you want to edit.
- Choose Type then Paragraph.
- In the paragraph Space options, specify the values you want in the Before and After text boxes.
Page formatting
This refers to formatting the whole page and may include things like column guides.
Columns guides
Column guides helps you divide the pages into columns that make the publication look more organized. The idea is to divide a large page into short readable sentence sections. Imagine if a newspaper page was not divided into columns! Therefore columns are mostly used in designing large publications, newspapers and journals. The difference between column guides and margin guides is that margin guides are around the edges of the printable page while column guides may split the page at the center. PageMaker. marks margins with a blue line but column guides with pink coloured lines.
To setup more columns:
- Turn to the publication page or master page
- From Layout menu, choose Column Guides. You can setup column guides separately in a double sided facing pages by clicking Set left and right pages separately check box as shown in Figure 4.17.
- Enter the number of columns you want on the page and the space you want between columns. If you are setting left and right pages separately, enter values for both pages.
- Select Adjust Layout if you want existing text and objects on the page to adjust to the revised column setup.
- Click OK.
Moving and locking columns
You can move the column guides by dragging them. The two lines forming the gutter between columns move in pairs and the space between the two lines remains consistent. Text and graphics already on the page are not affected when you drag column guides. Once you have set up your columns, you can lock them in place to prevent accidental moving.
To lock or unlock column and ruler guides:
From View menu, click Lock Guides.
Page numbering
To print page numbers in a publication, you must set the page numbers in the master pages. You do this by adding a page-number marker (a special character) that keeps track of the page order in the publication and ensures that each page is numbered correctly at all times.
To add page-number markers to master pages:
- Click the master page(s) icon
- Click where you want the page number to be placed.
- Press Ctrl + AIt +P. Page-number markers appear as RM (right master) or LM (left master) on the master pages but actual page numbers are displayed on each page of your document.
Changing page number style
By default, PageMaker applies the Arabic page numbering style ie 1,2,3,…..
To change the style:
- From File menu click Document Setup.
- In the Page setup dialog box, click Numbers.
- Select the numbering style you want to use then click OK to close the Page Numbering dialog box.
- To start page numbering from another number other than the default one ( which is usually 1), type the starting page number in Start
Page # box in the Document setup dialog box.
Rearranging pages
In PageMaker, you can change the order of your pages by rearranging page thumbnails (icons at the bottom of the window that represent pages). Changing the order of pages does not affect the text objects in your publication even though they may have moved to different pages.
Sorting pages
- From Layout menu, click Sort Pages.
- Select the page or pages you want to move either a single-sided page or a pair of facing pages. To select one page in a pair of facing pages, press Ctrl and click the page.
- Drag the selection to the location you want. To insert a selection between a pair of facing pages, press the Ctrl key and drag the selection over the facing pages. Notice that a black bar indicates where the selected pages will be inserted.
- Release the mouse button to drop the page onto the new position. PageMaker automatically renumbers the pages. The original page icon appears dimmed and another page icon appears beside the thumbnail to indicate its new page number.
- Click ok to change the page order.
Inserting page and column breaks
Sometimes you may want certain text or paragraphs such as a new chapter to start at the top of a column or page regardless of editing or reformatting elsewhere in the document.
To set a page or column break: .
- Select the paragraph or text you want to move to another column or page.
- From type menu, select paragraph to display the paragraph specifications dialog box.
- Check Column Break Before to force the paragraph to start at the top of the next available column or page break before as shown in Figure 4.19 to force the paragraph to start at the top of the next available page.
Adding headers and footers to a publication
A header refers to a line of text such as a page number, date, or a company name usually printed on the top margin of each page in a large document.
A footer on the other hand is a line of text printed in the bottom margin.
You can use the same header and footer throughout or use running headers and footers that indicates the content of each page as is the case in dictionaries, telephone and address directories.
Defining consistent headers and footers
To define header or footer common throughout the publication
- Click the master page(s) icon
- At the top of the page, click where you want header to appear or at the bottom click where you want the footer/header to be placed.
- Type the text that you want displayed on every page in your publication.
Defining Running headers and footers
- Select the text block you want to use to create running headers and footers using the pointer tool.
- Click Utilities, point to Plug-ins and then select Running Headers and Footers. A dialog box such as the one shown in Figure 4.20 is displayed with preview page that helps you correctly position the header or footer.
- Click the place icon and drag the header/footer place holder onto the text page.
- From content list box, select the words that will be used as headers or footers on every page e.g. the first word in the first paragraph then click Add. You can click the Preview button to preview the running headers and footers
- Click ok
Tracking and Kerning
Tracking refers to changing the visual denseness or openness of characters in a line while kerning is fixing particular pairs of letters that are too close or too far apart from each other such as To, Ta, We, we, Wo etc.
To apply a track:
- Select the text you want to track.
- From Type menu, choose Expert Tracking.
- Choose one of the five tracks options i.e. No Track, Loose, Tight or Very Tight as shown in Figure 4.21.
Very loose,
To automatically kern a pair of characters:
- Select the text you want to kern.
- From Type menu, click Expert Kerning
- In the dialog box such the one shown in Figure 4.22, click the appropriate slider button to make the text either tighter or looser.
- Click OK to apply the expert kerning.
To set a word or letter spacing:
- Select one or more paragraphs.
- From the Type menu, click Paragraph to display the dialog in Figure 4.23.
- In the Paragraph dialog box, click Spacing to display Spacing dialog box.
- In the Word Space or Letter Space text box, type new values.
- Click OK.
Measurements
Using rulers to measure objects
When using Page Maker, you can be able to design page layouts and graphics that are exact in measurement as specified using the horizontal and vertical rulers. The idea is to drag ruler guides to mark an area of the screen where you want to insert graphics or text that can fit in the guides.
For example, to draw a rectangle of 5cm by 5cm, set the rulers to measure in millimeters then drag and place ruler guides from the horizontal and vertical rulers to create a 5 x 5cm region on the screen. Finally, select the polygon tool and drag a polygon that fits exactly inside the marked region as shown in Figure 4.24.
Formatting graphical objects
Using the PageMaker tools and formatting effects, you can create very complex graphical objects.
Changing fill and stroke of graphics
To change fill or stroke of an object:
- Select the object by clicking it.
- From Element menu click Fill and Stroke.
- Select the type of fill or stroke you want.
- Select colors for the fill and stroke.
To apply fill:
- Select the object
- From Element menu, point to Fill then select the fill pattern you want to apply.
To apply stroke:
- Select the object
- From Element menu, point to Stroke then select the line style you want to apply.
Reshaping objects
To apply rounded comers to rectangles and squares:
- Select the rectangle or square you want to change comers
- From Element menu, choose Rounded Corners.
- Select the comer style you want, and then click OK. Figure 4.25 shows one rectangle without and another with rounded corners.
Reshaping a polygon
Once you draw a polygon, you can change it from the default rectangle or square to triangles, pentagons, hexagons and even a star.
To reshape a polygon:
- Select the polygon you want to reshape.
- Double click the selected polygon. PageMaker displays reshape placeholders.
- Reshape the polygon by dragging the vertices place holders.
To set the number of sides or create a star object:
- Select a polygon you want to reshape,
- From Element menu click Polygon Settings,
- In the Polygon settings dialog box, specify the number of sides you want, from three to a hundred.
- To create a star, enter a value in the Star inset box. A value of 0% means no star while 100% represents a star whose vertices meet at the centre.
- Click OK.
Copying an object:
- Select one or more objects.
- From Edit menu, choose Copy.
- Position the insertion pointer where you want to place the object.
- From Edit menu, select paste.
NB: You can quickly copy an object by right clicking it then selecting the copy command on the shortcut menu then paste in a new location. Alternatively, select the object then press Ctr+C to copy and Ctrl +V to paste in a new place.
Wrapping text around a graphical object
One of the best ways to enhance a publications visual impact is to wrap text around graphical objects. Wrapping determines how text behaves around an object. For example, you can select a wrap that makes text to surround an object without displacing it as shown in Figure 4.27(a).
To wrap text around an object:
- Select the object.
- From Element menu, choose Text Wrap to display the dialog box in
Figure 4.27(b).
- Click the middle wrap option as shown in Figure 4.27 (b)
- Specify a Text Flow option. The leftmost icon makes the text jump the object to the next page or column, while the middle icon allows text to jump over the object and continue on the same page. The rightmost icon creates a rectangular text wrap around all sides of an object.
- Enter standoff value (distance of the text from each side of the graphic) for the boundary.
- Click OK and notice how the text wraps around the object.
Importing graphics
You can import a graphic or text directly from another file or application by using a process called placing in PageMaker. In most cases, graphic files will be created in graphical based desktop publishers or picture editing software then imported into PageMaker. PageMaker has a very powerful object import engine that can be activated by the Place command.
The Place command is the main importing method. When you place text or a graphic, PageMaker establishes a link to the source file on the storage device (unless the file is an HTML document).
To import a graphic:
- Click the pointer tool. Select the frame in which you want to place the graphic. If you do not wish to place it in a frame then ignore this step.
- From File menu choose Place.
- Select the file you want to place, and then click the Open button.
- The cursor changes to become a loaded icon. Clicking any place on the paste board will place the new graphic at the clicked location.
NB: If you place using text tool, then the graphic that will be placed will be an inline graphic contained within the text object and will behave like text. It will become hard to format it separately as an object.
Grouping and ungrouping objects
You can group several objects into one, especially if you want to format, resize or move them as a single entity.
To group objects:
- Using the pointer tool, hold down the shift key as you click the objects to be grouped. This selects multiple objects.
- From Element menu, choose Group or simply press Ctrl + G on the keyboard.
- To select an object within the group then press Ctrl as you click the object.
To ungroup objects:
- Select the Group.
- From Element choose. Ungroup.
Locking objects
You can lock individual objects in place in order to help preserve the design of your pages through all stages of production. You can change the attributes of a locked object, provided the change does not affect the object’s size or position. For example, you can change a colour or fill applied to a locked object, but not its degree of rotation or its skewing angle.
To lock or unlock an object:
- Select the object.
- From Element choose Lock Position to lock. Otherwise select. Unlock to unlock a locked object.
Rotating an object
The process of rotating an object falls under a group of operations called transformations because rotation changes the angular placing of an object. Other transforming operations include skewing and reflecting objects. However, this book limits itself to rotating objects.
To rotate an object with the rotating tool:
- Select the object.
- Select the Rotation tool from the toolbox. The pointer changes and becomes a Star bust.
- Position the Starburst at a fixed point or around the centre of the object.
- Drag the starburst away from the fixed point, in the direction you want to rotate the object. To rotate an intervals of 45 degrees, press Shift as you drag clockwise or anticlockwise. The rotation lever helps you control the amount of rotation. The farther you drag the starburst away from the fixed point, the more control you’ll have when you rotate the object.
- When the object is in the desired position, release the mouse button.
Cropping an object
When you import a graphic from another program or publication, you can cut off unwanted parts of the graphic starting from the edges that you do not want to print by the crop place holders.
To crop a graphic using the cropping tool:
- Select the cropping tool, then the graphic that You want to crop to display the place holders.
- Position the cropping tool so that the place holder shows through the center of the tool.
- Hold down the mouse button to turn the cropping tool into a double sided arrow, and drag inwards until only the part of the graphic you want in your publication remains. To show more of the graphic, drag away from the center of the graphic.
- To move the graphic within its frame, position the cropping tool at the centre of the graphic and hold down the mouse button. (in Windows, hold down the left mouse button.
- When the hand appears, drag until you see the part you want to appear in your publication, then release the mouse button. .
Printing a publication
Because. the main purpose of any desktop publisher is to produce publications, it is impossible to do so without printing. The choice of a printer depends on the quality of hardcopy desired.
To print a publication:
- From File menu, click Print. A dialog box appears in which you can
specify the following:
The printer that you wish to use.
The range of print in the Ranges box if you do not wish to print whole document.
Number of copies to print per page in the Number of copies box.
Whether to print blank pages or not.
The print orientation.
Whether to print both pages.
2. Click Print to start printing.