
Introduction to databases
We are often faced with the need to keep, search for or give a report of daily experiences. This is the reason why many people use data storage methods like recording daily experiences in a diary. Traditionally, human beings used to manage data and information manually by using simple devices. However these methods have a number of weaknesses which include
- Unnecessary duplication of data
- Boredom and time wasting especially when searching for a Particular item.
- Misleading reports due to poor data entry and organisation
- Poor update of records etc.
Today, computerized systems have radically changec4the way data and information is managed by use of special programs called Database Management System (DBMS).
A database is a collection of structured and related data items organised so as to provide a consistent and controlled access to the items.
Database concepts .
Computerised database creation and manipulation is achieved using Database Management System software. This software facilitates the creation, organisation and maintenance of databases. Examples of database management software’s include Microsoft Access (Ms Access), Oracle, FoxPro, Dbase/V, Lotus Approach etc.
The functions of database management software are to:
- Allow the user add or delete records.
- Update or modify existing records.
- Organise data for easy access, retrieval and manipulation of records.
- Act as an interface between a database and other application programs.
- Ensure security for the data in the database by safeguarding it against unauthorized access and corruption (damage).
- Keep statistics of data items in a database.
Database models
Databases are classified according to the method used to organise data. The main database models are;
- Flat file 2. Hierarchical
- Network 4. Relational
NB: Current database models are called object relational and object databases. However these models will not be discussed in details in this book.
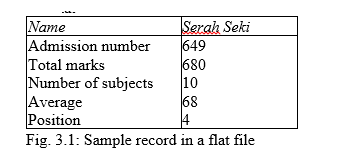
Flat files
In a flat file model, a database holds only one set of data and is not any different from the manual files. For example, the teacher’s assessment report may consist of performance cards for every student in a class. Another example of a flat file database are the cards used in a library books catalogue. The cards are arranged sequentially for easy access e.g. alphabetically using books’ titles or by authors’ names. Figure 3.1 below is a sample record of a flat file.
Hierarchical model
In this model, data items are arranged in hierarchical (tree) form as shown in Figure 3.2. To access level two data items, you have to first access level 1 data items. Level 1 item is called the root component. A specific single path leads to each item at lower levels. Hierarchical model is rarely used in modem database systems.
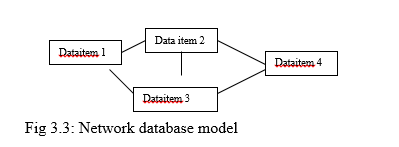
Network model
In this type of organisation, links are used to express the relationship between different data items, forming a network of items as shown in Figure 3.3. Access to one item can be through multiple paths and from any item. This model is also rarely used in modem database systems.
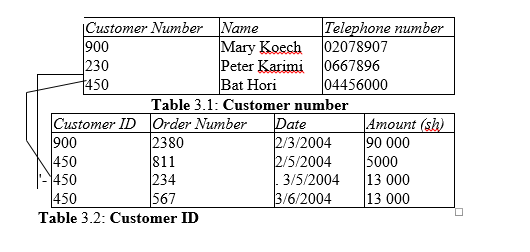
Relational model
This is the most common type of model used on minicomputers and microcomputers. In this type of organisation, related data items are stored together in structures called relations or tables. Relationship can be created between tables such that a record or records from one table relates to another or other records in another table. Tables 3.1 and 3.2 show customers and orders tables that are related by two fields; the customer number in Table 3.1 and customer ID in Table 3.2. In this case, the orders table shows that one customer with number 450 (Bat Hori) has made several orders.
Object oriented models . !
The next generation of database model will look at records as objects that are independent and relate with the other objects in the database. This concept is a bit difficult to conceptualise because such databases are still at developmental stage. However, many databases today combine object and relational concepts to come up with object relation models.
Features of a database management software
Most database software contains a collection of features that provides the user with a means to manipulate data in a database. These features include Tables/files, Queries, Reports generators, Form interface and a computer programming language within it. Microsoft Access database software that will be considered in this book has two distinct features used to automate operations namely Macros and Modules.
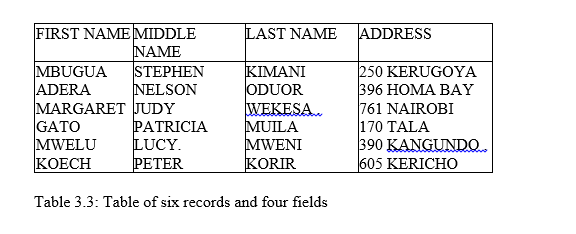
Tables/ file structure
This is a database structure that is used to hold related records. Tables are organised in rows and columns with each row representing a record while each column represents common fields in each record. Table 3.3 shows a table of six records and each record is made up of four fields.
Queries and query language
A query is a database tool used to search for or question a database on specific records. Because a query is a question posed to the database, it returns a result for the user. In Microsoft Access, this result is called a dynaset. For example, assume you work with the National Irrigation Board (NIB), you may wish to display all those farmers from Mwea Rice Irrigation Scheme who delivered rice in January to the National Irrigation Board. You can use a query object or statements to get the required records.
The query statements are written using a special language called
Structured Query Language (SQL). The user creates a, query by writing Structure query language statements such as:
Select
Farmer Number, Name, Month of Delivery
From
Delivery Table
Where
Month of Delivery = “January”
Forms/screen input
A form is a graphical interface that resembles the ordinary paper forms used to collect data. However, a database form enables the user to view and enter data into a table. Figure 3.4 shows a sample form used for entering a student’s marks scored in four subjects and. the date of admission. Form interface is a more convenient and easy way of entering and viewing records from a table.
Reports
Most database systems provide the user with a tool for generating reports from an underlying table or query. It is the report generator that provides the user with a means to specify the output layout and what is to be output or printed on a report. Table 3.4 shows a sample report for employees’ salaries.
Net Pay Report
Pay rol/no Last.Name First Name. . Basic salary PAYE Net salary.
07 Wangui Grace sh 80,000.00 Kshs 7,300.00 sh 72,700.00
09 Ochieng Mbenga sh 37,000.00 Kshs 3,800.00 sh 33,200.00
13 Mumbua Peter sh 22,000.00 Kshs 2,300.00 sh 19,700.00
20 Mbuvai Sicily sh 60,000.00 Kshs 5,700.00 sh 54,300.00
Table 3.4: Sample report
Macros
Some database software provides the user with a tool called a macro, that can be used to automate frequently performed procedures or tasks. For example, if you frequently use a particular form when you start a database program, you need to create a macro that automates the opening of the form.
Programming module
When your database becomes more and more complex, you may need a more powerful tool than the macros to automate your database operations further. Some database software come with their own computer languages associated with them. For example Microsoft Access comes with a language called Visual Basic included as a Module in the software. Using this feature, you can create a program that will print a query result over and over again until a certain condition is true. This can be illustrated using a simple statement like;
Print Student Report until NumberofStudents = 40 (Not a real command anyway).
NB: For the purpose of this book, only tables, forms, queries and reports, have been covered.
Data organisation in a database
One of the functions of a database system is to organise data for easy access, retrieval and manipulation. Data is organised from the simplest fQfll1 called a field to a very complex structure called a data,base.
Fields
A field is a character or a logical combination of characters that represent data item. For example, in a class list, the student name is a field.
Records
This is a collection of related fields that represent a single entity. An example of a record is the student report card that may contain the. student’s name, admission number, class, total marks, average and grade.
Files/tables
A file is a collection of related records. For example, the students’ file in a school database contains the details of all the students in the school.
Database
This is the highest in data organisation hierarchy that holds all related files ‘or tables. For example, a school database may contain students and staff tables/files.
Creating a database using Microsoft Access
Microsoft Access (Ms Access) is a package in Microsoft Office suite used for creating and manipulating databases. Because there are different versions of Ms Access such as Ms Access 95/97/2000 and XP, a general approach for carrying out tasks has been adopted in this book. However most of the illustrations are based on Access 2000 in order to maintain consistency.
Starting Microsoft Access
- From Windows desktop, click the start button.
- Select. Microsoft Access from the programs menu
- In the dialog box that appears when Microsoft Access starts, click Blank Access database as shown in Figure 3.5 then OK.
- The Save As dialog box appears. See Figure 3.6. This lets you specify the name and location where your database will be stored. Click Create to save the database.
- Microsoft Access database objects window is displayed from which I you can choose the type of object to create such as tables, forms, queries etc.
Microsoft Access screen layout
Like the other applications discussed earlier, Ms Access application Window has a title bar, menu bar, toolbars and status bar. However instead of having a work area like that ofMs Word or Excel, it provides the user with an object window from which you choose the type of an objectto work with such as tables, forms, reports e,tc. See Figure 3.7.
Exiting from Microsoft Access
Because Microsoft Access consumes a large amount of computer memory it is advisable to exit from the application at end of each working session.
To exit:
From the File menu, click exit the close button on the title bar.
Guideline on designing a good databases
To design a good database which will require little time to maintain, consider the following:
- Carefully study the requirements of the user in order to define all the data inputs, outputs and relationships required.
- Design a draft database on the paper to determine the number of files or tables required.
- Divide the information into separate fields, records and tables to allow flexibility in manipulating the database. This process of dividing information into independent tables to avoid repetition of data entries items is referred to as normalizing a database.
- Define a field for each table that will be used to identify each record uniquely. This field is referred to as a primary key
- Give the most important fields the first priority when constructing a table structure. Important fields are those that are used in sorting’ and querying the database. “
- Design data entry forms needed for the database
Creating a table/file structure
To define a table structure:
- From the Microsoft Access objects window, click the tables tab then new
- From New table dialog box, select Design View Figure 3.8 appears. :
- using the grid displayed, enter a unique name for each field in the table. A field name must start with a letter and can be up to a maximum of 64 characters including letters, numbers, spaces and punctuation.
- Choose the correct data type before adding the next field. By default, Ms Access inserts Text as a data type. Figure 3.8 shows various data types used in Ms Access.
- To save the table, click the Save button on the standard tool bar or save from the file menu.
- Access will ask you whether you want to create a Primary Key, click Yes.
Description of field data types
The type of data to be used in a database must be clearly defined for the purpose of manipulation and storage. For example, if a field is to be used for calculation, it must be defined as a number. The data types allowed in Ms Access include:
Text
This type includes alphabetic letters, numbers, spaces and punctuation. Use this data type for fields that do not need to be used for calculations such as names, places, identification numbers etc. This type of field accommodates a maximum of 255 characters.
Number
These are fields made up of numeric numbers 0 to 9 that are to be manipulated mathematically.
Memo
This is a field made up of alphanumeric (both alphabetic and numeric) data. Instead of using Text use this data type if you need to enter several paragraphs of text because it accommodates a maximum of 32 000 characters.
Date/Time
Used to identify a field as either a date or time. This is because date/time values can be manipulated mathematically in a database. For example, you can calculate the age of a person from the date of birth to the current data.
Currency
Used to identify numeric values that have decimals or fractions. Use this data type especially when dealing with monetary values such as fees balance, amount sold etc.
AutoNumber
This is a numeric value used if you wish Ms Access to automatically increment the values in a field. For example when entering a list of forty students and you have a field labelled StudNumber, the numbers will increase by one every time you enter a new record.
Yes/No
This is a logical field where an entry is either a yes or a no, true or a
false. For example a field may require you to answer whether you are a male or a female.
OLE Object
OLE stands for Object linking and Embedding. This type of field is mostly used with graphical user interface applications for inserting graphical objects such as pictures, drawings charts etc. – – –
Field properties
As you create more and more complex tables, you will find a need to use the field properties to specify finer details related to fields and the table entries expected. The field properties depend on the type of-the field selected. For example when you click on a Text field then the General tab you will see properties associated to text data type as shown in Figure 3.9. The various properties are:
Field size
This allows the user set the number of characters in a field instead of the default 50 for text fields for numeric field’s integer and long integer, Byte, Single and Double.
Integer and longer integer: Accept numbers with no decimals.
Byte: Can only accept a number from 0-255.
Single and double: Accept numbers with decimals. Single accommodates up to 38 decimal places while double, accommodates up to 308.
Format
Determines how information appears on the screen and when printed. For example, you can format a number to scientific, currency, percentage or general format.
Decimal places
For number and currency fields you can specify the number of decimal places.
Input mask ,
Input mask automatically formats the field entry into a specified format. F or example, if you enter a number such as 02000 I 00409874 and the input mask is set as 000-(00000)-000000, it is automatically displayed as 020-(00100)-409874. This property is mostly used to format phone and address entries.
Caption
This is a more descriptive name for a field to be used in a table or a form display. For example the caption for StuName could be Student Name.
Default value ,
This is a value that will appear automatically in the datasheet or form if ‘ nothing is entered by the user to change it. For example = Date -( ) automatically displays the current date in a date field.
Validation Rule
Logical expression restricts the values to be entered in a field. ‘For example, if you want to restrict marks entered in a field to values between
, zero and a hundred, type >=0 And <= 100.
Validation Text
The message that appears once the validation rule is violated. For example, you may create a validation text for the above validation rule I to display “Enter a number between 0 and 100” whenever the user enters I a value outside this range.
Required
Determines if an entry must be made in the field before you proceed to the next field or record. For example, if a primary key is required, you must enter before you proceed.
Allow Zero Length
This allows the user to proceed without making any entry in the field set as Zero length.
Indexed
An Index, facilitates the organisation of records for easy search. A primary key is an example of an index set to No duplicates to control double entry of a record (redundancy).
Primary key and Indexes
An index is a database feature used to speed up search and sort operations in a table. A key field also referred to as a primary key is a special index that enforces uniqueness in a table so that one record is not entered twice.
Ms Access uses the primary key to search for data stored in a table as well as define relationships between tables. Once a field is set as primary key, its datasheet is automatically indexed or sorted using the primary key.
To set a primary key:
- Open the table in design view.
- Select the field you want to set as the primary key by clicking in the row header to the left of the Field Name.
- Click Set Primary key button on the tools bar. A key should appear on the left of the field name as shown in Figure 3.10.
To see another field as an index other than the primary key: 1. Open the table in design view.
- Ensure that non of the fields is selected as a primary key.
- Click the Indexes button on the tool bar that is located next to the primary key. The index design grid is displayed on the screen as shown in Figure 3.11.
- In the index name column, type in the name you want to give to the index.
- In the Field Name column, click the cell to display a drop down list. From the drop down list, select the field to use as an index.
- In the Sort Order column, select either ascending or descending.
- In the lower portion, specify whether you want to make the field a primary key by selecting yes for primary and unique, and Ignore Nulls to ensure that data is entered into the field before proceeding.
- Close the dialog box.
Entering data into a table
To enter/append data into a table:
- Open the database in which the table is located
- Click the Tables tab then double click the table you want to add records to.
- Enter each record field by pressing the tab key to move to the next. Once you reach the end of the record and move the cursor to a new row the previous record is automatically saved.
Editing a database
Modifying the Datasheet view
To adjust the column size:
- Point to the column border between the field’s header then drag to the require size.
- Alternatively, click on the format menu then point to column and click on width
- Type the desired width
To adjust row height
- Point to the border between two rows in the row header and then drag.
- Alternatively, use format menu, then Row height.
To reorder fields:
- Select the column of the field you wish to move by pointing to the desired file name.
- Drag the column right or left to the top of the field where you want your field to appear and then drop.
Modifying the table structure
Once you create a table, you may need to add more fields, remove some fields, reorder the fields or change fields data types and properties. Before you modify the table it is important to save a copy to avoid losing everything in case you make a mistake
To make a copy of your table:
- From the file menu, click save as /export
- From the dialog box that appears, choose whether to save to another (external) database or the current.
- Type a new name for your table and click OK.
To modify the original table:
- Open the table in design view by clicking the button that looks like a pencil and a set square placed on the edge of a ruler.
- Select the field or fields to be modified and make the necessary changes.
- Click the Save button to save the changes.
NB: If a table contains data and you make changes to the field data type, Ms Access may refuse to implement the changes. To avoid this problem, exit without saving and delete all the records from the table then return to the design view. You can then import a copy or copies of tables you backed up.
To import a table from another database:
- From the File menu, point to Get External Data then click Import
- From the dialog box that appears, select the database you wish to import data from then click the Import button. Objects dialog box is displayed as shown in Figure 3.12.
- From the objects dialog box displayed, click the Tables tab
- Select the table(s) you wish to import then click OK.
Form design
Tables display many records at once from the database and in some cases you may not be able to see some fields properly. A form is an interface that enables the user to view and make data entries into an underlying table more easily. Figure 3.13 shows a sample form used to enter records into a books table.
In Microsoft Access, a form is designed using graphical objects called controls. A control is an object such as a text box, check box, command button or shapes that you place on a form design grid to display data or perform actions. There are two types of controls you can place on the grid: bound and unbound controls. A bound control is one whose source of data is a field in a table or query while unbound control is a control that is not connected to any data source.
You design or modify a form layout by dragging these controls to the required position. Figure 3.14 shows a form layout grid for a table called exam entry.
Creating a form layout using form wizard
To create a form layout, you can either use the form wizard or start from scratch. Using the form wizard you can create either a columnar, a tabular a datasheet or a justified form layout.
Columnar form: The fields for each record are displayed down a column i.e. each value displays on a separate line with field labels to the left. Tabular: Records are displayed from left to right across the page and labels appear at the top of each column and each row represents a new record.
Datasheet: The form resembles a table datasheet view.
Justified: One record occupies the whole form.
To create a form using the form wizard:
- Open the database for which the form is to be created e.g.”EMPLOYEES”
- Click the Form tab then, New. From the New form dialog box that appears, click Form Wizard.
- Select the table you want to create a form for then New, A dialog box appears.
- Click the name of the table or query that includes the data you want to add into the form, and then click OK.
- From the fields list window, select the fields to add into the form by clicking the> button or click>> to add all fields then
- From the layout dialog box, select the layout you wish to use e.g. Standard then. click Next.
- In the Form title dialog box, type the name of the form then click Finish. Ms Access will automatically display the form on the screen.
Creating a form using autoform wizard
You can easily create a form using the Autoform wizard. This wizard creates a form for you automatically by asking you very minimal questions. The form includes all the fields from the selected table.
To construct an autoform tabular.
- Make sure your database is open
- Click the Form tab, then New.
- In the new form dialog box, select an auto form layout e.g. columnar
- In the “Choose the table or query where the object data comes” select the table you wish to create a form for then click OK. The form with all fields will be displayed.
- Click the Save button to save the form.
Creating a form from scratch
- Open your database
- In the database window, click the Form tab then New
- From the New form dialog box, select Design view
- In the “Choose the table or query where the-object data comes” select the table you wish to create a form for then click The form with all fields will be displayed.
To add controls onto the grid:
- Click the View menu, then. Field list command . The table you selected fields list is displayed.
- Drag and drop each field and arrange them on the grid.
- Save the form by clicking on the save button.
Data manipulating in a form
Adding and displaying records
The form provides the user with navigation buttons located at the bottom that can be used to navigate the form
The functions of the buttons can be summarized from left to right as follows
- Displays the first record in the table
- Displays the previous record.
- Displays the next record
- Displays the last record.
- Add a new record.
Formatting fields/controls in a form
To format fields in a form;
- Open the form in design view
- To resize, click the controls then position the pointer on the outline of the control then drag to the required size.
- To move, click the control and position the pointer onto the place holder or inside the control then drag to the required location.
Searching for specific records in a database
One major reason for use of a computerised database is the ability to search and retrieve specific information more efficiently. Rather than searching through endless filing cabinets, you simply enter an instruction and let the database do the rest. To search for data in a database, Ms Access provides the user with two search tools:
- Find command 2. Queries’
Using the find command
With a large database, the Find command saves your time when you need to move a record pointer to a particular record.
To search for a record:
- From Edit menu, click Find. The find dialog box appears in which you specify the field you want to search for in the” Find What” box as shown in Figure 3.16.
- Type the name of field you wish to search for in the Find What text box. .
- In the Search box (Figure 3.16), specify whether to:
Search All
Search Down to up or
Search up to bottom
- In the match box, you can select one of the match types:
Any part of field – As long as a string of characters to be searched are present in a word, then all the words having the string will
be searched e.g. “Berg” finds Berger, inselberg etc.
Whole Field – Searches for the whole field for example, “Berg” will not return Berger, inselberg but specifically berg if it is in the database.
tart of Field – Specifies that, the searched word should start with the specified search string e.g. “Berg”
- In searching, you can also check or uncheck;
Match case – Finds only text that has the same pattern of upper and lower case as the one specified in the Find What box.
Search Field As Formatted – Select (check) to find data based on its display format e.g. ‘a date stored asa number 1/5/98 but
displayed as 05-Jan-98
Search Only Current Field:- Select to search through all records for the current field only.
- After you set the search conditions click the Find First button.
- If you want to search for the second record or other records with the same field, click Find Next button.
You can use a wildcard e.g. asterisks (*) if you are not sure of the correct search word that will find all records that match the specified search string. For example, if you wish to search for all names that start with letter “J” in a school database, type J *. All names that start with J e.g. John, Jane Joy, Joyce and James will be displayed.
Using Queries
Queries are the fastest way to search for information in a database. A query is a database feature that enables the user to display specific records as well as perform calculations on fields from one or multiple tables. You can analyse a table or tables by using either a select query or an action query. However, only the select queries will be discussed in detail in this book
Select query
This is the most common type query used for searching and analysing data in one or more tables. Select query lets the user specify the search criteria and the records that meet those criteria are displayed in a dynaset
Action query
These are queries that are used to make changes to many records once. They are mostly used to delete, update, add a group of records from one table to another or create a new table from another table.
The four types of a action queries found in Microsoft Access are:
- Update – Updates data in a table.
- Append query – adds data in a table from one or more tables.
- Make table Query – Creates a new table from a dynaset.
- Delete Query – Deletes specified records from one or more tables.
Creating a select query
- Ensure that the database you want to create a query for is open.
- Click the Query tab, then New.
- From the New query dialog box, choose either to create a query from in Design view or using a Wizard.
- To design from scratch, click Design View. The Show Table dialog box appears from which you can add a table or tables you wish to create a query for as shown in Figure 3.17.
- Click the table from the table/ query list and then click Add.’
- Click Close to close the show table dialog box.
- The query design grid opens. In Microsoft Access it is called Query By-Example. This lets the user to design a query. Figure 3.18 is QBE grid for a table called Exam.
Parts of the query grid
Field row- Fields from a table or tables to be used are arranged in this row. Each field should occupy its column.
Sort row – By clicking the down arrow in the sort cell, you can specify the sort order i.e. ascending, descending or no sort.
Show row – By clicking the Show box, you specify whether to display the field in the query results: When the box is not checked, the field will not be displayed.
Criteria row – This is where you type conditional statement that will be used by the query to display specific records.
Or row – Used to specify an alternative condition e.g. if you want to display records with a field called City with items Nairobi or Embu, type Nairobi in criteria cell and Embu in the Or cell.
To add fields into the query grid:
- Open the query in design view
- From the field list of the underlying table, drag each field and place it in the field row
Specifying the search criteria
In order to search for a particular set of records, you have to enter a conditional statement or statements in the criteria row. For example if you have a table called employees with one of the fields as salary, you can display all the employees earning more than Shs. 5,000, by typing >5000 in the criteria row, salary column.
To define criteria, use either relational or logical operators. Relational operators include less than «), greater than (», greater than or equal to (>=), less than or equal to «=), not equal to «» and equal to (=). Logical operators include AND, OR and NOT.
Use AND to display values in a specific range. For example, to display records from the employees table with salaries above 4000 but less than 6000, type, >4000 AND < 6000 on the criteria row in the salary column. All the employees who meet this condition will be displayed.
Use OR if you wish to get either one of two values. For example if you wish to get those employees either in Nairobi OR Embu.
If you want to display data in a particular range use the word Between. For example, instead of typing , >4000 AND < 6000, type Between 4000 And 6000.
If you want to list all records except those that you do not want to see use NOT. For example if you type NOT 6000 in the salary column of the employees table, all employees records will be displayed except. those with their salary as 6000.
To display records you are not sure of the field name but at least you can remember a few characters, use LIKE and the wildcards. Wildcards are
special symbols mostly an asterisk and a question mark used in place of other characters. For example, to display all names starting with “Sm” followed by any other character, type Like Sm? Like */*/1993 lists records created in 1993 regardless of the day or month.
Saving and running the query
- Click the Save button on the standard tool bar or save command from the file menu.
- In the name box that appears, type in the name of the query then click OK.
- To run the query in design view, click the Run button on the toolbar as shown in Figure 3.19 or Run command from the Query menu.
- You can view the results of your query any other time by selecting the query, then clicking the Open button from the database window.
Sorting the dynaset To sort a dynaset:
- In the sort row, click the down arrow that appears to specify the sort order i.e. ascending or descending of the desired field.
- Display the dynaset.
Modifying and updating a query
To delete fields from the query grid:
- Open the desired Query in design view.
- Select the field column you wish to delete
- Choose Delete from the Edit menu.
- Click the Save button to save the changes
To adjust the column size in a query
- Open the desired query in design view.
- Position the mouse pointer at the boundary that separates columns then drag it to the required size. Alternatively, double click the boundary to auto fit cell content.
- Click the Save button to save the changes
To modify a criteria statement ‘select query,
- Open the desired query in design view.
- Modify the criteria statements as desired, 3. Click the Save button to save changes.
- To test whether the changes have been effected, click the Run button to display the results of the query.
Performing calculations in a query
Unlike tables, queries let the user perform mathematical calculations on numeric data. You can perform calculations in a query by using the Total functions or by creating basic formulas
Creating basic formulae
To create a formula that calculates the total marks in an underlying table e.g. Exams table:
- Open your query in design view
- In an empty cell, preferably the immediate last field cell, type an expression that includes a field name of your choice such as:
Total: [Math’s) + (Physics) + (Chemistry) as shown in Figure 3.20

3. You can then set the criteria, and other query options.
- Save the query and run it. The results of the calculations will be displayed in the dynaset as shown in Figure 3.21. However, this field is not added to the underlying table(s) because query results must always be based on the most current data in the database.
Using Total functions .
With a query, you can analyze all records fields using the inbuilt functions such as Sum, Average, Minimum and Maximum etc. To use the total functions:
- Open your query in design view.
- Click the Totals button on the query toolbar.
- Select the field you want to analyze.
- For each field to be analyzed, click its cell in the Total row, and then select any of the functions as shown in Figure 3.22.
Sum: Adds all the numerical data items.
Avg; Calculates the mean of all numeric data items in the field column.
Min: Returns the minimum value from the field column.
Max: Returns the maximum value from the field column.
Count: Returns the number of items field column.
- Set criteria and other options then click run to preview the results
- Save the query.
Printing a query:
- Open the database window of the database containing the query you want to print
- Click the query tab then the query you want to print.
- From the file menu, click print Set the printing options then click the OK. Button.
Creating a select query from multiple tables
When you use fields from more than one table in a query, there should be a common link or relationship between the tables. There are three type of relationships
- One – to – One
- One -to – Many
- Many -to – Many
In a one -to – one relationship, for a particular field in one table (the main table), there is only one matching record in the related table and vice versa. In a one -to – many relationships, for a particular field in one table there are several matching records in another table. This is the most common type of relationship. For example, a person may make one order, or several orders. For this instance, there is only one record with that person’s details say in customers’ table, yet there are several records related to the same person in the Orders table.
In a many -to – many relationship, for particular records in one table there are several matching records in the other table and vice versa. This is not very common.
Defining relationship between tables
- Make sure your database is open.
- From Tools menu, choose Relationships. The relationship dialog box appears.
- Select the tables to add then click the Add button. .
- To create relationship, click on the common field and drag it to the second table. The fields used to create the relationship must be of the same type and properties.
- To Enforce Referential Integrity, right click the line joining the two tables then click Edit. An Edit relationship dialog box such the one in Figure 3.23 will be displayed.
- Make sure Enforce Referential Integrity is checked to ensure that all records entered in the related table exists in the primary table.
- Click OK to close the Edit relationship dialog box.
To create a query based on related tables
- Start the database window and click the Queries tab,
- Select design view and click OK.
- From the show table dialog box, click the tables you want to base your query on and then click Add.
- Relationship between various tables will be displayed as shown in Figure 3.24. Add the fields from both tables into the QBE grid.
- Save and Run the query.
Creating reports
Reports are used to summarize and present information from a database. A good database software should enable the user to generate database reports and print them for presentation and distribution. This process is referred to as formal presentations. As with forms, a report layout is also designed by placing controls on to the report layout grid as shown in Figure 3.25.
Parts of a report layout in design view
Report Header-This contains unbound controls that displays title of the report.
Page Header – Contains heading or labels data items to be displayed in every column.
Detail – Holds bound controls that display data items for the table or query it was created from.
Page footer holds a control that is to be displayed on every page such as the page number and date. For example =Now() displays the current date and time as set in the system clock.
Report footer – Used to display summary from a report such as the grand total for numerical data in a particular field column.
Creating a report using report wizard
Just like the form wizard, report wizard takes the user through a number of steps by answering a few questions and Ms Access automatically does the rest.
To create a report layout:
- Ensure that the database is open.
- Click the Report tab, then New
- From the/New Report dialog box, click Report Wizard then
- Select a table or a query then the fields to be added to the report then click next.
- The wizard asks you whether you wish to add any group. Grouping is used to categorise records using a particular field for better presentation or if you need to perform calculations on a group of common items. For example, to categorise books in a library database according to ISBNNumber, double click the field then click Next. (Figure 3.26).
- In .the dialog box that appears, select the Sort option if you want to sort the records. You can also click the Summary options button in case you want Ms Access to perform calculations on numerical fields. In summary options dialog box, select the Summary options you want performed e.g. Sum, Average etc. as shown in Figure 3.27. Click OK to close the summary options dialog box then Next.
- From the layout dialog box, select the type of layout such as stepped, block etc. Select page orientation i.e. either portrait or landscape then click Next.
- In style dialog box, specify the report style by selecting either bold, casual etc.
- Finally enter the name of your report then click finish. The report will be displayed on the screen in print preview mode.
Creating a report in design view
Just like with forms, you can create a report in design view by placing controls on the report design grid.
To design a report in design view:
- In the database window, click the Reports tab then New.
- In the New Report dialog box, click Design view.
- Click the name of the table or query you want to generate a report from.
- Click the OK button. You will get a report design grid where you can place data controls.
- From the view menu, click Field List.
- To design the layout, drag each field from the field list to the layout grid and drop it where you want the data column to appear.
- Once you finish placing controls, click the Save button.
- In the save as dialog box, enter the name of the report and click OK.
- To view the report, click the Print Preview button. Alternatively, click Print Preview from the file menu.
Modifying a report layout
To modify headers and footers:
- Open the report in design view.
- Click the report header or footer you want to modify.
- Make the necessary changes and then click the Save button.
- Click the Print Preview button to view the changes.
To add more controls onto the report layout:
- Open a report in design view.
- Display the field list by clicking the Field list button or using the View.
- Select one or more fields in the field list and drag view to the Report design grid.
To resize or move a control:
- Click at once to select it. Position the mouse pointer to on the place holder, until the mouse pointer changes to a double-sided arrow. Drag the pointer to resize the control
- To move a control, select it and place the mouse pointer on the place holder until it changes to a hand.
Creating labels
A label is a sticker or piece of paper put on an item for the purpose of identification. Examples of stickers are mailing labels, label on the floppy disk where you write your name etc. Using the report label wizard, Microsoft Access lets you easily create labels of different sizes.
To create a label using the report wizard,
- Open the your database
- From the database window, click the Report tab then New
- From the New Report dialog box, select Label Wizard the table or query from which the labels are to be generated from.
- Label wizard starts running as shown in Figure 3.28.
- From a series of dialog boxes displayed, specify the label size, font, and fields to be included in the label, whether to sort the labels, the name of the label then click Finish.
Modifying labels
Just as you can modify a report or a form, you can also modify a label by manipulating the layout controls.
To modify a label,
- From your database window, click the Report tab then the Design View button.
- The label design grid is displayed. Edit the layout as desired, save and close the design grid.
- To view the modified label, click the Preview button from the database window.
Printing the report and labels
Before you print a report or a label, you should first set the page options i.e. the margins, paper size and orientation.
- Open the database that contains the report you want to print.
- Click the Report tab, select the report you want to print then click the Preview button.
- From the File menu, click Print.
- Set the printer options i.e. the printer type, print range and number of copies.
- Click OK to print.