
These are software that allow records to be entered in the system and to be retrieved in a specified format. Examples are Ms Access, Paradox, Dbase, FoxPro, Sybase.
From the above examples, we shall look at Ms Access.
7.1 MS ACCESS
MS Access is a database tool used to store, maintain and use a collection of information that is organized to serve a specific purpose.
A database is a collection of related information organized to serve a specific purpose.
Benefits of using database to store information
- Fast retrieval of information i.e. data is easier to find.
- Easy to maintain accurate and up to date data.
- Easy to analyze and make summary reports on the stored data.
- Easy to protect your data from unauthorized access.
- Information can be accessed in many ways.
Database objects
Tables, Queries, Forms, Reports, Macros, Modules.
Tables
Collection of data about a specific subject e.g. customers, employees e.t.c. In a table, data is organized in fields (columns) and records (rows)
A table consists of:
1. Field names
2. Data types
3. Description
Field name: – these are column headings for the table being created.
Data types: – the attribute of a field that determines the type of data it can hold e.g. text, Numeric, Currency etc.
Description: – This column is optional but can be used to give a detailed of the field name.
Primary key: – This is a field that is used to uniquely identify each record stored in a table.
Queries
A query is a type of database search. It enables you to retrieve data that has met conditions you specify, indicating data from tables.
The word „query‟ literally means „to ask‟. Access queries provide a way of asking about your data. When you design a query, you identify the fields to be included and the records to be retrieved from one or more tables.
You can as well update or delete multiple records at the same time, perform built
in or custom calculations on your data.
Forms
They are used for adding new data, editing or displaying existing data. This data can be in a table or a query. Information entered directly in a form will appear in Tables automatically.
Reports
The desired result of any database is to provide information in the form of reports. You can print reports from tables or queries in any desired format. Reports are used to summarize and display data from your database. It displays the most up-to-date information.
Modules
They are collection of codes using Access Basic programming language. If programming is necessary, you can write modules.
Database definitions
- Field: This is any piece of information in a database e.g. Names, Age, Birth date.
- Record: It is a collection of several related fields.
- Database File: This is a collection of several records.
Applications of databases
- Educational applications: Preparing students‟ reports, class schedules.
- Retail applications: This may include sales projections and Quotas, Market analysis e.t.c.
- Legal applications: This may include client information and case schedules.
- Financial applications: This may include stock market forecasting and end of year financial reports.
PLANNING REQUIREMENTS
In order to plan an efficient database you need to ask yourself some questions, these include.
- What information do I need to keep track on?
- What is my hardware and software capability?
- Who will be using the database?
- What are the projected future database needs?
Using the example of student records database, let us design, implement and use Access as a database manager.
The subject/object here is a student and the suggested field names could be;
- Student‟s name
- Student‟s registration number
- Student‟s address
- Parent‟s name
- Age
- Sex
- Course taken
- Subjects
- Hours a subject takes
- The lecturer
- Lecture‟s rate per hour
- Tuition fee
- Course duration
- Date of admission
- Amount paid
All the above listed is information about one object – student. There is need however to limit the list to the subject area only.
Therefore the next stage you ask question (s) like:
Do I want to store information about lecture’s records or student’s?
If I want the student’s records, should I include fee payments records, timetable or examination records?
Let us assume we wish to store student fee payment records only. This will reduce above list to the following.
- Student’s name
- Student’s registration number
- Student’s address
- Course taken
- Age
- Sex
- Date of admission
- Amount paid
7.2 WORKING WITH ACCESS 2000
Starting Access
- Click start button and move to programs.
- Move to Ms access and click.
- The resulting dialog box prompts you to create a new database using either blank database, database wizard or existing database.
- Click „blank database, option since you are creating a new one. To open an existing one, click the appropriate option.
- The „file new database‟ window appears. Enter the name of the database you want to create i.e. (Macarl student record system) and click Create.
- A database window appears. It is blank since there are no tables, queries, forms, and reports.
NB: The database name (Macarl student record system) is displayed on the title bar of the database window.
7.3 WORKING WITH TABLES
When you create a database in Ms Access a new table is created for the user. In order to customize the table follow the following steps.
- Select view under the datasheet tab.
- Select design view
- The „table window‟ appears with field name, data type and description columns (as discussed in tables earlier)
- In the Field name, type the first field i.e. assuming we are creating a table on students, one suggested field could be Student name. Therefore, type Student name.
- Click data type column and select the data type, (in this case text)’
- Click the description column and describe the field you have just made. However it is optional and could be skipped.
- Define all other student‟s detail fields by repeating steps 5-7.
- Close the table and respond affirmatively to „save changes‟ dialog box.
Save the table as „students‟
NB: your database now has one table object.
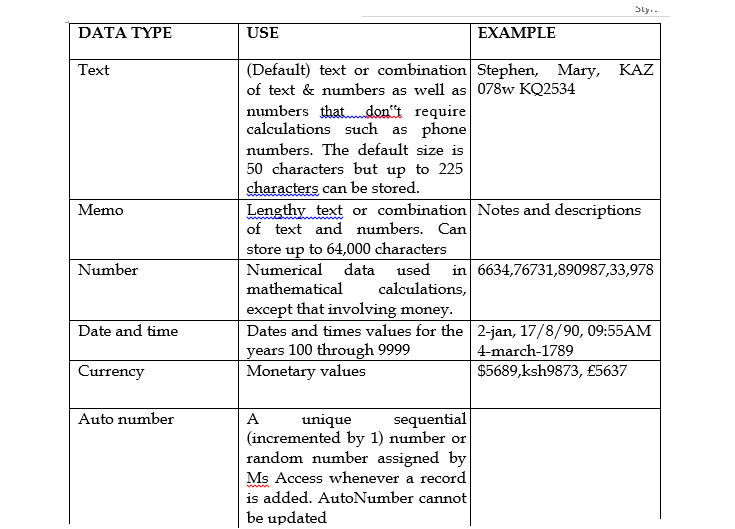
A unique field is required in every table. This is an identification key like the national ID card that identifies each person individually. The unique key is referred to as primary key in Access. It is useful when you want to avoid entering duplicated records.
If what you design does not have a unique field, Access lets you include a
special field called AutoNumber which contains sequential or random numbers that Access automatically generates as you add new records.
Setting a primary key
1.In the table design view, click inside the key you want to define as the primary key.
2.Click on the primary key in the design tab.
N/B: If Access has already taken AutoNumber as the primary key, delete the record by choosing it from the border and pressing delete key from the keyboard.
Using the data sheet view and the design view
1.Double click on the table to open it
2.The table is open displaying all the field without any record
3.At this juncture, you can add records in your table
4.In case you want to change the a field name, click view from the menu bar
5.Click design view, highlight the field you want to rename and type the new name.
N/B:
Datasheet view allows you to add records while you modify the table in design view.
You can rename a field in data sheet view by double clicking the field and typing a new name
Sorting records in the table
Sorting helps to quickly locate the highest or the lowest value in a list E.g. you can sort to know who has paid the highest amount.
It also helps arranging data in order of priority.
Procedure
1) Position the cursor in the field you want to sort.
2) To sort in ascending or descending, click the sort ascending/descending from the home tab.
Insert, Delete or Rename a column
To insert a new column to the left of the current column, click on add new column on table datasheet view.
To rename a column, double click its heading and then type the name desired.
To delete a column, click the column heading to select it and then click
Delete on the home tab.
7.4 RELATIONSHIPS
After setting up different tables for each subject in a database, there is need to let access know how to bring the information back together. The first step in this process is to define relationships between the tables. After that, queries, forms, reports can be used to display the information from all the tables at once.
A relationship is an association established between common fields in two tables. It can be one-to-one, one-to-many or many-to-many relationship. A relationship works by matching data in key fields usually a field with the same name in both tables.
A one-to-one relationship
In a one-to-one relationship, each record in Table A can only have one matching record in Table B and each record in Table B can have only one matching record in Table B.
A one-to-many relationship
A one-to-many relationship is the most common type of relationship. In a one-to- many relationship, a record in Table A can have many matching records in Table B, but a record in Table B has only one matching record in Table A.
A many-to-many relationship
In a many-to-many relationship, a record in Table A can have many matching records in Table B, and a record in Table B can have many matching records in Table A. This type of relationship is only possible by defining a third table (called a junction table) whose primary key consists of two fields, the foreign keys from both Tables A and B. A many to many relationship is really two one-to-many relationships with a third table.
7.5 WORKING WITH QUERIES
Creating a query
Query is a database search. It enables you retrieve data that meets certain criteria. You can use a query to create a table, a report or a form. When you have a frequently asked query, you can save it so that each time you need the information, you just run the query instead of opening the table.
Creating a select query
- In the create tab select query design.
- The show table dialog box appears. In this dialog box, you select the table(s) that you want to base your query on.
- Select the table and click Add.
- Click close to close the dialog box and get to the query window.
- Place the cursor in the row for „field‟ and click to chose the field(s) you want in your query.
- To view the output, click on the „RUN‟ button on the query design toolbar.
Saving a query
- Close the query box by clicking „X‟ button
- Click yes when prompted to save the query.
- Type the name of the query in the „save as‟ dialog box. In our case „students balances‟
- Click Ok
A query that meets a given criteria
- Open the table you want to query.
- In the database window, click the query tab.
- Choose the table(s) that you want to query, in the show table dialog box, click add and then close.
- In the field area, select the field(s) to be included in your query E.g. you can select „student‟s name‟ and „amount paid‟ fields.
- In the criteria row, type the criteria you want to base your query on e.g. if you are querying for all the students who have paid over Ksh2000, type >Ksh2000 under the „amount paid‟ field.
- Click the run button „!‟ on the toolbar.
- Save the changes you have made.
Searching for words that begin with a specified letter.
- In the database window, click the query tab.
- Click the „New‟ button and then select design view.
- Click OK.
- The show table dialog box appears. In this dialog box, you select the table(s) that you want to base your query on.
- Select the table and click Add.
- Click close to close the dialog box and get to the query window.
- Place the cursor in the row for „field‟ and click to chose the field(s) you want in your query.
- In the field’s Criteria cell, type LIKE [Enter the first character to search by:] & “*”
- Click the run button „!‟ on the toolbar.
- Save the changes you have made.
Searching for words that contain a specified character.
- In the database window, click the query tab.
- Click the „New‟ button and then select design view.
- Click OK.
- The show table dialog box appears. In this dialog box, you select the table(s) that you want to base your query on.
- Select the table and click Add.
- Click close to close the dialog box and get to the query window.
- Place the cursor in the row for „field‟ and click to chose the field(s) you want in your query.
- In the field’s Criteria cell, type LIKE “*” & [Enter any character to search by:] & “*”
- Click the run button „!‟ on the toolbar.
- Save the changes you have made.
7.6 FORMS
Working with forms
A form is basically a way of displaying data, record by record. It is the most convenient object in which a non-experienced user of Access can enter records. Any record entered using a form is automatically entered into the table. In forms, you can edit, sort, filter, add/delete records etc.
To create a form using wizard
In the create tab select form. A new form will be created for the user. Click on close to save the form. Double click on the saved form in order to open it. You can now enter new records using the form.
(Object linking and Embedding)
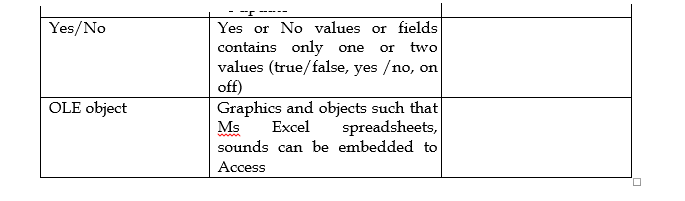
O.L.E: its an object such as the Ms- word document, MS –Excel spreadsheet, graphics, sound or other binary data linked to or embedded in a MS-Access table.
Access allows you to accompany your database with graphical objects e.g.
you can have a customers photo as one of the items in his records. You can have
the picture of the products you have on sale etc.
Procedure
1) In the database window, click the tables tab then click new or use an existing table.
2) Click design view then Ok
3) Designate one of the field for the O.L.E. The field name could be photo, picture etc. For its data type, select O.L.E. objects.
4) Close the table and save the changes.
5) Open the table.
6) Right click the O.L.E fields(s) then insert object.
7) From the object type list, select a category i.e. Microsoft clip gallery then click Ok.
8) Select a clip then click insert.
NB/ The object will always be seen whenever you open a form based on the table or query that has the O.L.E field.
7.7 REPORTS
Reports are used to analyze data or present it in a certain way in print. A report could be that which groups data and calculates totals and another different data formatted for printing mailing tables.
To create A Report using Wizard
You can create a report on your own or you can have Ms-Access create one for you .The wizard speeds up the process since it does all the basic work for you. A wizard promotes you for information and creates a report based on your answers. You can also customize a table in design vie\ w.
Procedures
1) In the design tab click on report design.
2) Click the table or the query that contains the data you want to base your report on.
3) Click Ok.
4) Follow the directions in the wizard dialog boxes.