
Human society is said to have natural tendencies for self preservation and also for preservation of other valuables around. The practice of preservation has therefore been in existence ever since man started translating his thought into writing, what has differed has been the method. History tells us that at one stage man was engraving records on stones and metals before parchment and palm leaf come to scene. Because of the important attached to records held on such materials, scholars and other learned people developed some methods of conserving them e.g. the papyrus scroll were dried and unrolled after every season to determine whether rain had washed off the ink writing.
In china where paper was first used, it was treated against insect attached by substance called huang-heih. This preserved paper for several thousands of years N/B before the Middle Ages, preservation of information materials was not really a big problem because the materials used were of very good quality and durable e.g. the parchment (skin) were treated carefully with lime to give them more durability. Also the demand of paper was low and this gave manufacturers enough time for them to produce quality paper with time however, the demand of paper increased and this led to delays in production process so as to satisfy the ever increasing demand for paper.
In the 18th century the increase demand for paper led to the shortage of paper fibers to meet the demand. Poor quality fibers were therefore used which subsequently lowered the paper quality. It was at the stage that custodians of records records became conscious at the need to take action to conserve and restore damaged written documents.
DEFINITION OF TERMS
Conservation –the root word for conservation is said to have coined from two terms. i.e. con- for constant and servation– for serving. Therefore, conservation –is a combined process or operations carried out in information centres with an intention of prolonging the life-span of the documents.
Conservation therefore, ensures that the life of documents is not diminished and that the life would outline unlimited time span. The type of conservation is based on three main principles
- The information materials are made up of a base upon which the information is fixed e.g. CD, tape etc.
- The base has impression i.e. information itself that makes the element to be called a record or document.
- A document created from the above has got some message in the impression.
There three principles are variables as a result of changing technology in the production or creation of records i.e. the type of impression and characters of message. Conservation of information materials therefore constitutes two main aspects.
- Care and maintenance –of materials under good and proper condition for the sake of their upkeep.
- Treatment-this deals with the practice applied to those materials in which damage has already occurred. The form of treatment therefore involves practices that attempts to reverse conditions of damage documents so as to return them to their original state.
Preservation-to preserve the document, one has to understand the conditions under which every document can be survive well. The word preservation therefore encompasses a wide variety of inter-related activities designed to prolong the usable life of information materials.
Restoration-involves repair or rehabilitation process and it also embraces the operations or techniques or means of treating the materials in which damage has taken place. Restoration is therefore a curative measure.
NEED OR REASONS FOR CONSERVATION OF INFORMATION MATERIALS.
Legal/ evidential values.
Some documents carry important legal information, such documents courts judgment, constitutional documents etc .they can be advanced in a court of law as evidence.
Fiscal/ financial value.
Some documents will be preserved because of the financial evidence they posses. Also some documents are preserved because of the financial implications involved in purchasing them.
Administrative value.
Some records are kept because they provide details on the origin and organization structures of a given country or organization.
Cultural/educational value.
These documents are used by scholars when carrying research activities on a given subject, such documents are also described having educational, research or information value.
Archival value.
In this group the documents that provide the records of past activities of major events in a given country or organization. In other words such documents are preserved for posterity.
Economic value.
With good conservation press information centers will spend less money on the repair of the documents because the rate of damage will have been minimized.
Physical integrity.
In some cases conservation is done so as to preserve; in this case, it will be expected that after sometimes such documents can still be produced in same appearance, as was the original.
Opportunity to study.
Conservation program in an information centers will provide the staff with an opportunity to study the various causes of deterioration of information to information materials in their custody.
Also they will learn on the latest techniques that can be used to preserve and restore such documents.
Consistency in collection growth.
Without proper conservation program, the collection in information centers will always assume a negative trend i.e. items will always get diminishing trend. to avoid this there is need to have a conservation program so that any new acquisitions will add up on the existing collection.
CHAPTER 2 NATURE OF INFORMATION MATERIALS AND THEIR PROPERTIES
INTRODUCTION.
To be able to provide proper conservation measures for information materials, it’s necessary to know the nature of the materials particularly the components that go into making up the materials i.e. the various constituents of the materials and their properties.
Categories of information materials and their properties
Graphic materials
These are documents that are written, drawn, or printed. Most of them are made from the following. Paper, skin (leather, parchment or vellum), cloth, leaves, tree barks and papayrus.bricks/clay tablets, metallic tablets-brass, copper, bronze and lead. Stone, wood. All of those have been and are being are being used to create information by different society world.
To create information on those materials requires –ink and other pigments (e.g. paints, scoots, dyes etc
Audio visual materials.
These are non-graphic information materials. They have been in use since 18th century e.g. sound tapes, microforms.
Machine readable materials
These include those materials which are in electronic media and computers related documents. Examples include; computer disc, television, radio video and compact disks which use lease beam.
Writing substances of ancient before paper invention
- Stones
This was the first media upon which characters were graven. In Egypt the Egyptians used hard instrument called chisel, which were sharp pointed to curve hierographics.
Types of stones used
- Sand stones
This are grains of stones cemented together by silica iron oxide and carbonate of lime. Silica stones are most durable .iron and lime carbonate are easier to work on and are not durable.
- Slates
These are hardened clays –all sandstones and slates absorb water making them vulnerable in freezing.
- Lime stone and marble
These are carbonate of lime and differ only in quality i.e. in chemical component. Marble are harder and higher polish but are difficulty to curve. Lime stone are affected by chemicals impurities in the air and rain.
- Granite
These are of great hardness and strength and suffer little from chemical action but are susceptible to damage by temperature change.
Bricks
The ancient Babylonians and the Assyrians used to engrave characters upon the bricks made from clay. They used the instrument called stylus to incite the writings to the bricks. Information from person to person, the bricks were handed from one person to another to convey.
1. Brass,copper,bronze and lead
Metals have been used by man for recording as well as decorations ever since from the Stone Age. Recording data on this kind of metals have been common in Rome line. These are non-fibrous materials that have been as writing support.
Lead- is soft and soon tarnishes when exposed to air. It suffers less than most metals from hard weather.
Copper- is an abundant element i.e. malleable/compliant and flexible. It does not oxidize easily under ordinary conditions. It becomes touched with a coating of oxide that resists subsequent deteriorative agents of water and air.
Brasses-those are alloys of copper and zinc. Brasses are resistant to corrosion and are more suitable for costing.
Bronze-this is a mixture of copper and tin. Bronze is badly corroded when recovered from earth but can restore to almost their original state by careful treatment with suitable chemicals.
2. Palm leaves and tree bark
These are fibrous and cellulose writing support. This media was used in southern Indian and to some extend in northern Indian and adjainise countries like Burma, srijanza and Thailand. These records can be found in private institutions in Burma, federal republic of Germany, India, nepel, srilank, Thailand and other countries.
Palm leaves
The surface of a palm leave consists of cells with thick walls. When written on with the stylus the sharp pointed end cuts through the epidermis.
The process of manufacturing leaves for writing purpose
- Leaves were cut direct from the palm tree and both ends were cut.
- Stylus were used to scribe the messages
- Lamp black oil was applied on the scars.
Other leaves which have been used for writing purpose include;
Olive leaves, talipat leaves (type of a palm), aloe leaves, East Indian palm leaves, and palmyrn leaves. Palm leaves are very long and provide appropriate surface for writing. These leaves were commonly used to transmit thoughts and ideas.
Problems associated with leaves as writing materials
- They become brittle with time and crumble easily.
- Keeping them requires big storage space
- Lignin is present (not removed) and is acidity in nature that causes deterioration of information.
3. The tree barks
This was the first to be used as it was easily obtainable and its manufacture was also very easy.liber is the Latin word for the inner bark, which also means abook.the inner bark is layer of tissue surrounding the wood cylinder of tree and shrubs.
Preparation process of tree barks for writing purpose.
- The stem of the tree was cut.
- The bark was peeled off
- The outer surface o the bark was smoothed with a stone or a bone
- The inner surface was written on
Problems associated with bark
- The bark is vulnerable to dampness and when wet the leaves of the bark books stick together rolls up and becomes extremely fragile.
- When dried up often being wet the leaves of the bark books and manuscript split and powder when handled.
- The liquid not removed leads to first breaking when it dries.
- No standard format of the cell arrangement.
- The nature of the birch bark is thick hence presenting storage problems.
4. Animal skin
Animal skin is a continuous membrane of fibrous tissue. The outside has sweaty gland and hair follicles, which determine the grain. The fresh side is lined with fat muscles and blood vessels.
Varialious in physical structure of the skin of variora animals’ influence their suitability for utilitarian purposes. The true skin is composed of the protein fibrous made up of complicated chain structure of atoms and molecules.
Preservation of the skin
The skin is preserved by the following method
- Tanning leather-process of converting raw skin into leather with the use of chemicals. The process of preparation of vellum is the same as that of parchment. However it consists more to produce vellum than parchment.
- Treatment with lime(parchment)
- Treatment with alum rosin
Parchment and vellum
Parchment was made from the skin of a sheep or a lamp (mammal).vellum was made from the skin of unborn and young calf sometimes from the stomach lining of an OX.
Preparation process of skin for writing purpose
- The skin was soaked in the water foe three days to remove any fats.
- Scrubbing of the hair was done using a sharp instrument
- Drying the skin on the stretched for a number of days
- Sandpapering took place to smoothen the surface writing
The finished product of vellum
- It’s more delicate than parchment.
- Has more polish
- Has shinning whiteness
- Semi-transparent beauty
Characteristics of parchment and vellum
- Both are strong and long lasting
- They are difficult to work on and are seldom ornamented
5. Papyrus reeds
This plant grew naturally at the banks of river Nile in Egypt. It was 6-9 feet long. This was the first materials to assume the properties of paper. Egyptians were the first people to use papyrus as early as 2200bc.they use the plant for a number of purposes;
As writing materials, as building materials, Making boats and making mat.
Papyrus as writing materials was made from the marrow of the papyrus plant, which was smooth to be written on.
Preparation process of papyrus as writing materials. (Egyptians)
- First cut the stem of the plant into about 16 inch and the bark removed.
- The cut stem is split lengthwise into thin strips, which were laid side by side to form one ply of the sheet. The first ply is laid and the next is laid over the first one at aright angles.
- The sheets were then saturated with a gum solution, pressed and then dried and then polished by rubbing with a bone/stone/ivory making it easy for writing
- The strips were covered on upper side with a thin past of wheat flour mixed with vinegar, the joining of strips by gum makes them compact and aid in gluing hence sizing of the materials took place.
- The long strips were then rolled on stick to make the handling easier and prevent tearing.
Polishing gave the surface the necessary characteristics to make it appropriate for writing. The layers of the strips formed a laminated substance used for writing.
6. Amate
This was the main writing substance used in America to record their cultures. It is possible that it might have originated earlier among some cultures of the Gulf of Mexico mate is a kind of felt obtained from fig tree which prominently grows in America.
Method of manufacture/procedure/steps of a mate.
- Thick branches of fig tree were cut to the required sizes.
- For them to soften, they were laid in the stream of water and weighted down by heavy stones. They were left this way for several days to soften enough.
- When softened enough the bark were removed.
- Pieces were then arranged on a flat surface.
- They were then pounded with a stone until it split open.
- The fibers were then separated from the wood and converted into a conglomerate which was then beaten further using a flat stone until something which looked like a pulp was obtained.
- This was then smoothened out to form strips of varying sizes. It was then allowed to dry. After drying some fluids obtained from orchids plant was used as a sizing agent.
7. cloth
This has been used as a writing material for a very long time i.e. The screen-printing method used in writing on the cloth.
8. Paper
Is a thin tissue of any fibrous material the individual fibrous which after being separated mechanically and suspended in water is then matted into sheets suitable for writing. OR is simply a lamina conglomerate obtained by pulping vegetable or plant fibrous.
As it can be seen from the previous account from the earliest times up to the present day the substances used as vehicles for writing have been numerous. Whatever was convenient and available was used as a writing support. Papyrus, cloth, metals, stone, wood palm leaves, parchment, vellum and paper, until the letter replaced all the other materials.
The chief chemical constituent of paper is fabricated cellulose fibre, which doesn’t exist in pure state. Raw cellulose fibres contain fats, waxes, lignin and other impurities which because they are harmful to paper and contribute to its deterioration must be removed before a fibre of high quality is obtained for paper making.
The processes, by which these substances are removed, if they are not carried out properly, degrade the cellulose fibres by weakening them and breaking the cellulose into the substances which are harmful to the resulting paper. However pure cellulose is permanent. The initial purity of cellulose used determines to a great extent the degree of permanence manufactured.
The durability of paper i.e. its physical strength is dependent upon the quality and length of individual fibres as well as its bonding. The fact that information materials more than ten hundred years old in a good condition are still available in information centres and that the archeologists have unearthened original papers dating back to A.D.105, when the paper was first inverted in china, show that paper made in the past was intended to last for centuries.
Naturally cellulose fibres are structurally quite similar and fibres of central straws, bagasse, kenaf, bamboo, esparto, hemp, jute, flax, cotton, bark and wood used to manufacture paper.
Ingredients found in plant fibrous are
- Sugar,
- starch,
- carbohydrates
Characteristics and properties of cellulose
- It’s a white substance that is hygroscopic in nature.
- It is insoluble in water and most other solvent.
- It has a high tensile strength.
- It is resistant to the action of most chemicals except strong acids.
Characteristics and properties of lignin
- An amorphous complex, polydispers polymer network of phenyl with a number of reactive functional group that changes to a more highly coloured from as it ages. Hence papers made with lignin containing fibrous tend to discolour with age.
- Its very complicated organic acid surrounds and impregnates the fibres in some plant.
- It very vulnerable to oxidizing agent i.e. easily oxidizes.
- It’s insoluble in water.
- It gives the plant its structure by binding the cellulose fibres together.
- It’s acidic in nature.
The fibrous are microscopically small units which because of special physical properties can be given various treatment that ultimately determine the characteristics of the finished paper such as
Tearing, Handling, Absorbance, Porosity, Colour, Stretch, Tensile, Fold, Brightness, Opacity.
In real sense the fibrous are hollow with protoplasm. In the paper making process the cell wall collapse and tube become flat ribbons.
The strength of a paper is determined by the strength of its fibrous and the degree of fibrillation (the number of fibrous)
Cellulose fibrous deteriorates by;
- Oxidation
- Action of acid and alkaline
- Exposure to sunlight or artificial light.
The deterioration causes chemical and physical changes which affect not only the characters of the paper but also the subsequent aging process.
Pure cellulose is much more stable than impure but the chemistry of cellulose degradation is inseparable from the chemistry of its impurities.
Sources of raw materials for papermaking.
- Cotton
- Animal fibrous-wool, fur, hair and silk.
- Mineral fibrous –asbestos.
- Synthetics-rayon, nylon and glass
- Ceramic
- Stainless steel and other metals.
- Grass –esparto, flax ,hemp, jute and bamboo
Classification of paper
Paper can be classified according to the sources of fibrous from which it is made from.
Cotton group
Cotton fibres can be used to produce highly quality stable paapers.the wall structure of cotton fibres is similar to that of wood fibres ,it is relatively thin and grows free of lignin. The molecular weight of cotton cellulose is slightly higher than that of wood and the crystallites are slightly longer. The longer virgin fibres used in textiles are too valuable to be economical for papermaking. However the cotton ginning operations leaves a fuzz of short fibres on the cotton seed and these shorter hair fibres or linters, together with rags and textile clippings are the sources of cotton fibres for special paper.
The grass group: the straws the bamboo, wheat rice .sugarcane barley, rye etc
These fibrous because they are lignin free generally make god long lasting paper.
The wood group: there is a group wood – untreated macerated chips (mechanical pulping semi chemical pulp thermomechnical pulp and chemical pulping (soda sulphate or sulphate) in which the ligning and other intercellular matters / impurities in the fibrous have been removed leaving much pure cellulose.
INVENTION OF PAPER
Paper –is a thin material produced by pressing together moist fibres of cellulose pulp derived from wood, rags or grasses, and drying them into flexible sheets. It is a versatile material with many uses, including writing, printing, packaging, cleaning, and a number of industrial and construction processes.
The pulp papermaking process is said to have been developed in China during the early 2nd century CE, possibly as early as the year 105 CE, by the Han court eunuch Cai Lun, although the earliest archaeological fragments of paper derive from the 2nd century BCE in China.The modern pulp and paper industry is global, with China leading its production and the United States right behind it.
Paper making is one of the inventions by Chinese. 105 A.D. is often cited as the year in which papermaking was invented. In that year, historical records show that the invention of paper was reported to the Eastern Han Emperor Ho-di by Ts’ai Lun, an official of the Imperial Court. Recent archaeological investigations, however, place the actual invention of papermaking some 200 years earlier. Ts’ai Lun broke the bark of a mulberry tree into fibres and pounded them into a sheet. Later it was discovered that the quality of paper could be much improved with the addition of rags hemp and old fish nets to the pulp. The paper was soon widely used in China and spread to the rest of world through the Silk Road. An official history written some centuries later explained: In ancient times writing was generally on bamboo or on pieces of silk, which were then called ji. But silk being expensive and bamboo heavy, these twoich materials were not convenient. Then Tsai Lun thought of using tree bark hemp, rags, and fish nets. In 105 he made a report to the emperor on the process of paper making, and received high praise for his ability. From this time paper has been in use everywhere and is called the “paper of Marquis Tsai.” In few years, the Chinese began to use paper for writing. Around 600 A.D. woodblock printing was invented and by 740 A.D., The first printed newspaper was seen in China.
To the east, papermaking moved to Korea, where production of paper began as early as the 6th century AD. Pulp was prepared from the fibers of hemp, rattan, mulberry, bamboo, rice straw, and seaweed. According to tradition, a Korean monk named Don-cho brought papermaking to Japan by sharing his knowledge at the Imperial Palace in approximately AD 610, sixty years after Buddhism was introduced in Japan.
Along the Silk Road, we learned that paper was introduced to Xinjiang area very early according to the archaeological records. The paper found at Kaochang, Loulan, Kusha, Kotan, and Dunhuang sites dated as early as the 2nd. Century. The technique eventually reached Tibet around 650 A.D. and then to India after 645 A.D. By the time Hsuan Tsang from China arrived to India in 671 A.D., paper was already widely used there.
For a long time the Chinese closely guarded the secret of paper manufacture and tried to eliminate other Oriental centers of production to ensure a monopoly. However in 751 A.D. the T’ang army was defeated by the Ottoman Turks at a mighty battle at the Talas River. Some Chinese soldiers and paper makers were captured and brought to Samarkand. The Arabs learned the paper making from the Chinese prisoners and built the first paper industry in Baghdad in 793 A.D. They, too, kept it a secret, and Europeans did not learn how to make paper until several centuries later. The Egyptians learned the paper making from the Arabs during the early 10th century. Around 1100 A.D. paper arrived in Northern Africa and by 1150 A.D. it arrived to Spain as a result of the crusades and established the first paper industry in Europe. In 1453 A.D. Johann Gutenberg invents the printing press. The first paper industry in the North America was built in Philadelphia in 1690.
Paper making is one of the inventions by Chinese. 105 A.D. is often cited as the year in which papermaking was invented. In that year, historical records show that the invention of paper was reported to the Eastern Han Emperor Ho-di by Ts’ai Lun, an official of the Imperial Court. Recent archaeological investigations, however, place the actual invention of papermaking some 200 years earlier. Ts’ai Lun broke the bark of a mulberry tree into fibres and pounded them into a sheet. Later it was discovered that the quality of paper could be much improved with the addition of rags hemp and old fish nets to the pulp. The paper was soon widely used in China and spread to the rest of world through the Silk Road. An official history written some centuries later explained: In ancient times writing was generally on bamboo or on pieces of silk, which were then called ji. But silk being expensive and bamboo heavy, these twoich materials were not conveninet. Then Tsai Lun thought of using tree bark,n hemp, rags, and fish nets. In 105 he made a report to the emperor on the process of paper making, and received high praise for his ability. From this time paper has been in use everywhere and is called the “paper of Marquis Tsai.”
In few years, the Chinese began to use paper for writing. Around 600 A.D. woodblock printing was invented and by 740 A.D., The first printed newspaper was seen in China.
To the east, papermaking moved to Korea, where production of paper began as early as the 6th century AD. Pulp was prepared from the fibers of hemp, rattan, mulberry, bamboo, rice straw, and seaweed. According to tradition, a Korean monk named Don-cho brought papermaking to Japan by sharing his knowledge at the Imperial Palace in approximately AD 610, sixty years after Buddhism was introduced in Japan.
Along the Silk Road, we learned that paper was introduced to Xinjiang area very early according to the archaeological records. The paper found at Kaochang, Loulan, Kusha, Kotan, and Dunhuang sites dated as early as the 2nd. Century. The technique eventually reached Tibet around 650 A.D. and then to India after 645 A.D. By the time Hsuan Tsang from China arrived to India in 671 A.D., paper was already widely used there.
For a long time the Chinese closely guarded the secret of paper manufacture and tried to eliminate other Oriental centers of production to ensure a monopoly. However in 751 A.D. the T’ang army was defeated by the Ottoman Turks at a mighty battle at the Talas River. Some Chinese soldiers and paper makers were captured and brought to Samarkand. The Arabs learned the paper making from the Chinese prisoners and built the first paper industry in Baghdad in 793 A.D. They, too, kept it a secret, and Europeans did not learn how to make paper until several centuries later. The Egyptians learned the paper making from the Arabs during the early 10th century. Around 1100 A.D. paper arrived in Northern Africa and by 1150 A.D. it arrived to Spain as a result of the crusades and established the first paper industry in Europe. In 1453 A.D. Johann Gutenberg invents the printing press. The first paper industry in the North America was built in Philadelphia in 1690.
How Paper is Made
Paper is simple material. It is essentially a mat held together by the fiber’s roughness, and can be made from almost any fibrous material like wood or recycled paper.The process for making paper was invented in China in the second century A.D., and all paper was made one sheet at a time until 1798. The process of making paper has not changed – at least, fundamentally – since its discovery. But with almost two centuries of improvements and refinements, modern papermaking is a fascinating, high tech industry. Wisconsin has led the nation in papermaking for more than 50 years.
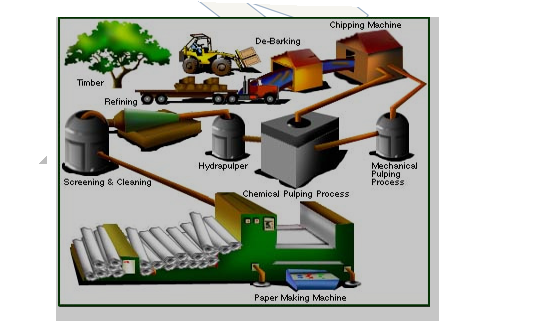
Step 1: Forestry
Typically, trees used for papermaking are specifically grown and harvested like a crop for that purpose. To meet tomorrow’s demand, forest products companies and private landowners in Wisconsin plant millions of new seedlings every year.
Step 2: Debarking, Chipping and/or Recycling
To begin the process, logs are passed through a debarker, where the bark is removed, and through chippers, where spinning blades cut the wood into 1″ pieces. Those wood chips are then pressure-cooked with a mixture of water and chemicals in a digester.
Used paper is another important source of paper fiber. Thanks to curbside recycling programs in many communities, we recover 40% of all paper used in America for recycling and reuse. The paper is shredded and mixed with water.
Step 3: Pulp Preparation the pulp is washed, refined, cleaned and sometimes bleached, then turned to slush in the beater. Color dyes, coatings and other additives are mixed in, and the pulp slush is pumped onto a moving wire screen. Computerized sensors and state-of-the-art control equipment monitor each stage of the process.
Step 4: Paper Formation As the pulp travels down the screen; water is drained away and recycled. The resulting crude paper sheet, or web, is squeezed between large rollers to remove most of the remaining water and ensure smoothness and uniform thickness. The semidry web is then run through heated dryer rollers to remove the remaining water.
Waste water is carefully cleaned and purified before its release or reuse. Fiber particles and chemicals are filtered out and burned to provide additional power for the mill. Papermakers carefully tests for such things as uniformity of color and surface, water resistance, and ink holding ability.
Step 5: Paper finishing the finished paper is then wound into large rolls, which can be 30 feet wide and weigh close to 25 tons. A slitter cuts the paper into smaller, more manageable rolls, and the paper is ready for use. Papermaking is one of the most capital intensive industries in the nation, investing over $100,000 in equipment for each employee. The largest papermaking machines are over 32 feet wide, 550 feet long and can produce over 1,000 miles of paper a day.
The Deterioration and Preservation of Paper: Some Essential Facts
Paper deterioration is still a problem, but thanks to years of scientific research by the library community and beyond, it is no longer a mystery. The preservation strategy for paper materials at the Library of Congress continues to evolve as our scientific understanding of deterioration mechanisms has progressed.
Factors that Promote Paper Deterioration
Why is 500-year old paper often in better condition than paper from 50 years ago? In other words, what makes some papers deteriorate rapidly and other papers deteriorate slowly?
- The rate and severity of deterioration result from internal and external factors: most importantly, the composition of the paper and the conditions under which the paper is stored.
- Paper is made of cellulose — a repeating chain of glucose molecules — derived from plant cell walls. One measure of paper quality is how long the cellulose chains, and subsequently the paper fibers, are: long-fibered paper is stronger and more flexible and durable than short-fibered paper.
- In the presence of moisture, acids from the environment (e.g., air pollution, poor-quality enclosures), or from within the paper (e.g., from the raw materials, manufacturing process, deterioration products), repeatedly cut the glucose chains into shorter lengths. This acid hydrolysis reaction produces more acids, feeding further, continued degradation.
- Before the mid-19th century, western paper was made from cotton and linen clothing rags and by a process that largely preserved the long fibers of the raw material. While fibers may shorten with age, rag papers tend to remain strong and durable, especially if they have been stored properly in conditions not overly warm or humid.
- Starting in the mid-19th century, wood replaced rags as the raw material for paper manufacture. Wood is processed into paper by mechanical or chemical pulping, which produces paper with shorter (compared with rag paper) fibers.
- Mechanical pulping produces paper with the shortest fiber length and does not remove lignin from the wood, which promotes acid hydrolysis. Newspapers are printed on mechanically pulped paper. Chemical pulping removes lignin and does not cut up the cellulose chains as thoroughly as mechanical pulping, yielding a comparatively stronger paper, but which is still not as durable as rag paper.
- Wood pulp paper from before the 1980s also tends to be acidic from alum-rosin sizing (added to the paper to reduce absorbency and minimize bleeding of inks), which, in the presence of moisture, generates sulfuric acid.
- Acids also form in paper by the absorption of pollutants — mainly sulfur and nitrogen oxides. Book leaves that are more brown and brittle along the edges than in the center clearly illustrate this absorption of pollutants from the air.
- Research by the Library of Congress has demonstrated that cellulose itself generates acids as it ages, including formic, acetic, lactic, and oxalic acids. Measurable quantities of these acids were observed to form under ambient conditions within weeks of the paper’s manufacture. Moreover, paper does not readily release these acids due to strong intermolecular bonding. This explains why pH neutral papers become increasingly acidic as they age.
- Acids form in alkaline paper as well, but can be neutralized by the alkaline reserve.
- Besides acid hydrolysis, paper is susceptible to photolytic (damage by light) and oxidative degradation.
- Photo degradation appears to progress more severely and rapidly in poorer quality papers.
- The role of oxidative degradation appears limited compared with acid hydrolysis, except in the presence of nitrogen oxide pollutants.
Generally speaking, good quality paper stored in good conditions (cooler temperatures; 30-40% relative humidity) is able to last a long time — even hundreds of years.
Accelerated or Artificial Aging Tests
One can readily observe that papers from hundreds of years ago are often still in good condition and that papers from not even 30 years ago are often brittle or perhaps even unusable. So as not to rely on anecdotal observation, scientists have developed experimental methods known as accelerated or artificial aging to collect data over weeks or months on how materials may age over years or decades.
- Artificial or accelerated aging tests for paper is continually evolving and is viewed as more or less meaningful, depending on the test parameters and what information is sought from the data.
- The U.S. National Bureau of Standards, now the National Institute of Science and Technology, carried out early accelerated aging tests on paper in the 1920s-1930s, which involved inducing aging with elevated temperatures. In the 1940s, William Barrow used elevated temperature aging methods to project lifetimes of paper samples. Barrow’s predictions have since been proven to be erroneous and illustrate the importance of the test parameters and of framing questions appropriate to the test design.
- Today, artificial aging tests combine elevated temperatures and elevated humidity, recognizing the essential role that moisture plays in the acid hydrolysis of paper.
- A five-year research effort completed in 2000 at the Library of Congress showed similar chemical products formed during natural and accelerated aging of paper. Moreover, when naturally-aged papers were subsequently subjected to accelerated aging in the laboratory, the degradation products from natural aging simply increased in concentration by predictable proportions; no new degradation products were identified. These results suggest that well designed artificial aging tests can provide a good approximation of natural aging and is a valid and reliable test for predicting paper longevity.
- Artificial aging tests show that the rate at which paper degrades increases with time as acidic degradation products accumulate in the paper.
Other Experiments and Findings
- Experiments with cotton rag papers (see Henk Porck, “Rate of Paper Degradation”) have found that the center of the leaf in a book tends to be weaker than the edges and that paper bound in books ages faster than loose single sheets of paper. (Not to be confused with the observation of brittle edges that result when the paper absorbs, starting at the edges, industrial pollutants from the air, which catalyze acid hydrolysis.)
- In other words, the moisture contained within the paper contributes to acid hydrolysis and paper deterioration. In an closed airtight environment, the paper retains the acidic degradation products, which accelerate aging.
Applying the Scientific Findings to Library Practice
- In the 1980s, paper manufacturers began adding alkaline buffers to wood pulp papers intended for lasting use and today this is common practice. Alkaline buffers retard or prevent acid hydrolysis by neutralizing acids that attack the cellulose chains. Alkaline wood pulp papers stored under good conditions are long lasting. Since the 1990s, books published in the U.S. that conform to ANSI/NISO paper permanence standards (e.g., ANSI/NISO Z39.48 – 1992) are likely to be printed on chemically purified wood pulp alkaline paper.
- Alkaline papers made of chemically purified wood pulp (high alpha cellulose) mixed with cotton are also available and are recommended for permanent documents.
- The useful life of retrospective collections on acidic paper, but which are still serviceable (i.e., not yet brittle), can be extended many times by neutralizing or removing the acids in the paper.
- Neutralizing the acids with an alkalizing agent is an approach that can be scaled to address millions of items (mass deacidification) and is an option for loose sheets as well as for bound items.
- If mass deacidification treatment is carried out while the paper still has significant measurable strength, and the treated items are then stored under proper conditions, these once-acidic items are projected to remain in usable condition for several centuries, rather than becoming brittle and unusable in only fifty to a hundred years. Improving environmental storage conditions, regardless of whether the item can be deacidified, will also significantly slow the rate of degradation and extend the useful life of paper
Handmade paper
Earlier paper were produced by
- Stamping or beating hemp, linen rags and ropes in mortars with water until smooth paste of fibres was obtained.
- The paste was then dilute with water to suitable consistency, mixed thoroughly and poured over alien fabric stretched on a wooden frame mould or mould made from bamboo strips were uniformly
- This mould was kept in constant vibration in all direction to ensure that the fibres were uniformly distributed
- The greater part of the water filtered through leaving a thin layer of wet and matted fibres on the fabric
- The dried fibres is then detached in the sun brick base and cut to size and flattened
Nb the modern hand – made paper manufacturing technique employees a wooden mould with brass wire laid in parallel or woven across the frame. The sheets are stripped from the mould while relatively wet to economize on the number of moulds in use.
Procedure of paper manufacture by hand/ manual case of Europe
- The pieces of rays wags were rolled in lime to make the extraction of fibres easier
- The fibres were then pounded with water driven beaters and separated into pulp. The separation was mechanical process called maceration
- The pulp was mixed with water to form a suspension known as slurry. The use of water was important because it made the fibre bonding strong
- The machine known as paper mould/ mold is dipped into the slurry (pulp) and the person manipulated the machine in such a way that a layer of the pulp get trapped on the screen f the mould the mould is brought to the surface laden with fibres. The fibres are matted by shacking of the mould draining out excess water. The mould leaves imprint on the paper which once dries is permanent
- The newly formed wet sheets are then laid on other machines called felt a more water squeezed From this a thin sheet of pulp is converted into paper.
- Once dried the paper is glued using adhesives obtained from roots and algae.
- The paper is polished (sized) i.e. transformed into a surface for receiving ink.
- The paper is polished then loaded using calcium oxide.
N/B a paper made this way is very high quality because of the fact that it is somewhat alkaline and n account of addressing which are essentially harmless.
SIZING
Refers to the process whereby certain chemicals are applied to paper to make it have greater mechanical strength and have the required surface characteristics. Sizing agents are many types of non-fibrous raw materials that are added to paper to improve it physical, optical and electrical properties.
Sizing agents are the polymeric binder materials that are used to improve the cohesion of the individual fibres and increase the strength and stiffness of the paper.
Advantages of sizing process
- It prevents the ink from feathering /spreading/running on the paper.
- It assist in the bonding of the fibres /binds the fibres
- It prevents water and moisture penetration
- It also contributes to the felting process during the formation of the paper in the machine.
- It’s meant to give the paper some smooth surface for writing.
- It consolidates and hardens paper i.e. filling in the gaps a mong the fibres.
Examples of sizing agents
- Gelatin/animal glue from animal bones
- Starch
- Modified starches
- Polyvinyl alcohol
- Methyl cellulose
- Latex
- Water emulsion materials such as polystyrene-butadiene.
Loading
These are inert inorganic materials known as pigments or fillers which are added to paper manufacturing process.
Advantages of loading process
- Improves the opacity of the paper
- It improves receptability of the surface of paper to writing inks
- To fill volds between the fibres
- It improves the brightness of the paper depending on the particles size, refractive index and brightness of those substances
- To smoothen the surface for printing, writing and drawing
Basic component of a handmade paper
Cellulose-it is a very stiff and durable material that attracts insects because its sugary so the insect can destroy the paper. They are shirt and even and weakened during extraction stage in the case of mechanical
Lignin-during manufacturing process if great care is not taken lignin can be left which can lead to deterioration of paper because it oxidizes easily.
Metallic ions-these are ion of copper, sodium and potassium and water from the plants. Water gives paper flexibility and also provides shape i.e. bind the molecule of the fibrous together. Sodium sulphate is used to absorb the lignin. The ions can also destroy the fibres in the paper.
Water-used for washing the excess chlorine after bleaching process.
Characteristics of a handmade paper
- The fibres of the paper are aligned randomly because of the process is mechanical in nature
- It’s not possible to produce the sheets of the same size and nature.
- Paper has no uniform thickness.
- It dilates evenly in all directions due to irregular distribution of fibres
- Watermarks are evident that it’s a handmade paper-these are symbols and signs that the paper was wired to the mould machine.
CHAPTER THREE: DISASTER CONTROL PLANNING AND RECOVERY
Disaster– is a serious disruption of the functioning of a community or a society. Disasters involve widespread human, material, economic or environmental impacts, which exceed the ability of the affected community or society to cope using its own resources.
Disaster management –is the organization and management of resources and responsibilities for dealing with all humanitarian aspects of emergencies, in particular preparedness, response and recovery in order to lessen the impact of disasters.
General Objectives of a Disaster or Contingency Plan
The following is a list of general objectives departments should consider when creating an Information Disaster Prevention and Recovery Plan:
- Ensure the safety of all employees and visitors at the site/facility
- Protect vital information and records
- Secure business sites and facilities
- Safeguard and make available vital materials, supplies and equipment to ensure the safety and recovery of records from predictable disasters
- Reduce the risk of disasters caused by human error, deliberate destruction, and building or equipment failures
- Be better prepared to recover from a major natural catastrophe
- Ensure the organization’s ability to continue operating after a disaster
- Recover lost or damaged records or information after a disaster
Plan Information
A sound understanding of the nature, scope, and limitations of a disaster plan ensures that management’s expectations are realistic and the plan plays its proper role in achieving the department’s overall goals and objectives.
An information disaster plan is a practical program of preventive steps and actions responding to potential and actual disasters. While each department must determine its own specific objectives, several main objectives are present in all plans. The plan should:
- Identify and adequately protect the department’s vital records (vital records program)
- Reduce the risk of disasters caused by human error, deliberate destructiveness, and building or equipment failure, as well as, the adverse consequences of all disasters by mandating specific security, maintenance and training programs (disaster prevention)
- Ensure the department’s ability to effectively resume operations after a disaster by spelling out management policies, procedures, and resources to be activated in disaster situations (crisis management)
- Ensure the department’s ability to rapidly reconstruct essential information and salvage damaged records containing information essential to establishing detailed recovery procedures, and a management directive for implementation (disaster recovery)
An information disaster plan is a written, approved, implemented, and periodically tested program to identify, protect, reconstruct or salvage an organization’s vital and historical records, and establishes procedures for the immediate resumption of business operations in the event of a disaster.
Types of disasters
There is no country that is immune from disaster, though vulnerability to disaster varies. There are four main types of disaster.
- Natural disasters: including floods, hurricanes, earthquakes and volcano eruptions that have immediate impacts on human health and secondary impacts causing further death and suffering from (for example) floods, landslides, fires, tsunamis.
- Environmental emergencies: including technological or industrial accidents, usually involving the production, use or transportation of hazardous material, and occur where these materials are produced, used or transported, and forest fires caused by humans.
- Complex emergencies: involving a break-down of authority, looting and attacks on strategic installations, including conflict situations and war.
- Pandemic emergencies: involving a sudden onset of contagious disease that affects health, disrupts services and businesses, and brings economic and social costs.
Any disaster can interrupt essential services, such as health care, electricity, water, sewage/garbage removal, transportation and communications. The interruption can seriously affect the health, social and economic networks of local communities and countries. Disasters have a major and long-lasting impact on people long after the immediate effect has been mitigated. Poorly planned relief activities can have a significant negative impact not only on the disaster victims but also on donors and relief agencies. So it is important that physical therapists join established programmes rather than attempting individual efforts.
Local, regional, national and international organizations are all involved in mounting a humanitarian response to disasters. Each will have a prepared disaster management plan. These plans cover prevention, preparedness, relief and recovery.
Disaster prevention
These are activities designed to provide permanent protection from disasters. Not all disasters, particularly natural disasters, can be prevented, but the risk of loss of life and injury can be mitigated with good evacuation plans, environmental planning and design standards. In January 2005, 168 Governments adopted a 10-year global plan for natural disaster risk reduction called the Hyogo Framework. It offers guiding principles, priorities for action, and practical means for achieving disaster resilience for vulnerable communities.
Disaster preparedness
These activities are designed to minimize loss of life and damage – for example by removing people and property from a threatened location and by facilitating timely and effective rescue, relief and rehabilitation. Preparedness is the main way of reducing the impact of disasters. Community-based preparedness and management should be a high priority in physical therapy practice management.
Disaster relief
This is a coordinated multi-agency response to reduce the impact of a disaster and its long-term results. Relief activities include rescue, relocation, providing food and water, preventing disease and disability, repairing vital services such as telecommunications and transport, providing temporary shelter and emergency health care.
Disaster recovery
Once emergency needs have been met and the initial crisis is over, the people affected and the communities that support them are still vulnerable. Recovery activities include rebuilding infrastructure, health care and rehabilitation. These should blend with development activities, such as building human resources for health and developing policies and practices to avoid similar situations in future.
Disaster management is linked with sustainable development, particularly in relation to vulnerable people such as those with disabilities, elderly people, children and other marginalised groups. Health Volunteers Overseas publications address some of the common misunderstandings about disaster management.
TOPIC FOUR: CAUSES OF DETERIORATION OF INFORMATION MATERIALS
The materials of which library and archive collections are composed, namely paper, parchment, palm leaves, birch bark, leather and adhesives used in bookbinding, are susceptible to two main forms of deterioration. One is biological deterioration caused by insect attack and/or fungal growth, and the other form of deterioration is caused by adverse environmental conditions such as extremes of dampness or wide fluctuations in relative humidity associated with large variations in day and night temperatures, light and atmospheric pollutants. These two forms of deterioration are interconnected because humid conditions favor the growth of fungi and accumulations of dust and dirt will attract insects.
Biological Factors
Where there is condensation or moisture due to high humidity, there is always the presence of biological growths such molds or fungi, insects and rodents causing infestation. Biological agents attack paper and other organic materials when both temperature and humidity are uncontrolled. Mold spores remain suspended in the air until they find suitable conditions for their growth. If mold is observed in the collection yet environmental conditions are not altered to halt its proliferation, the mold will digest the material on which it has begun to grow. This results in the staining and deterioration of materials attacked and in rapid loss of strength of organic materials. The growth of fungi is revealed by the formation of whitish patches on book covers and documents, which later may become brownish or greenish in color. It is a common experience to note that this mold growth occurs more readily on items made of organic materials that are tightly packed, and this is due to the fact that a thin, stagnant pocket of moist air is formed which favors mold growth.
In addition to high temperature and humidity, man’s negligence also favors the growth and proliferation of insects. The following manifests such negligence:
- accumulations of dirt and dust from poor or careless housekeeping practices;
- introduction of foodstuff to storage and exhibit areas;
- entry of insect-infested items into the collection;
- open windows, air vents or poorly sealed windows and doors;
- unattended roof leaks and cracks in a deteriorated museum building; and,
- Poor ventilation.
Rodents and insects are the worst enemies of books and other organic materials that are cellulose in nature. The materials contain proteins and carbohydrates in the form of sizing, paste or starches, and other organic substances attractive to insects. The nature and extent of the damage depend not only on the insect and material, but also on how promptly the infestation is discovered and controlled. Damage may vary from a few holes to complete destruction.
Deterioration of Paper Caused By Insects
The most common types of insects that attack paper objects are:
Termites are small, yellowish or whitish social insects that live in wood and under the ground. They live under conditions in which humidity within the colony is maintained at a high level. In books, they produce deep, crater-shaped holes, or deep, irregularly shaped erosions; sometimes this leads to almost total destruction of the volume and bring about irreparable loss or damage.
Silverfish are wingless insects with long antennae and usually with three (3) long, tail-like appendages that are of silver-gray color. They are usually found in moist locations, that is, under stones and boards, cracks and crevices or in dark places where humidity is greater than 55%. This type of insects cause superficial damage to paper of irregular outline, but much smaller than that caused by cockroaches, especially the glossy type, books and documents, and wallpaper, and, eats away glue, paste, etc.; also attacks photographic plates and gelatin.
Cockroaches are nocturnal insects that have reddish brown color and fetid odor. Cockroaches hide in warm, damp and dark places like the bathroom, floors of kitchen, under the sink, near water pipes, crevices, cabinets and cupboards. They cause superficial erosion of irregular outline; a blackish “comma” shape mark on paper is a positive indication of the presence of cockroach.
Booklice are small soft-bodied insects that have relatively large heads, fairly long antennae and strong-toothed mandibles. Booklice cause tiny superficial erosions of irregular outline to paper, leather, gelatin of photographic plates, watercolors, parchment, glue and gum of bookbinding.
Case-bearing clothes moth thrives in undisturbed and unventilated areas that destroy bookbinding.
Powder post beetles have leathery front wings forming a sheath for the membranous underwings. They have long antennae of various shapes, 2 to 5 mm long and dark red to black in color. They bore holes into books and other organic materials.
Deathwatch beetles winding, circular tunnels which generally extend from the edges to the book’s center; the mixture of eroded material and feces that fills the tunnels is known as “frass”.
Carpet beetles cause irregular perforations and sometimes surface tunnels containing powdery excrement and cast-off larval skins on books and other paper organic materials.
Temperature and Relative Humidity
Temperature and relative humidity have been shown to be interdependent. Hygroscopic materials that normally contain moisture are the most sensitive to over-drying. These hygroscopic materials are those of organic origin and of fibrous or cellular structure, such as paper, parchment, papyrus, leather and notably the adhesives used in bookbinding. Paper and related materials, on the other hand, deteriorate rapidly with temperature and relative humidity changes.
The greatest danger that can arise from an excessively high relative humidity is the tendency for molds to grow on any material that can provide nutriment, such as glue, leather and paper. The presence of mold growth is a warning that the atmospheric relative humidity is above the limit of safety. If too high, humidity hastens acid deterioration. When conditions are favorable to mold growth, for example, in a library, a gray dusty bloom is observed in the first instance on the darker bindings, and it soon becomes fluffy with a tendency to be organized in circular patches.
There are some evidence that regular changes in temperature and relative humidity (cycling) can lead to weakening of paper and related materials, as a result of internal stresses set up in them in response to these changes. There are no firm data to indicate how serious this effect may be, but scientists do not believe that it results in measurable damage to these materials if such changes in temperature and relative humidity can be held to less that 10 degrees and 15%.
Light Apart from other causes earlier discussed, light can, to a large extent, be regarded as an independent and prime cause of deterioration of museum objects. The type of materials forming part of the museum collection that are subject to damage by light are pigments and dyestuff, including inks; paper and other cellulose materials; and, various other organic materials.
Pigments and dyestuff fade when exposed to light and this is very noticeable in water colors. Unfortunately, colors fade selectively, some disappearing while other remain unchanged, which means that the color relationships of a painting can be grossly distorted. Rapid and serious deterioration of paper is caused by the oxidation of cellulose brought about by the ultraviolet rays in sunlight and fluorescent light. There are two effects of light on paper that result in its ultimate embrittlement and deterioration. First, it has a bleaching action that causes some whitening of paper and fading of colored papers and certain inks. Second, it causes any lignin, which may be present in the paper, to react with other compounds and turns it yellow or brownish. It is this reaction that results in newspapers’ turning yellow on exposure to light. Certain invisible changes also occur at the same time when these visible effects of light are taking place. Fibers in the paper are broken into smaller and smaller units until they are so short they can no longer maintain the bonds necessary to hold the paper together. Some woods bleach under the action of light; some turn “yellow” and some darken. Unfortunately, the reactions initiated by light continue after the source of the damage has been removed.
Atmospheric Pollutants
Materials of organic origin such as leather, parchment and artifacts in which cellulose fibers such as paper products form the support are likely to be soiled and stained by solid particles of carbon, tarry matters and other solid contaminants. The worse contaminants for this group of materials are sulfurous and sulfuric acids resulting from the combustion of fuels and from other industrial processes. The effects are severe with cellulose materials such as paper and leather. There is a close correlation between the loss of strength of paper and its acidity resulting from sulfuric acid contamination. Dust and dirt particles in the air not only carry with them the adsorbed pollutants mentioned above but may exert an abrasive action on books and paper.
TOPIC FIVE: LIBRARY BINDING
Library binding is a preservation technique for library books, which often face the tough reality of rough handling, many borrowers over their circulating lifetime, and the need to stick around for a long while. Library binding is a protective hardbound binding that is meant to protect the book, or bound set of serials, for durability and long-term preservation. The longer the shelf-life of library books, the more the library can save on the cost of re-buying books over time. Additionally, books are kept in better condition, providing a nicer experience for the reader.
In most cases, the covers on library bindings are made of buckram (a sturdy cotton cloth) and coated with acrylic which renders it resistant to insects, water, and ultraviolet light (2). The spine may be reinforced with linen or muslin, and rounded to prevent the case from buckling. The result is a remarkably sturdy book
Books can be manufactured and purchased directly from a library binder, or libraries can choose to send their books to the library bindery sometime after purchase. This technique is used on books that are important for their content and never used on books that are important as artifacts. Rare books in archival collections undergo treatment from professional conservators and archivists for long-term preservation, or, if fragile, can have individual book boxes made to contain them. Such books are not bound in library bindings.
However, there are several types of binding you can choose, and each has their own unique properties that might make it more suitable for some than others.
Types of binding
- Plastic comb binding – Common form of binding, cheap and easy to do.
- Wire binding – Similar to comb binding, but uses metal wire & looks more professional.
- Slide binders – Cheap, quick & easy to use. Not as secure as other types.
- Thermal binding – Uses heat to bind pages. Very professional looking but more expensive.
- Surebind / Velobind – Permanent form of binding, good for important documents.
- Binding screws & rings – Allows more of the page to be seen and read. Not quite as professional looking.
Plastic Comb Binding
Plastic comb binding is an easy and relatively cheap way of binding your documents, booklets, instruction manuals or reports, and is probably the type of binding most people will be most familiar with.
When you open the document, the pages move around the comb, allowing them to lie flat on a desk, making the bound material very easy to read. This type of binding also allows for easy adding and removing of pages, which is useful if it’s a document that will be updated regularly.
Plastic comb binding is suitable for pretty much everyone, but is popular with schools, offices and print departments.
Wire Binding
Wire binding is quite similar to plastic comb binding but is a smarter way of binding documents to give a more professional finish, although it is slightly more fiddly and generally a touch more expensive.
Wire binding is often used by schools, councils and businesses such as architects and surveyors. Again, the pages will lay flat, making them easy to read, and by using the Renz de-binding tool, you can add and remove pages as required.
This type of binding can be used for various documents and brochures, but is also used for making calendars.
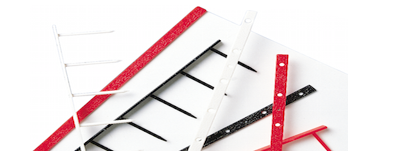
Slide Binders
Slide binders are a very quick and easy way to bind documents that have not been punched. You simply slide the plastic binder up the edge of the document, which makes it very simple to add and remove pages if you need to. This is also a very economical way of binding as no machine is required.
However, by using slide binding, you won’t be able to lay the documents flat, which can make them tricky to read. Therefore, this type of binding may be preferable for material to be read when standing or outside of an office – for example at an exhibition, trade show, waiting areas.
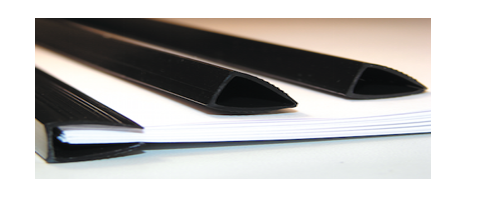
Thermal Binding

Unsurprisingly, thermal binding uses heat to bind documents. The covers have a front, back and spine, with the glue already in the spine. You can choose either hard or soft covers.
You simply insert your documents into the cover and then put the whole lot into the thermal binding machine. After a short time, the machine will beep to let you know it’s done. Leave to cool for a few minutes and your document is ready.
It’s a very professional way of binding so is often used by businesses, although schools often use it too. It is a more permanent form of binding as the pages are glued to the cover. As such, it’s not recommended for documents that may need pages regularly adding or removing.
Sure bind / Velo bind
Both Sure bind and Velo bind are more permanent types of binding that are often used to bind important documents. It works by punching holes down the side of the documents and uses either sure bind or Velo bind strips (depending on the type of machine you have) that have prongs to insert through the holes. The machine then grips the document tightly, cuts the prongs to the correct length and heat seals them.
This type of binding is often used by print and copy shops, as well as universities when binding dissertations and essays. Solicitors also may use Velo bind or sure bind when sending documents to court, as it’s very obvious if it’s been tampered with and pages have been removed.
Binding Screws & Rings
Binding screws and rings are used by punching or drilling holes in the documents, inserting the screws and tightening them. This ensures minimal intrusion of the documents, meaning more of it can be seen or read. These are sometimes used in some forms of book binding. They’re available in nickel, brass and steel.
Procedure followed in bookbinding
| Preparing the Pages
Any existing covers are removed, torn pages are mended, and sections must be intact at the fold. Staples are taken out of magazines. |
| Putting the Pages Together
Hand sewing Books printed in sections (one or more sheets folded in half at the spine) are sewn by hand. The person doing this begins at one end of a section, sews along the centre fold, around cloth tapes, and adds the next section at the other end, securing every section to the previous one. |
| Over sewing
Fifty years ago over sewing machines were invented to sew books printed in single sheets. As with hand sewing, the over sewer begins with a few sheets, and builds up these “sections” one at a time. |
| End Papers End papers are extra sheets which come between the cover and the first and last sections of a book. One of these sheets is sewn or glued to the book and one is eventually glued to the cover. After these are attached to the book, the spine of the book is glued. |
| Edge Trimming
After the spine is glued, a minimal amount of the top, bottom, and opening sides of the book are trimmed. |
| Rounding
A rounding machine rounds the spine of the book to distribute any build-up caused by sewing and to counteract the concave curve of a book when opened. |
| Backing A backing machine shapes the spine so that it is wider that the hinges of the book. This also prevents the eventual tendency of a book to curve in the opposite direction, and locks it into the cover. |
| Headbands
These are glued to the top and bottom of the spines, giving a finished look to the spine edge. These bands may be individually braided or woven by hand, but are usually purchased in rolls and in various colours. |
| Mull
A strong mull cloth that will soak up glue is cut slightly shorter than the length of the book spine and one inch wider. It is glued to the spine as an extra strength to hold the pages together. The flaps extending over onto the front and back are glued to the end paper and the book cover. They add strength, holding the book firmly in the cover. |
| Cutting The Material Two book boards (eskaboard – 60-100 pt.) are measured slightly larger than the book size. The grain of the book board must go up and down so the cover will not warp. |
| Case Making
Gluing the book board onto buckram or another cloth material to make a book cover is called case making. The skilled bookbinder positions parts accurately and uses a bookbinder bone to fold over the cloth and seal it securely, before the cover goes through the case making press (rollers). |
| Gold stamping The case is still not completely finished until the title, author, and any decals and lines are stamped in gold or in a colour. This is done: |
| Pasting and Pressing This is the final step – gluing the book into the cover. The outside endpapers are glued to the cover, sealed by the three-ton pressure of the compressed air operated hydraulic press, and placed between boards to dry overnight. A slightly wider metal strip around the edge of the boards presses the spine hinge into the covers. PaperPaper is available in many forms in the market, and many of these can be used for bookbinding purposes. Rag content paper (paper made from a percentage of woven cotton fibers, normally around 25%, is a good choice over wood pulp paper because it does not yellow and possesses higher durability. If a blank book has to be made, then ledger, white wove bound or typewriter paper of around 16 to 20 points should be preferred. For the end sheets, both domestic and imported paper can be selected in any shade like white, cream, gray or ivory. The same type of paper can also be used for the cover board, boxes and slip cases. The cover should be made from a medium weight paper that is strong and flexible enough to bear folding, pasting and joint fixing. It should also be an attractive shade so that any designing that is done looks beautiful and stands out. It is crucial to be sure that grain direction goes along the spine. Both for the paper and cardboard. You can read a thorough tutorial on finding the grain direction and aligning elements of the book here: Paper Grain Direction and Cardboard Grain Direction. One tip for selecting good quality paper is to inspect it by folding and turning with scraps. If the quality is not good, the paper will either crackle or tear apart. Tape Small Roll of Linen Tape Bookbinding tape is made from linen, cotton or polyester. Polyester tape should not be used in any case because it is not strong enough to support the binding. Either linen or cotton tape should ideally be used, but both have their drawbacks. Cotton tape has a higher flexibility which makes pasting easier. Linen is stronger than cotton and more durable, but the flexibility is a little less. Many times, it has to be pasted twice to achieve the required result. – Personally, I would always use linen tape. The width of tape comes in various sizes. Generally, one fourth and one half of an inch are suitable for most uses. In some cases, a 3/8 inch tape may also be required. ThreadColored, waxed (linen) Binder’s Thread. The thread used for binding should be strong yet soft enough so that it does not cut and tear apart the signature paper. This just weakens the binding, and it does not last for a very long time then. A thread which possesses all these qualities is the linen binder’s thread, but it is not available easily from high street stores .The No 16 and No 25 mercerized cotton thread can serve as good substitutes (what is Mercerized Cotton Thread?). The carpet and No 18 button threads can also be used. In most cases, a No 50 thread will also be just fine, which is often used for sewing cloth. The numbers associated with these threads actually depicts their fineness; a greater number indicates a finer thread, further information on Thread (Yarn). Before sewing, thread should be waxed so that kinking can be prevented. This also strengthens the knot and increases the thread’s life. Boards Books with uncovered plain binding boards A perfect board is one that is stable and dense, and does not allow the covering material to warp as it is pasted onto the board. At times, the material suffers from shrinkage after the paste has dried, which makes the board hollow onto one side. The same thing can happen with the end sheets as well when they are pasted onto the boards other side. Before pasting any of these, it should be ensured that the pull of the end sheet is the same as the cover material. Of the many boards available, a binder board is the most suitable one for use (most common brands are Lineco and Davey Board. Binders Board is made from pulp and is not made from any glue or lamination. The board is manufactured by hydraulically pressing damped pulp webs or blankets onto top of each other. The process removes water and compacts the fibers, reducing the dimension almost 50%. The board produced by this method is resistant to distortion and has a higher density than other boards of the same thickness, which makes it more suitable for binding. Chipboard, which is similar to the back that supports paper pads, can also be used for books that are smaller than 7 by 9 inches. For books greater than this size, make sure the board is not stiff which can weaken the binding with time. In this case, a high quality illustration board can be used because it is stiffer and prevents warping. This board is made in a single ply, double ply or threesome ply. If the book is excessively large and requires even stronger covers then two illustration boards can be combined together and used as one. This can be done by pasting them onto each other and leaving them pressed between heavy weights for about 12 hours. Mull Applying the mull to the backbone Mull is actually a word used for the cloth that is pasted to cover the tapes and the signatures after sewing is done. The main purpose of the mull is to assemble all the signatures together while ensuring that the backbone of the book remains flexible. An ideal mull is one that has enough weave space and durability. The first characteristic allows the paste to penetrate easily and stick it well over the tape and signatures, and the second feature lets the mull bear repeated flexing. The most suitable choices for mull are white linen and muslin because of their high durability. Muslin is available in the unbleached form as well but it can mar the appearance because it may appear as shadow through the end sheets, particularly if they are thin. As such, a white muslin cloth is more preferable. Paste Since traditional times, a paste made out of wheat flour has been used for bookbinding. This particular glue is not only inexpensive, but gives very good results as well, making the binding stay put for several generations to come. Moreover, it is safer than other modern glues that contain chemicals in large quantities, and so can react with the paper and other bookbinding supplies and materials, thereby shortening the life. The wheat flour paste can easily be prepared at home. Pour almost one and a half cup of water into a saucepan. Add about four tablespoons of white flour in the water, but do this is in very small quantities. All the while, beat the mixture thoroughly with a fork or egg beater. Heat the mixture and stir it constantly until water begins to boil. Remove the saucepan from heat and let the mixture cool at room temperature. Remember that the stirring step is important because it prevents the mixture from getting burnt and sticking into the pan’s bottom. Once the paste has been cooled off, observe its consistency. If it seems too thick, then add more water. This homemade paste can be stored at room temperature for a quite a few days. However, if it is refrigerated in an airtight container, its life can increase up to three weeks. If mold starts growing on the paste, then throw it out, and make some more. ClothA fine example of buckram cloth work Cloth may be available in a wide range in the market, featuring attractive hues, beautiful designs, varying textures and different weaves. However, not all of them can be used for bookbinding. This is because every fabric does not have the same suppleness, the same handling strength and behaves differently when pasted onto other materials. The last point is obviously the one of most concern because it depicts the strength and life of binding. Before choosing any fabric, test it by two different methods as an assurance that the right one would be chosen. In the first technique, apply some glue onto the cloth and fix it onto a small piece of the board. Now put some glue onto the surface of the board, and then try to fix the cloth over it. Observe the paste: if it settles down and stays there while putting the cloth firm in its place, the fabric can be used. However, in other cases, the paste might just seep through the fabric, and appear on the actual cover. This creates a very prominent stain when the paste dries up. Moreover, if the quality of the paste or the fabric is low, the paste can dull the color of the fabric or change it due to chemical reactions with the dyes. Considering all the factors, the most suitable cloth is binder’s buckram. It does have its drawbacks, but the fact that the fabric does not allow the paste to appear onto the outer surface compensates them. The buckram fabric is woven in a special manner such that the weaves prevent the glue from passing through. But the cloth is stiff and it cannot be easily manipulated or folded over. As such, it is difficult to stick it onto the board; the overall effect is good because no glue stains appear on the cover outweighs this. However, choosing a color might be hard because buckram is available in limited shades only. Right Tools and Equipment for bindingA large variety of tools are needed for bookbinding. Some of them are present in every household and others are easily available in the market. A few tools can also be prepared by simple methods, which will be discussed in another section of this website. Carpenter’s Square A carpenter’s square is a must have tool for cutting the paper and the board accurately. The recommended size is 16 by 24 inches. Squares in smaller sizes are also available, but using a professional sized model made of steel is more advantageous because it has a greater weight, and so does not slip or move from place during any cutting operation. A little video I discovered displaying some interesting things you can do with a carpenters square (along with some basic techniques in the first minute! Steel Ruler A ruler is used for various purposes when binding books together. These include, measuring, cutting, trimming, folding and other tasks that require using a sharp and straight edge. Try if you can to get one with a lip or raised edge (like this one) to save cutting your fingers which I guarantee you’ll do multiple times if you get a standard steel rule. Knives & Cutting Mat A rubber cutting mat & knife are essential for common bookbinding tasks. Your knife should feature a large handle which provides a strong and firm grip, whilst making the tool safe for use. The blade should be replaceable and/or be sharpened if it becomes blunt or wears out, a common Stanley knife is perfect. Razor Blade The sharpest things on the market, perfect for cutting paper of any thickness.While you can use the knife for all sorts of cutting tasks, it is better to use a blade if you have to cut paper. Made of extremely thin and sharp steel, a razor blade cuts paper into pieces with very fine edges. If you can maintain a good grip on it, you can also use a blade for cutting boards. I use Feather razors to shave with as they are the sharpest and finest blades you can buy on the market (made in Japan!), I also use these for cutting paper, quite simply perfect. There is just one issue that you might face. Until you hold a blade perpendicular to the surface, you would just put pressure on it, which can break the blade easily. Shears Shears will be needed for cutting cloth. Look in the market for a size that is around 8 inches and has offset handles, which can make the grip better. Flat Folder A flat folder would be required so that you can properly fold and crease the paper and cloth over the hinges. You do not need to buy this;– It’s effectively a piece of flat sanded wood. |
Paper
Paper is available in many forms in the market, and many of these can be used for bookbinding purposes. Rag content paper (paper made from a percentage of woven cotton fibers, normally around 25%, is a good choice over wood pulp paper because it does not yellow and possesses higher durability. If a blank book has to be made, then ledger, white wove bound or typewriter paper of around 16 to 20 points should be preferred. For the end sheets, both domestic and imported paper can be selected in any shade like white, cream, gray or ivory. The same type of paper can also be used for the cover board, boxes and slip cases.
The cover should be made from a medium weight paper that is strong and flexible enough to bear folding, pasting and joint fixing. It should also be an attractive shade so that any designing that is done looks beautiful and stands out.
It is crucial to be sure that grain direction goes along the spine. Both for the paper and cardboard. You can read a thorough tutorial on finding the grain direction and aligning elements of the book here: Paper Grain Direction and Cardboard Grain Direction.
One tip for selecting good quality paper is to inspect it by folding and turning with scraps. If the quality is not good, the paper will either crackle or tear apart.
Tape
Bookbinding tape is made from linen, cotton or polyester. Polyester tape should not be used in any case because it is not strong enough to support the binding. Either linen or cotton tape should ideally be used, but both have their drawbacks. Cotton tape has a higher flexibility which makes pasting easier. Linen is stronger than cotton and more durable, but the flexibility is a little less. Many times, it has to be pasted twice to achieve the required result. – Personally, I would always use linen tape.
The width of tape comes in various sizes. Generally, one fourth and one half of an inch are suitable for most uses. In some cases, a 3/8 inch tape may also be required.
Thread
Colored, waxed (linen) Binder’s Thread. The thread used for binding should be strong yet soft enough so that it does not cut and tear apart the signature paper. This just weakens the binding, and it does not last for a very long time then. A thread which possesses all these qualities is the linen binder’s thread, but it is not available easily from high street stores .The No 16 and No 25 mercerized cotton thread can serve as good substitutes (what is Mercerized Cotton Thread?). The carpet and No 18 button threads can also be used. In most cases, a No 50 thread will also be just fine, which is often used for sewing cloth. The numbers associated with these threads actually depicts their fineness; a greater number indicates a finer thread, further information on Thread (Yarn).
Before sewing, thread should be waxed so that kinking can be prevented. This also strengthens the knot and increases the thread’s life.
Boards
A perfect board is one that is stable and dense, and does not allow the covering material to warp as it is pasted onto the board. At times, the material suffers from shrinkage after the paste has dried, which makes the board hollow onto one side. The same thing can happen with the end sheets as well when they are pasted onto the boards other side. Before pasting any of these, it should be ensured that the pull of the end sheet is the same as the cover material.
Of the many boards available, a binder board is the most suitable one for use (most common brands are Lineco and Davey Board. Binders Board is made from pulp and is not made from any glue or lamination. The board is manufactured by hydraulically pressing damped pulp webs or blankets onto top of each other. The process removes water and compacts the fibers, reducing the dimension almost 50%. The board produced by this method is resistant to distortion and has a higher density than other boards of the same thickness, which makes it more suitable for binding.
Chipboard, which is similar to the back that supports paper pads, can also be used for books that are smaller than 7 by 9 inches. For books greater than this size, make sure the board is not stiff which can weaken the binding with time. In this case, a high quality illustration board can be used because it is stiffer and prevents warping. This board is made in a single ply, double ply or threesome ply. If the book is excessively large and requires even stronger covers then two illustration boards can be combined together and used as one. This can be done by pasting them onto each other and leaving them pressed between heavy weights for about 12 hours.
Mull
Mull is actually a word used for the cloth that is pasted to cover the tapes and the signatures after sewing is done. The main purpose of the mull is to assemble all the signatures together while ensuring that the backbone of the book remains flexible. An ideal mull is one that has enough weave space and durability. The first characteristic allows the paste to penetrate easily and stick it well over the tape and signatures, and the second feature lets the mull bear repeated flexing.
The most suitable choices for mull are white linen and muslin because of their high durability. Muslin is available in the unbleached form as well but it can mar the appearance because it may appear as shadow through the end sheets, particularly if they are thin. As such, a white muslin cloth is more preferable.
Paste
Since traditional times, a paste made out of wheat flour has been used for bookbinding. This particular glue is not only inexpensive, but gives very good results as well, making the binding stay put for several generations to come. Moreover, it is safer than other modern glues that contain chemicals in large quantities, and so can react with the paper and other bookbinding supplies and materials, thereby shortening the life.
The wheat flour paste can easily be prepared at home. Pour almost one and a half cup of water into a saucepan. Add about four tablespoons of white flour in the water, but do this is in very small quantities. All the while, beat the mixture thoroughly with a fork or egg beater. Heat the mixture and stir it constantly until water begins to boil. Remove the saucepan from heat and let the mixture cool at room temperature. Remember that the stirring step is important because it prevents the mixture from getting burnt and sticking into the pan’s bottom. Once the paste has been cooled off, observe its consistency. If it seems too thick, then add more water.
This homemade paste can be stored at room temperature for a quite a few days. However, if it is refrigerated in an airtight container, its life can increase up to three weeks. If mold starts growing on the paste, then throw it out, and make some more.
Cloth
Cloth may be available in a wide range in the market, featuring attractive hues, beautiful designs, varying textures and different weaves. However, not all of them can be used for bookbinding. This is because every fabric does not have the same suppleness, the same handling strength and behaves differently when pasted onto other materials. The last point is obviously the one of most concern because it depicts the strength and life of binding.
Before choosing any fabric, test it by two different methods as an assurance that the right one would be chosen. In the first technique, apply some glue onto the cloth and fix it onto a small piece of the board. Now put some glue onto the surface of the board, and then try to fix the cloth over it. Observe the paste: if it settles down and stays there while putting the cloth firm in its place, the fabric can be used. However, in other cases, the paste might just seep through the fabric, and appear on the actual cover. This creates a very prominent stain when the paste dries up. Moreover, if the quality of the paste or the fabric is low, the paste can dull the color of the fabric or change it due to chemical reactions with the dyes.
Considering all the factors, the most suitable cloth is binder’s buckram. It does have its drawbacks, but the fact that the fabric does not allow the paste to appear onto the outer surface compensates them. The buckram fabric is woven in a special manner such that the weaves prevent the glue from passing through. But the cloth is stiff and it cannot be easily manipulated or folded over. As such, it is difficult to stick it onto the board; the overall effect is good because no glue stains appear on the cover outweighs this. However, choosing a color might be hard because buckram is available in limited shades only.
Right Tools and Equipment for binding
A large variety of tools are needed for bookbinding. Some of them are present in every household and others are easily available in the market. A few tools can also be prepared by simple methods, which will be discussed in another section of this website.
Carpenter’s Square
A carpenter’s square is a must have tool for cutting the paper and the board accurately. The recommended size is 16 by 24 inches. Squares in smaller sizes are also available, but using a professional sized model made of steel is more advantageous because it has a greater weight, and so does not slip or move from place during any cutting operation.
A little video I discovered displaying some interesting things you can do with a carpenters square (along with some basic techniques in the first minute!
Steel Ruler
A ruler is used for various purposes when binding books together. These include, measuring, cutting, trimming, folding and other tasks that require using a sharp and straight edge. Try if you can to get one with a lip or raised edge (like this one) to save cutting your fingers which I guarantee you’ll do multiple times if you get a standard steel rule.
Knives & Cutting Mat
A rubber cutting mat & knife are essential for common bookbinding tasks. Your knife should feature a large handle which provides a strong and firm grip, whilst making the tool safe for use. The blade should be replaceable and/or be sharpened if it becomes blunt or wears out, a common Stanley knife is perfect.
Razor Blade
The sharpest things on the market, perfect for cutting paper of any thickness.While you can use the knife for all sorts of cutting tasks, it is better to use a blade if you have to cut paper. Made of extremely thin and sharp steel, a razor blade cuts paper into pieces with very fine edges. If you can maintain a good grip on it, you can also use a blade for cutting boards. I use Feather razors to shave with as they are the sharpest and finest blades you can buy on the market (made in Japan!), I also use these for cutting paper, quite simply perfect. There is just one issue that you might face. Until you hold a blade perpendicular to the surface, you would just put pressure on it, which can break the blade easily.
Shears
Shears will be needed for cutting cloth. Look in the market for a size that is around 8 inches and has offset handles, which can make the grip better.
Flat Folder
A Flat folder will be requires so that you can properly fold and crease the paper and cloth over the hinges.
Folding Stick
A folding stick serves as a traditional bone folder. It is available in the market, but just like the flat folder, make one at home because you can do a better job and produce a more effective tool than the pre-made ones.
Folding Needle
Want your work to be extremely fine and of high quality? Get a folding needle, but just keep in mind that this is another tool you should make at home.
Right Angle Card
A right angled card is in the shape of a square that is utilized for shaping the book head into a square before attaching it to the mull. You can use a carpenter’s try square for the same purpose, but why not go for an option that is more convenient?
Squared Card
Just as the name suggests, you can use the squared card in all tasks that require a square. An example of this could be an inspection of the overhang of the cover boards.
Sewing Frame
A sewing frame can make your sewing job a lot easier because it leaves both your hands free for sewing, and does not require you to hold the materials in one hand, and the needle in another. You can use a frame to fix the tapes taut in appropriate positions, and use the platform for laying the signatures.
Press and Tub
A press and tub is probably the most vital binding equipment that you are going to need. Add it to the list of bookbinding supplies that you want because you can do with no other substitute as there isn’t one. This is another tool that can be made at home for only a small percentage of the costs involved with a commercial product (example of a handmade one). However, it is easier to buy a premade press because it is more effective and convenient.
There are many types of presses, including laying (or lying) presses, finishing presses, nipping presses and more. A finishing press can only help you with limited tasks, but a laying press can be used for all sorts of jobs that also cover the functions of a finishing press. So if you are buying a commercial product, a lying press should be your choice.
Benefits of book binding
- Binding make the book and project reports look good. Just imagine what impression it will give to your seniors or professors if you submit your project report as loose sheets without proper binding. Or imagine how shabby will it look to submit stapled sheets of papers as a project report. To make books and project reports look good, binding is very important. It also gives an impression that you are not an irresponsible person and care for your hard work and effort spent in making the project report.
- Binding improves the shelf life of the books and project reports. Unbound books and papers do not remain intact and can be lost. Just imagine the situation when you have an unbound book and suddenly on the night before your exam you realize that some pages of the book have been lost. This is the worst thing which can happen with unbound books. So, binding of books is of utmost importance. There are certain books and documents which you might need for many years. So, keeping them bound is a good idea.
- Binding not only makes the books and documents look good but also gives them a professional look. If your project report is well bound on the day of presentation, it will leave a good impression on your seniors and colleagues. These days, lots of beautiful binding covers are available in market. You can even get the titles embossed on these covers giving them even more professional look.
- Binding is much less expensive and more efficient than punching holes in documents to insert them in files and folders.
CHAPTER SIX: RESTORATION OF INFORMATION MATERIALS
The conservation and restoration of books, manuscripts, documents and ephemera is an activity dedicated to the preservation and protection of items of historical and personal value made primarily from paper, parchment, and leather.
Restoration-is an activity carried out or performed on damaged document. The process aims at treating the documents and brings it back to its original state.
Methods used in restoration of information
- Lamination
- Inlaying
- Full-pasting
- Leaf casting
- Chiffon repair
- Deciphering
- Deacidification
- Fumigation
- Patch repair
- Re-sizing
- Tissue repair
- Encapsulation
- Repair of oversized document.
Rules and principles of restoration of information
- The principle of reversibility; states that all restoration work must be reversible
- Principle of visibility, all repair carried out must be visible
- Principle of compatibility of materials, papers should be used in repairing the document and must be compatible with the document to create harmonious assistance
- The repair carried out must correspond with the degree of damage.
- Any repair carried should not interfere with the original value of the document.
- Any process of repair used should be economical and at the same time give the document maximum protection (principle of affordability).
- Restoration work should not increase the bulkiness of the document.
- The treatment that is used should match the problem e.g. even if the acid is the cause of the documents brittleness. Deacidification cannot be a solution to the brittle document. Strengthener is required for reinforcement.
- Avoidance of any process which imply real or apparent modification authentic(genuine known to be the true, real)
- Respect for any complimentary additions which are inseparable part of the history of the cultural object itself.
- Renunciation of any treatment demand technical and human resources that exceed human resources that is available.
- Reconstruction of missing elements when the gaps are identifiable.
- It’s important to stabilize and consolidate materials that have suffered damage as approved, to their complete removal.
- All restoration work must be documented and this should involve;
- Documenting the form and materials constituting the document.
- Define the treatment to be used for repair
- Documenting the repair materials to be used
- Documenting the date when the treatment was carried out.
- Documenting the name and the designation of the office who carried out the treatment.
FACTORS TO CONSIDER BEFORE RESTORATION
Identify the document value
- Identification of the characteristics and properties of the materials which it is made of.
- Structural analysis of all the elements which make up the whole.
- Definition in time and space of historical period and time in which it was created and possible additions.
- Objectives assessment of all the physical and functional modifications which it has undergone.
Evaluate in current state of conversion determining:
- Causes of alteration
- Physical or functional damage or effects
Definition of treatment to be applied in accordance with the data obtained from the previous studies.
TREATMENT PREPARATION PROCESS
Before a document is repaired the following process should be carried out to determine which type of restoration to be followed.
1. Surface cleaning of the paper.
Dirt on the surface of the paper is removed using a soft flat brush, a plastic eraser or documented cleaning pad according to paper type and its condition.
2. Removing adhesives:
Pressure, sensitive adhesive tapes are removed from paper by carefully applying small quantities of a solvent and pulling the paper off as the adhesive softens. This process is slow and calls for patience and care.
3. Removal of tape fasteners
Metal fasteners rust, rubber bands become brittle and may discolor paper, strings or cloth ties cut into brittle paper and can be highly acidic. These and more tools such as spatula.
4. Mending tears in paper.
Tears in paper are repaired by patching them with strong acid free paper as nearly transparent as possible. Long fibers, handmade Japanese papers which are torn easily to fit the shape of the tears are commonly used with archival –quality adhesives. Two patches a little larger than the shape of the tear to be mended are out or torn, adhesive applied on both sides of the paper being repaired, the patches are stuck on and the repaired tear dried under weights.
5. Checking the solubility of the ink
The solubility is tested by putting a drop of water on the writing and allowing it to settle for around five minutes then a blotting paper is used to sue the drop of water. If it is dyed the ink is soluble and needs to be fixed before carrying out any aqueous restoration techniques.
TESTING THE PH OF THE DOCUMENTS.
The ph of the paper to be determined by dropping a single drop of water on the paper and leaving it for five minutes. The ph paper is used, it’s allowed to absorb the water and see if the paper turns reddish- then it’s acidic it turns bluewish – alkaline and if it doesn’t turn the it is neutral.
Methods used in restoration.
Lamination
Laminate is a material that can be contracted by uniting two or more layers of materials together. The process of creating a laminate is known as lamination
Materials used in lamination.
Acetone solution
Procedure followed
- Acetone solution and acetone foil are mixed. The foil meets into a solution
- A brush is used to polish the fading ink on a document using the melted solution
- Leave the document to dry. The ink becomes stable on the paper i.e the ink will permanent achieving ink on the paper.
Types of lamination
Hand lamination (solvent/manual)
Machine lamination.
- Hand lamination
This method originated in India. The method is approximate for of large documents with paper dissolving and cannot be in contact with water.
Materials used.
- Cellulose acetate film
- Acetone solution to help in preparing the adhesive by dissolving the acetate
- Japanese tissue paper for rehenforcing materials.
- Cotton swabs
- Glass toped table
Procedure followed in hand lamination.
Lay the document on a dry surface and place acetone foil on it
Place a Japanese tissue paper on it
Acetone is applied on this arrangement by use of a cotton wool (movement should be from the centre towards the edge)
Turn the arrangement and repeat the process.
Advantages of hand lamination
- It is time consuming and very slow.
- It needs many personnel.
- It needs large tables and hence space.
- It interferes with legibility of the writings.
- It increases the size of the documents and hence storage problems.
Machine lamination.
- Materials used
- Heat resistant materials
- The source of heat (instead of acetone solution)
- Acetone foil.
- Japanese tissue paper.
Procedure followed:
- Set the arrangement as in solvent lamination (re-visit the procedure in hand lamination above)
- First place the arrangement (prepared document as in hand lamination) on the heat resistant material and cover it again with the same heat resistant material.
- The upper and the lower plates of the laminator hold the document.
- The document is then laminated on both sides at the same time.
N/B many small documents can be arranged and laminated on both sides at the same time.
Advantages of machine lamination:
Several small documents can be laminated at one ago hence saving time.
It is also suitable and effective for reinforcing damaged document provided the variables are controlled.
It is a suitable for document with running ink or pigments
It is a reversible process.
Disadvantages of machine lamination.
- The higher temperatures might accelerate the aging of the document.
- It needs trained personnel to handle the machine.
- The initial cost, repair and maintenance of the machine are high.
2 De-acidification: it is a process intended to neutralize the paper acidity and deposits an alkaline buffer to prevent the return to an acidic state.
Acid make a document to become brittle and break. Therefore to conserve a document it must be de-acidified i.e. make it neutral to litmus paper. To test the acidity the conservator tests the PH of the paper.
Procedure for testing the PH of the paper.
- Pour a few drop of the universal indicator solution on the sample of paper (document)
- Give it a few minutes for the reaction to take place.
- Compare the results with the scale for colour change and merge the number.
The scale:
- Cherry red
- Rose
- Orange red
- Orange
- Yellow orange
- Yellow
- Yellow green
- Green
- Sky blue
- Violet
Techniques/ methods used in de-acidification.
- Aqueous /wet/ barrows method.
- Non aqueous / dry method.
Aqueous deacidification. Materials needed
- Calcium hydroxide.
- Basin
Procedure for deacidification: in aqueous deacidification
Stage 1 preparation.
The document are put in a basin of water and left there overnight (the water colour will change to brownish and this is due to acid migration and dust.)
Stage 2 deacidification.
A standard solution is prepared for deacidification (20g of calcium hydroxide powder to half a litre of water)
Put this solution in a funnel and filter. A clear solution will come out of the basin. The clear standard is put into a basin.
Remove the document from the basin of water deep them into the basin of standard solution and keep them their overnight to de-acidify.
Stage 3 drying.
Remove the document from this standard and pt them in a clean basin of of water for some reasonable time to wash off excess solution and hence stop any further reaction
Remove the documents from water and leave them to dry on the racks
Advantages of aqueous method of deacidification.
- This improves the bonding of the celluse fibres.
- It is easier to apply.
- It takes relatively shorter time to apply once the documents are immersed in the solution and every part of the material or document is deacidified.
- It is through an effective method as every part of the material is immersed into the solution and receives similar treatment.
- It forms a buffer against the information materials as the precipitates that remain protect the document.
Disadvantages of aqueous deacidification.
- It is expensive in terms of raw materials ( chemicals)
- It is not suitable for fragile documents.
- It needs trained personnel.
- It is time consuming (in terms of putting and waiting overnight).
Non-aqueous (dry method)
Dry method of deacidification may be carried out bye use of
- Ammonia solution
- Vapour phase.
Ammonia solution. Procedure
- Arrange the documents in a v-shaped in a special build chamber.
- Adjust the temperature and humidity to about 80( the ammonia solution will change into vapour and raise the PH to about 7.28)
- Give the documents about 24-26 hour for deacidification to take place.
Procedure in vapour phase
- Arrange the documents in a v-shaped manner in a special built chamber.
- Dry powder of the carbonate is dissolved in water or alcohol.
- Put this solution in the (special built) chamber and seal to make it air-tight.
- Adjust the temperature and humidity to about 80. (The ammonia solution will change into vapour and raise the PH to about 7.28.
- Give the documents about 24-36 hours for deacidification to take place
N/B. Non- aqueous method is recommend under the following conditions.
- When the document to be treated are written in water soluble inks (those inks that are affected by water and spread easily when it comes into contact with water)
- When the document to be treated is brittle i.e those that can easily break when immersed into water.
The method should not be used for documents which are written by red ink/dye or those can easily be affected by organic solvents instead magnesium acetate solution should be used. (Dry method)
- This should involve as bit brushing and spraying and not immersing.
Advantages of non-aqueous method.
- Not wet treatment is required so it is safer on the documents.
- Treatment is effective as the gas permeates all the materials provided enough time is given.
- Several documents can be deacidification at the same time.
- It does not need to pull off the bound volume for treatment to be effective.
- It is easy to apply.
- It does not require testing for ink solubility before treatment.
Disadvantages on non-aqueous method.
- It is easy to observe what is taking place and therefore one cannot be 100% sure that all acids have been neutralized.
- It requires carefully controlled conditions hence expertise knowledge.
- It requires special made equipment e.g. the air tight special built chamber or cupboard.
- It requires a lot of time for effective de acidification to take place.
- Some gases used are toxic i.e. ammonia gas.
- Fumigation:
Fumigation from the conservation point of views is considered as the first aid to the information materials. All new acquisitions must be fumigated. In case of any infection by micro-organisms it cannot be detected by use of naked eyes so fumigation of all new acquisition is inevitable.
Fumigation is done using using a suitable recommended insecticides or fumicides and also using proper recommended concentration.
Factors considered before treatment of documents using fumigation.
- Chemicals being used for fumigation are both harmful to insects and human beings during fumigation great care must be exercised.
- The concentration of fumigable has to be measured according to the recommended procedures followed.
- The time for fumigation has to be observed according to the recommended duration and procedures
- Only fumigation of tested efficiency should be used. Testing should be done on materials which are not usable.
N/B. for it is 100% effectiveness fumigation should be done in fumigation chamber special room box or cupboard.
Methods of fumigation.
- Gaseous fumigation.
- Thymol crystal fumigation/heat treatment.
- Liquid crystal fumigation.
1 Gaseous fumigation.
This is the use of some chemicals in gaseous from to treat the affected documents by e.g. moulds fungi and mildews e.t. c.
The document are sprayed using the recommended gas for a given identified organism.
2 Thymol crystal fumigation /heat treatment.
The documents are arranged in special chambers and source of heat is introduced from below. The temperature is increased to such level that it become unbearable to the infect ants hence due.
Books and files are placed in a v-shaped position.
3 Liquid crystal fumigants.
A liquid is used to react document infected by fungi mildews and moulds. However before using this method make sure that the ink is not soluble in water.
Safety and precautions during fumigation.
The person undertaking fumigation should use.
- Mask
- Gloves
- Dust coat
- Headgear
Procedure for fumigation.
- Preparation of fumigation chamber that is air tight.
- Arrange the volumes that are to be fumigated in the chamber in an inverted v-shaped position.
- Close the entrance and seal it.
- Remove the air using a simple pump.
- Introduce the fumes from evaporating chemicals.
- Allow the materials to be exposed to the fumes within the described time period.
- Remove the materials and clean them according to the instruction.
Advantages of fumigation.
- Effective for documents affected by micro-organism.
- Faster method since documents can be treated at the same time.
- The information materials will not be tempered with in the process of preparation.
- Saves time and energy because the fumigation of the new acquired document is done before the storage.
Disadvantages of fumigation.
- Expensive in terms of cost e.g. chemicals.
- Can cause health problems.
- Time consuming in terms of preparation of fumigation chamber.
- Needs expertise.
- Some methods may require the use of special chamber i.e. gaseous and thymol crystal fumigants.
- Chemicals used are toxic and harmful to human beings and therefore care must be taken when using this method.
4. Tissue repair.
This method of repair is suitable for very fragile documents, in all stages of documents deterioration. It’s suitable for the documents written on both sides and with very bright writings.
Materials used in tissue repair method.
- Japanese tissue paper (transparent tissue paper).
- Carbon methyl cellulose (CMC) paste.
- Sodium salt which is in powder form.
- Roller
- Glass toped table.
Procedure followed in tissue paper.
- Wet the surface and spread the Japanese tissue paper on it
- Dissolve CMC to form a paste.
- Use a brush to apply a thin paste on the Japanese tissue paper ensuring that the paste is spread uniformly.
- Relax the document to be repaired using water-jet pump to remove previous repair work e.g. cello-tape.
- Place the document on the centre of Japanese tissue paper prepared and make sure that the paper is flat with no air bubbles.
- Apply a thin layer of CMC paste on the document.
- Place another Japanese tissue paper on top of the paste document.
- Use rollers to remove any wrinkles or air bubbles.
- Transfer the freshly repaired documents to the drying rack.
- Trim the excess tissue paper leaving a margin of 2mm all rounds.
Advantages of tissue repair.
- It’s suitable for enforcing strength to documents which are brittle and fragile.
- Gives a new case i.e. it will make documents to be more durable.
Disadvantages of tissue repair.
- Requires expertise to the method.
- Slightly increases the thickness of the document.
- It interprets with legibility of the writings.
- RE-SIZING.
Is a procedure that smoothens the paper to make it have a proper surface for taking ink without bloating.
Materials used.
- Sizing materials such as animal glue, paste and gelatin.
- Water for dissolving the sizing materials.
- Enamel tray that is strong enough to withstand chemicals.
- Spray gun or brush.
- Waxed paper.
Procedure of re-sizing.
- Dissolve the appropriate sizing agent in water and then warm up the water to about 42-44 degrees.
- Pour the required amount in a tray to drain off the excess sizing agent.
- Place the affected documents one at a time on pieces of wire mesh netting.
- Immerse the documents one at a time in the solution from an angle ensuring the documentnis completely submerged.
- Remove the documents and drain off excess sizing.
- Allow the document to dry under normal room temperature.
- When semi-dry the documents should be put between 2 pieces of waxed paper and allowed to dry completely under slight pressure.
- Finally take the document back to the shelves or where they were before.
Advantages of resizing.
- It’s effective in strengthening slightly fragile documents because it consolidates the component of such documents.
- The method can be applied to all document whether written on one side or both sides .
- It is easy to apply and does not interfere with the original size of the document.
Disadvantages of re-sizing.
- It interferes with the legibility of writings.
2. It cannot be applied to extremely fragile documents as this can easily break them down.
3. Not applicable to documents with dissolving ink.
- DECIPHERING /INK RECOVERY.
This is a process or science that is applied to bring back a faded document to life.
- Pigment or writings on the document will always fade because of the oxidation process that involves inks and other types of dyes that have been used.
Oxidation is influenced by:
- Relative humidity.
- Presence of pollutants.
Methods of deciphering.
- Chemical process
- Physical/photographic method.
Chemical process.
This involves the use of chemical solutions such as dilute solutions of ammonia sulphate. Sometime the solution of tannic acid can be used. The chemicals have characteristics of reacting with iron oxides to form blue-black coloured fernic compounds.
Procedure in chemical process.
- Test the entire document for the presence of any chemicals such as iron copper and others
- If the document is found to have iron copper and others then prepare a solution of hydrogen sulphate at concentration of 2-3 %.
- Using a stylus pen re-write on the paper tracing the previous writings using the ammonium sulphate solution. Then wash the document using hydrogen sulphate.
Advantages of chemical deciphering method.
- Restores faded ink.
- Bonding of the cellulose fibres in enhanced.
- Iron copper and other impurities are washed from .
7. ENCAPSULATION.
This is the process known as docketing. Its a reinforcement measure particularly on fragile documents.
It enhances durability by giving documents a new lease of life 100-200 years.
Materials used.
- Transparent polyester material.
- Iron box or heat spatula
- Scrapper / scalpel/ knife for cutting.
- Ruler for measuring
CHAPTER SIX: SETTING UP A CONSERVATION WORKSHOP
It’s a building set aside for the purpose of maintain information materials or preserve the materials in good condition in order to prolong their life-pan so as to serve the future generation.
Duties of a conservator in a conservation workshop
- Maintain the conservation equipment
- Managing staff and allocating them duties
- Providing advice on the conservation of information in an information centre.
- Providing materials and equipment needed for conservation of information.
Developing a strategy of preservation/conservation workshop
Broadly speaking, the function of a forward thinking plan is to establish the real priorities not necessarily dealing with the apparently worst problem first. Whilst preservation activities provide a wide range of possibilities, there are some basic elements that must be established first. Without them any more technical solutions, such as practical conservation, will fail.
Establishing a secure storage facility
The starting point in developing a strategy to maintain material that is affected by its surroundings is to ensure that the building in which it is housed meets the basic requirements for the storage of library and archive materials. It may seem obvious but this consideration is often low on the agenda.
The building must be situated in an area that is identified as secure – i.e. not close to any military installations or the petro-chemical industry. It must be situated well away from sources of water, especially rivers and lakes. All vegetation in close Proximity must be removed and a clear perimeter area established around the building. Ideally, there will be no basement or sub-level storage and the (again, ideally) single-storey building will be above literal ground in case of local flooding.
The building must have one identified entrance (for both in and out) and all windows must be protected against intruders – this must also include controlling access by rodents and insects. A fine metal wire mesh over the openings will offer some protection. The provision of blinds to exclude direct sunlight is recommended. All doors and other direct means of access must have good seals when closed. There must be a ready availability of basic fire-fighting equipment and some form of out-of-hours inspections.
Lighting should be fluorescent and able to be controlled aisle by aisle. Other electrical sockets should be minimal and placed for the ease of cleaning staff.
In most cases it will not be possible to install any air-conditioning systems because of set-up, running and maintenance costs. The use of windows to increase ventilation will need to be considered against the risks. Precautionary measures, as mentioned above, will reduce the overall risk, but regular monitoring by appropriate staff is essential. Any other option to reduce high humidity and temperature levels should be investigated. It is suggested that the fabric of the building may provide some source of control.
As in section 3.2, the above recommendations are based on archival standards and best practice. It is clearly not feasible, or desirable, to pack books that are on open-access; the depth of library shelving will only accommodate archive style boxes if they are placed side on, and this is not economic on space or aesthetically pleasing. However, boxing for groups of pamphlets can be a useful solution for access and security. The appearance of the books on the shelves is very important in the library environment, and is also a mainstay of public perception of standards.
Book stock that is defined as reserve or special collection may benefit from a different form of storage and boxing will answer many of the concerns regarding protection and security. Boxing can also be a suitable method for stabilizing material that is too fragile to handle, or reference material that is so badly degraded that a microform copy has been created, but the original must be retained (a very viable solution to the problem of deteriorating newspapers)
Packaging
It is recommended that a packaging programme be developed as part of an overall preservation strategy. This is an area where much can be achieved with prudent investment. It will considerably improve the management of the materials if packaging is standardized.
It is suggested that for single sheet material, each file or bundle be packaged in a separate archival quality folder. The folder is then tied four ways with an archival quality linen tape, which is threaded through a non-rip label.
Calculations will have to be made regarding how many folders will fit in each box and how much material will fit into a folder. This information can then be used to inform future standardization.
It is further recommended that plans and maps, where possible, are stored flat, in folders, and in plan chests. Careful consideration must be given to the safe handling of this material. Clear policy guidance must be developed to include a decision on:
- the number of items per folder
- the number of folders per drawer
- the use of an appropriate trolley to transport large format folders
- the number of folders made available, at any one time, to an individual researcher
- The range of weights and Melinex sheets available to aid the viewing and protection of maps and plans.
Handling
An early target must be to ensure that all staff is aware of the importance and responsibility of handling. It is crucial that high standards are maintained in the public areas, where trained staff must ensure that users are aware of their responsibility when handling original material. Strong standards of supervision must be maintained, and it is recommended that pencils only be used for note taking. The expected standards of behavior must be published and available to users – no smoking, eating or drinking, etc.
If a photocopier is to be added to the services on offer, copying should be carried out by staff only and not be self-service. A record must be kept of any items that are copied regularly – it may be appropriate to produce a facsimile.
There are a range of risks to original material associated with the photocopying process, especially handling and physical damage:
- the spines of books are easily damaged when placed face down on a photocopier platen
- large sheets are damaged when they are allowed to hang over edges
- Frequently copied photographs can be affected by the intensity of the copying light source.
There are no suitable, specially designed photocopiers. Some useful work is currently underway to improve the handling capacity of digital copying systems. The digital vs microfilm debate has moved into a crucial phase with a range of hybrid systems in development. However, the production of published standards, defining responsibilities, will aid in enforcement.
Disaster preparedness and recovery
It is recommended that all institutions that hold books or records develop an emergency plan. This will enable staff to react effectively and efficiently if an emergency event occurs. The plan must be clearly written and understood by all the staff who will be involved. The plan will further require a rigorous training and review programme to be developed.
The main elements of an Emergency Plan:
- Risk assessment – assessing the dangers to the building and the collections
- Prevention – implementing measures to remove or reduce danger
- Preparedness – the detail of the plan itself
- Response – the planned procedures to follow
- Recovery – restoring the site and material to a stable and usable condition.
The assessment of risk will involve the establishment of a building maintenance programme. This will identify both the external and internal environmental threats.
Prevention will include the level of routine building maintenance carried out and the degree of provision of fire alarm and fire suppression systems.
Preparedness will require detailed floor plans and the establishment of priority lists of the stored material. It will consist of a range of management activities, such as regular reviews of incidents (however minor), the identification of salvage areas, the training of staff and the establishment of teams to carry out the specific salvage activities.
There is also a need for a significant commitment to the research of local facilities, including freezer and transportation services. Careful consideration will be required to identify adequate budgets for the purchase of emergency supplies.
Response will be the practical application of the plan and its timetable. This will include:
- Assembling the teams.
- Preliminary assessment.
- Recording.
- Packing for freezing.
- Air-drying slightly wet material.
- Conservation treatments (on-site if applicable).
Finally, recovery will require management to set priorities, liaise with the media, clean and rehabilitate the site and ultimately review the plan.
THE ROLE OF SURVEYS
One of the most significant ways to define the extent of a conservation problem is to look at the material in detail. A structured survey, clearly thought through, and with achievable goals, can provide information on a number of different levels. It can outline the generalities, give very detailed analysis, and provide unique management information. It is not always possible or desirable to look at every item, and a percentage sample will give enough indicators to enable policy decisions to be formulated and priorities drawn up.
It is recommended that the methodology of a survey plan be tested before embarking on the project. The commitment of time and resources on a major survey project is significant and should not be underestimated. A survey will probably only be carried out once and can be traumatic for the material. The availability of useful data may be very late in the process, and management expectations should be realistic from the beginning.
One of the results of a successful survey will be the potential to attract funding for project based work and this in turn enables managers to identify the experience level(s) of the staff to be involved. The results of a survey now form the basic requirement for background information in the grant application processes in the UK.
A survey should enable priorities to be identified by:
- assessing the current condition of collections
- assessing the current storage – environment and packaging
- gathering quantitative information on the preservation needs of a collection
- collecting the minimum data needed to fulfill a brief
- consulting with appropriate colleagues to determine the levels of actual or potential use
- Defining timescales and estimating costs.
SAMPLING CATEGORIES
Random sampling
The documents for assessment are chosen randomly. However, this approach will only be successful if the collection has a detailed catalogue.
Cluster sampling
In this case a decision is made to assess an agreed percentage throughout the collection e.g. sampling every tenth or twentieth item or box.
INVESTIGATING ALTERNATIVES
This guideline has sought to emphasise that practical conservation is one of the elements of preservation policy – it may not be the answer in many situations. Each item or collection of items will present a number of options that must be considered before sanctioning the commitment of full conservation. They will all have cost implications and these must be considered carefully.
Substitution
- Can the material be copied in any way?
- The options to consider are:
- photocopying
- photography
- microfilming
- digital scanning
- Digital copying.
However, these forms of substitution will only be an option for larger institutions that have in-house copying facilities. In general, these services will have to be sought through external contractors or agencies. It is imperative that a contract is drawn up to ensure that the appropriate standards of handling and security are maintained.
Packaging
Can the use and storage of the material be improved by an enhanced and better quality packaging?
Good examples would be:
- photographic materials
- Volumes where the text is secure but the covers are badly deteriorated.
Leave alone
Would it be best to do nothing? Because of:
- lack of resources
There are elements, such as packaging and the testing of conservation materials that are often regarded as less interesting than the technology, but they must remain the primary source of investment if strategic preservation initiatives are to succeed.
Undertaking conservation treatment and then replacing the material in unsatisfactory conditions is a waste of time and money. It is more important to establish a good, basic and sustainable workshop environment than to get embroiled in the requirements of more specialized areas of expertise.
Identify site
The ideal position for a conservation facility is within easy access of both the repository and Search Room areas. Conservation staff will need to survey material at short notice and they will play an advisory role for other staff and especially members of the public.
The workshop should ideally have adequate natural light via windows, mains water supply and local drainage facilities. The perfect shape would be square, no less than 25sq.m. And with one side of windows. However, the key elements of a conservation facility can be accommodated into the space available – a certain degree of lateral thinking will be required!
Security must be another consideration, both internally and for the perimeter. The conservation area will contain materials and equipment, both of which are portable, and documents and books undergoing treatment may often have to be left in the workshop overnight. The room must be locked when staffs are absent, and all staff must be made aware of the health and safety risks associated with a primarily craft-based, practical workshop area, where cutting machines, sharp knives and chemical solvents are in regular use. This room must never be a thoroughfare and access must only be available to staff of the institution. Consideration will have to be given to identify which staffs are to be designated as key holders.
Clean and prepare
Once identified the area must be properly prepared:
- the room must be cleaned and washed down
- any areas of weakness must be repaired (especially faults that would aid insect, rodent or water access)
- all surfaces must be re-painted
- The floor must be sealed (to reduce dust) and covered with a waterproof vinyl.
Electrical services
Workshop layout
The design of a workshop provides an opportunity for a creative approach. In most cases the area available for conservation facilities may not be the ideal. However, if the basic principles can be achieved then a satisfactory layout should be possible.
At this early stage it is prudent to think about the functions of the workshop and to ensure that there is enough room for the staff to circulate safely and efficiently. This in turn should be influenced by a consideration of the proposed workflow to ensure that the different stages of conservation work can be carried out in a logical way.
Bookbinding
If bookbinding facilities are to be included then they should be placed away from paper conservation activities, as dusts will be transferred to the face of the work.
In general, bookbinding activities will require extra (often bulky and heavy) equipment, such as nipping presses, laying presses and guillotines. They will also need more space for storage of work in progress and materials.
It is suggested that careful consideration be given to the use of external bookbinding facilities. This will require sound planning, as security, conservation standards and the level of staff skills will need to be specified in the contract. It may be prudent to investigate local facilities in other institutions.
For example, the national library may have a bindery and be able to take on work for the national archives with the latter providing microfilming services in return. Such arrangements would relieve some of the worries expressed regarding commercial firms.
Benches
It is recommended that the bench height should be 90cm with a depth of 100cm. This will appear very deep, and the back of the bench may be out of reach, but it is space required for adequate placing of larger flat items when they are receiving treatment. The working height should enable conservators to get their legs under comfortably whilst also allowing for working standing up. Therefore all bench seating must be “draughtsman’s” height.
Washing/wet areas
The washing/wet areas should be placed away from the benches where detailed work will be undertaken. It is important that all wet processes (which use baths and quantities of water) are kept under control to minimize damage to other material or slipping hazards.
Where supply from local sources seems unlikely, appropriate suppliers in the UK are suggested using the acronyms given in Annex A.
However, their inclusion does not imply a recommendation.
The following equipment is essential and recommended:
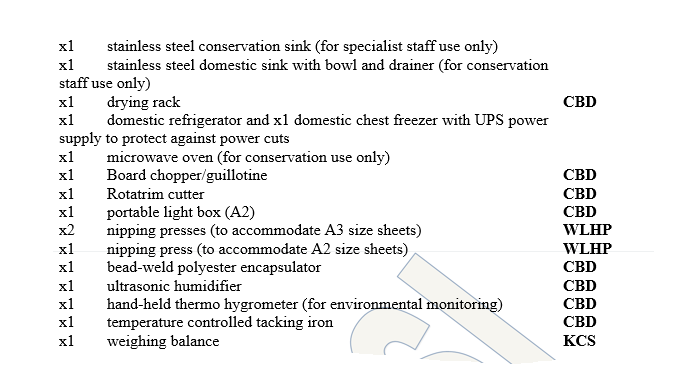
Chemical storage
Chemicals must only be stored in specially designed cabinets. Such cabinets can be bought from chemical suppliers or those specializing in PPE. Individual containers within the cabinet should not exceed the permitted capacity. There should be one cabinet for dry chemicals, and one for combustible and flammable liquids. Many chemicals are incompatible and this should be carefully researched.
Waste disposal
All personnel involved in the use of chemicals must be aware of their responsibility to dispose of toxic and flammable materials properly and in line with local and international legislation. A specialist, licensed contractor who can provide a certificate of disposal, must carry this out. This must detail that the disposal has been carried out:
- without injury to living beings
- without adulteration of drainage systems
- Without contamination of the earth or air or water supplies.
Conservation
Each of these options must consider the role that conservation can play as it crosses many of the boundaries covered by preservation management. It is clearly an important part of a conservation section’s work to be involved in the preparation of material that has been identified for copying.
Material that has suffered damage will require different levels of conservation first aid, to ensure that the information to be recorded is presented in the most secure and legible way. It is recommended that a conservator be consulted during the planning phase of a copying programme.
It is equally important to ensure that appropriately trained staff are involved in all of these considerations. All the skills of assessment that are required in other areas of preservation work are needed here. Whilst this is clearly passive (not practical handcraft) conservation in action, it must be seen as the necessary level before sanctioning active conservation in the workshop.
Some of these options are uncomfortable for both archive and library professionals to consider but they are now becoming valid when campaigning for resources.
Function of the conservation workshop
The conservation workshop has a very important role to play in the development of a culture dedicated to the preservation of heritage materials. It establishes a specialist activity within a public service and also represents in an unassailable way that there is a significant commitment to the long-term preservation of material worthy of retention.
The workshop is a place where important and complex activities are carried out. It often carries the image of a laboratory; pristine benches and a clean white decor. It should be specialised, but the conservation facility must also reflect the needs of the organisation.
All services should be upgraded to perimeter trucking with double sockets at approximately one-meter intervals. The height of the trucking should be approximately 50cm above the bench tops.
CHAPTER SEVEN: CONSERVATION POLICY
1. Purpose and Scope
The purpose of this document is to present high level policy statements for the National Library of Australia regarding the preservation of its collections, and regarding the Library’s role in fostering preservation of documentary heritage.
The policy is intended to define the Library’s preservation responsibilities, and to provide guidance to Library staff engaged in making decisions and undertaking other activities that may have an impact on collections. It is also a fundamental accountability document concerning one of the Library’s core business functions, and is intended to serve as the basis for communication with a range of external stakeholders. This policy has been endorsed by the Library’s Corporate Management Group for implementation throughout the Library.
The Library’s preservation role is mandated by the National Library Act 1960 which requires the Library (s.6):
1. To maintain and develop a national collection of library material, including a comprehensive collection of library material relating to Australia and the Australian people;
2. To make library material in the national collection available to such persons and institutions, and in such manner and subject to such conditions, as the Council determines with a view to the most advantageous use of that collection in the national interest
Under this authority, the Library has a strategic objective of ensuring that a significant record of Australia and Australians is collected and safeguarded. To achieve this, the Library protects and maintains its collections to ensure their longevity, and implements relevant preservation strategies for priority areas of the collection including electronic resources. The Library also maintains a significant collection of non-Australian library materials to ensure they are available for current and future use for as long as they are needed.
In addition, the National Library Act requires the Library (s.6):
3. To co-operate in library matters (including the advancement of library science) with authorities or persons, whether in Australia or elsewhere, concerned with library matters.
Under this authority, the Library seeks to help others preserve the documentary heritage resources for which they are responsible, particularly those relating to Australia.
With regard to its own collections, the Library’s preservation responsibilities identified in Directions 2009 – 2011 are to ensure that a representative record of Australian life is collected and preserved for the future.
Preservation of the National Library’s collections
The Library’s collections of Australian include documentary materials of all kinds – printed works (books, serials, maps, sheet music, newspapers, ephemera), online and other digital publications, unique unpublished materials such as manuscripts, pictures, oral histories and folklore recordings, and extensive collections of microform and digital copies of information resources held by other institutions. The Library also holds considerable collections of general overseas and rare book materials, as well as world class Asian and Pacific collections.
The materials that make up the Library’s collections are composed primarily of organic materials which are subject to natural deterioration even in storage, and to accelerated damage from use. The collections also include a large and rapidly increasing component of digital and other electronic information resources which depend on particular technologies for access, making them vulnerable to loss of accessibility through technology obsolescence even if the original information carriers have been preserved.
Principles for preserving the Library’s collections
Preservation of its collections is a core business function for the Library. All Library staff are responsible for taking account of potential impacts on preservation of the collections in their work and their decisions.
The main aims of the Library’s preservation programs are to preserve collection items and to maintain access to them, consistent with their significance to the collection, usage requirements and current condition. This may require maintenance of the physical format of the items or maintenance of access to their information content, as for audio tapes, or both.
In addressing its preservation commitments, the Library recognises that different items and collections may need different levels and types of care, security and intervention. This may involve differences in how long materials will be maintained, and how far the Library will go in seeking to avoid or overcome either damage or loss. Most materials in the Library’s collection will be maintained in their original format.
In supporting accessibility, the Library seeks a suitable balance between the needs and rights of current users and the access expectations of future users.
In managing its preservation commitments, the Library takes account of a number of factors, including:
- The nature and purpose of its collections
- The nature of the risks to their ongoing value and usefulness
- The business context in which it operates, including the resources that have been made available for allocation to preservation; the availability of specialist expertise and facilities; and opportunities for addressing preservation needs along with other business requirements.
To adequately account for these factors, the Library must maintain adequate knowledge of its collections in order to make informed planning decisions, and to report on the Library’s performance in caring for this highly valued publicly-owned asset.
The Library attempts to retain and preserve at least one copy of all Australian material collected in accordance with its collection development policy, or for which it has accepted a preservation responsibility. Items will be maintained in their original format for as long as practicable, although access may be provided to the original format or to a surrogate copy as appropriate to support users needs and cost-effective preservation.
Australian print, electronic and special collections are given a high priority for preservation. Overseas collections are managed for access for as long as practical, and in general receive a lower preservation priority than Australian collections. However, it is recognized that some overseas materials such as rare books, and library materials relating to Asia and the Pacific, may be of particular international significance and may have special preservation needs. The Library accepts a responsibility to preserve this material.
Special storage, security, treatment and copying provisions are made for nationally significant materials. These treasures and other items or collections of particular significance, whether Australian or from overseas, are identified and prioritized within a Register of Nationally Significant Materials which guides the allocation of priorities for a range of preservation actions, including disaster protection and response.
Copies made or acquired to serve as potential replacement preservation masters for particularly ephemeral formats (including sound recordings, digital resources, newspapers and fugitive photographic materials) are given a high priority for preservation.
In all of its preservation approaches, the Library applies high standards of professional care and appropriate methods to maintain the significant characteristics for which the material receiving attention is valued.
The mandated preservation responsibilities of the National Library can only be addressed through adequately resourced programs, appropriate policies, and well managed plans for ongoing action. While the Library may choose from a range of supply options to address some aspects of its preservation commitments, it recognizes the value of maintaining a preservation presence as a core business function. This requirement reflects the complex nature of the Library’s preservation challenges, and its leadership role.
The Library also recognizes the need for adequate documentation and metadata that will support effective planning, informed decision making, appropriate future action, and accountability. Means used by the National Library to achieve its preservation objectives
To achieve its preservation objectives, the Library uses a range of means including:
- Planning and policy making
- Development and use of procedures across the Library to prolong the useful life of collections
- Specialized conservation treatment
- Copying to preservation standards.
These measures are aimed at:
- Recognizing potential threats and preventing or minimising their impacts
- Stabilizing damage that may have occurred and preventing further loss
- Repairing damage or loss that significantly interferes with use or detracts from the usability and values that give the collection material significance
- Providing suitable replacement copies if necessary and available.
Because conservation repair treatments and data recovery are relatively expensive and not always successful, the Library aims to prevent or pre-empt damage or loss where it is practical to do so.
Acquisition and item creation
The Library acquires collection items either from external sources or through its own content creation activities (such as digitization, photographic or oral history commissions).
For materials acquired for long term retention and use, the Library acquires the best available copy, and encourages the use of appropriate stable and manageable materials and formats where these exist.
The Library considers the likely costs of ongoing preservation in making decisions to acquire materials for the collections.
The Library sets and monitors standards for materials, formats and metadata for items it creates or commissions itself, aimed at minimising the later costs of preserving such material.
Safe storage
The Library provides appropriate accommodation to support preservation of the physical collections, and suitable secure systems and storage for digital data collections. This is achieved by:
- Ensuring engineering and building specifications for new buildings and for upgrades or renovations to existing buildings address preservation needs of collections to be stored in them
- Ensuring that all Library buildings are maintained to continue to meet those specifications
- Providing appropriate environmental conditions for collection storage with acceptable levels of temperature, relative humidity, light exposure, air quality and other parameters that may be specified from time to time
- Providing and maintaining specially controlled environmental conditions for particularly vulnerable or significant collection materials
- Ensuring the Library has an effective integrated pest management program
- Providing security measures that ensure collection materials are protected from theft, vandalism, and accidental damage or loss during use or in storage.
- Using appropriate shelving and retrieval equipment
- Using best practice systems and regimes for long term data management, including secure backup and disaster recovery arrangements
- Maintaining best practice disaster preparedness plans and procedures to prevent, minimize, react to and recover from emergency situations that may damage the physical collections.
Collection processing and maintenance
The Library believes that appropriate collection processing, housing, and ongoing collections maintenance will reduce the likelihood of serious damage to its collections. These measures include:
- Timely processing of newly acquired materials to a use-ready state
- Using appropriate means of identifying items to ensure ongoing retrieval and security while minimising the risk of causing long-term damage
- Using suitable housing containers such as boxes, folders, sleeves and wrappers where required to protect collection items
- Regularly maintaining storage areas, equipment and collections in a clean condition using suitable low risk methods.
Protective use, display and handling
The Library recognizes that use of its collections is a prime purpose of its existence. However, the nature of the collections, their national significance, what is required to support user access needs, and the access rights of future users are taken into account in determining what kinds of use will be allowed.
The Library encourages the use of surrogates rather than originals in cases where the original material is not suitable for regular use, such as rare or fragile items like glass plate negatives, or material in particularly vulnerable formats, such as audio tapes.
The Library takes serious account of preservation considerations in determining the selection of items and the frequency and duration of their use for exhibition purposes, or for loan for exhibition to other institutions. All items proposed for exhibition or loan are assessed for their current condition and vulnerability, and all items approved for exhibition or loan are appropriately prepared to minimize the risk of damage and to maximize the effectiveness of their display. Display and loan conditions with regard to security, light and UV exposure, temperature, relative humidity and air quality are specified in exhibition and loan agreements, and are intended to comply with current international standards or with special Library specifications for particular materials.
The Library requires staff and users to handle collection materials in ways that minimize the risk of damage. To address this need, training and advice on safe handling and transportation of collection materials are provided.
Recognizing that copying is a potentially significant source of damage to collection materials, the Library applies restrictions to the copying of at risk materials by and for users. Preservation Services is responsible for providing guidance on which materials are considered to be at risk, and guidelines for safe copying.
Conservation treatment
Conservation treatments are undertaken to prolong the useful life of collection materials by stabilization or repair when collection material is at risk or damaged.
In applying conservation techniques, the Library’s policy is to use the least intrusive methods available that are consistent with preventing further damage and protecting the significance of the items in question. All treatments are undertaken to a high standard and use appropriate materials. Treatment approaches include:
- Minor repairs or stabilization of individual items when required
- Intensive treatment of high priority or nationally significant items requiring special attention
- Intensive treatment of materials selected for National Library exhibitions when required
- Commercial binding of Australian deposit collections if required for security reasons.
Preservation copying
Preservation copying of collection items is undertaken to reduce the risks associated with the use of vulnerable or particularly significant materials, and to provide a suitably faithful backup surrogate when this is possible. Preservation copying approaches used by the Library include microfilming, digitization, and preservation photocopying. Preservation surrogates are created to appropriate standards for preservation purposes and for access; where agreed standards are not available or not suitable, the Library determines its own specifications to ensure suitable outcomes.
Increasingly, the Library uses digitization as a means of preservation copying, when it is able to ensure that detail can be captured at the required level, and that it will be able to manage the digital copies as enduring preservation masters.
Preservation of digital and other electronic collections (including audiovisual collections)
The Library recognizes that the preservation of digital and other electronic collections requires methods principally aimed at maintaining meaningful access to information content. In addition to the risks of media deterioration and data loss or damage, the primary driver for the Library’s electronic preservation programs is the risk of losing access through changes in the technologies required to access and use.
To address these risks, the Library aims to:
- Manage its digital collection building activities with preservation objectives in mind
- Monitor technological changes that may impact on the access paths for its various electronic collections
- Transfer analogue audio and video collections to well-managed digital formats while analogue replay equipment is still available
- Transfer digital materials from poorly managed storage formats to managed storage
- Monitor the data formats in its collections and the access paths required for their reliable use
- Plan and undertake interventions to maintain access, possibly including transformation of the digital objects or of the means of providing access.
In order to be sustainable, the Library recognizes the need for systems, tools and workflows to automate as many of these processes as possible.
Cooperation
The Library recognizes the need to work with others in the Australian and international library and information sectors to address common challenges while minimising unnecessary duplication of effort and facilities. The Library actively participates in collaborative programs where there is a prospect of benefit in meeting its preservation objectives more cost-effectively. The PADI (Preserving Access to Digital Information) website and the Australian Newspaper Plan (AN Plan) are examples of this type of cooperation.
As the national library, the Library has a key role to play in fostering the preservation of Australia’s documentary heritage beyond its own collections. The Library also accepts a role in promoting the preservation of library and information collections internationally, with a special interest in Southeast Asia and the Pacific, as a Regional Centre of the International Federation of Library Associations Preservation and Conservation Program .
Priorities
In its fostering and facilitating role, the National Library gives priority to:
- Supporting and initiating programs and activities that enable others to identify and meet their objectives and responsibilities in preserving documentary heritage
- Supporting and initiating programs and activities that address significant information formats at particular risk of loss, such as newspapers, digital formats, and unstable cellulose acetate information carriers
- Promoting wide impact preservation strategies, including disaster preparedness, preservation copying, and management of digital collections, training and information sharing.
Responsibility for Preservation Policy
This policy is monitored and reviewed by the Library’s Collection Development and Management Committee on a regular basis.
Factors to consider when setting up a conservation policy
Preparing a preservation plan
Few institutions have the time or the money to meet every preservation and conservation need for their collection. When resources are limited, choices must be made among preservation activities. The physical condition of collections is only one aspect of making preservation decisions. As discussed earlier in this session, other considerations include the intrinsic value of collections, their importance to the institution, their legal and historic value, the ease and cost of replacement, and other factors that can only be identified by the collections’ custodians.
There are several basic steps in creating a preservation plan: determining preservation needs, identifying potential solutions, setting priorities, and devising a detailed plan to address the identified needs. Opportunities to address preservation issues sometimes arise unexpectedly, so you will be ahead of the game if you have a preservation plan in place that allows you to take advantage of such opportunities.
1. Assessing Needs
The Preservation Needs Assessment Once an assessment has been completed, it is essential to summarize the preservation needs that have been identified by preparing a written report. This report should list observations and recommendations for each preservation component (e.g., environmental control, disaster planning, security, housekeeping, collection storage and housing, reformatting, conservation treatment). If your assessment was done by an outside consultant, the consultant will provide this report. If you did an assessment in house (or as part of this course), you will need to produce a written report. In a full assessment report, observations and recommendations like these would be provided for each major preservation category (environment, storage, handling, etc.).
It is also important to prepare an executive summary for the assessment report that sets forth short-term, medium-term, and long-term preservation priorities. Short-term priorities are problems requiring immediate action and/or projects that can be undertaken with existing staffing and funding. Medium-term priorities are projects that will require additional funding, planning, and/or staff time. Long-term priorities include steps to be taken once short- and medium-term goals have been accomplished, as well as large-scale activities (e.g., new environmental systems, installation of sprinklers) that must be planned over a longer period of time.
Setting Preservation Priorities
While it provides a great deal of useful information, an assessment report cannot provide a complete analysis of the many additional factors that must be considered when setting priorities for actual preservation action. Some factors—such as available funding for preservation, staff time and expertise, and user demand for collections—change as institutional circumstances change. Other factors that affect preservation priorities require an in-depth understanding of the institution and its collections that only staff members possess, such as the relative value of collections to the institution and political considerations.
There is consensus regarding the issues to consider when prioritizing potential preservation actions. The following criteria are taken from Preservation Planning: Guidelines for Writing a Long-Range Plan, referenced in Additional Resources:
Collection-Specific Criteria
- Use—Materials that are used frequently, whether consulted by researchers or exhibited routinely, may be at higher risk than other collections.
- Storage—Collections that are stored under adverse conditions, whether environmental or in damaging enclosures, may require prompt preservation action.
- Condition—Items or collections in fragile condition may be at risk of loss unless they receive attention quickly.
- Value—either absolute value (rarity, monetary worth, intrinsic, or associational value) and/or relative value of collections to an institution may influence preservation priorities. Whether collections have long- or short-term value to an institution will also influence decision making.
- Format—whether materials need to be preserved in their original format will also influence priorities.
Overall Criteria
- Impact—Those actions that will result in dramatic improvement in current conditions or a slowing of deterioration, or that will affect the greatest number of items, will often be the highest priority.
- Feasibility—this factor is essential; it includes staffing levels and expertise, financial considerations (outside funding, operating costs, expenses for materials and services), policy and procedural changes required and political considerations. Even if the impact of a preservation action is high, it may be given a low priority if implementation is not feasible.
- Urgency—There will always be some activities that require immediate action; collections may be damaged or lost, or an opportunity to act on a particular project may be lost if action is not taken.
In general, preservation activities that will have high impact (e.g., improved climate control, rehousing of a collection, or reformatting) and are highly feasible (e.g., the staffing, time, and money is available to carry them out in the near future) will be the highest priority. Activities with high impact but low feasibility (e.g., replacing the HVAC system) may be given a lower priority until circumstances make them more feasible, while actions that are feasible but have only minimal impact (such as installing UV sleeves on fluorescent lights) may or may not be undertaken, depending on such factors as cost, visibility within the institution, and collection value.
The Preservation Planning Team
The preparation of a preservation plan must be supported by your institution’s administration and board of trustees, since drafting an effective plan will consume a significant amount of staff time. It is crucial to gain support from both the administration and from staff members, as it will be difficult to implement the plan’s recommendations without this commitment. A team approach is generally recommended when writing a preservation plan, to facilitate collaboration and maintain support for the plan.
Members of the Team
The preservation planning team should include a wide range of staff members who are responsible for collections care within the institution. This includes maintenance, housekeeping, and security staff in addition to collections care staff. Representatives from the board of trustees or advisory committee should also be included. A leader of the team must be appointed, who will be responsible for keeping the project on schedule. The team must prepare a realistic timetable for completion of each task or goal.
The team may be large or small, depending on the size of the institution. In a small institution, almost all staff might be involved, while in a large institution representatives from various departments would participate. In a large institution, input from other staff should be solicited and communicated to the planning team by the designated representative from each department.
Assigning Tasks
Each member of the team should be assigned responsibility for a specific category or part of the plan (e.g., description of collections, summary of needs and required actions, listing of preservation actions to date, and the action plan and timetable). It may be appropriate for more than one team member to work together on each section. It is usually a good idea to assign one person the responsibility of pulling together all the information gathered by the team into a written plan, or at least to edit the various sections that have been written to provide consistency.
Writing a Preservation Plan
The Planning Process
The process of writing a preservation plan can be complex and time consuming, but completing the sections of this text will help you gather the necessary information for your plan.
The basic components of the planning process are:
- set the groundwork (establish staff and administrative support and pull together a team)
- gather and review existing documents (e.g., the preservation planning assessment, the institution’s mission and goals, the institution’s overall long-range plan, collection policies, the institution’s disaster plan)
- write the plan (you must decide whether a lengthy and detailed plan will be most effective or a short and succinct plan)
- implement and update the plan
Structure of a Preservation Plan
The basic structure of a preservation plan should be as follows:
- Title Page
- Acknowledgements
- Executive Summary
- Table of Contents
- Introduction
- Description of Collections
- Preservation Needs and Required Actions
- Institutional Action Plan and Timetable
- Listing of Preservation Actions to Date
The key items in the plan are the list of high priority actions that are achievable and a timetable for implementing them. Once you have completed your preservation planning assessment, your primary goal should be to produce this timetable, using the recommendations in your report as a starting point. Worksheets listing preservation actions, resources, steps required, and target completion dates may be helpful (either the ones in Preservation Planning: Guidelines for Writing a Long-Range Plan, worksheets that you create yourself, or those you find in the sessions in this course).
Maintaining the Preservation Plan
A preservation plan (unlike an assessment report) cannot remain static; it must be periodically revised as circumstances change and preservation needs are addressed. Changes in staff, funding, or facilities may require the preservation plan to be reviewed and possibly updated. Goals and objectives should be periodically revisited to insure that the expectations of the initial plan are being met.
It is important not just to be reactive, but also to try to guide the preservation program intentionally. Sometimes activities or resources may fall behind in a particular area. In that case, new planning may be needed, or schedules may need to be adjusted. Usually the person responsible for preservation management within the institution should be directing periodic evaluations of all ongoing preservation projects, as well as the plan itself, in consultation with their planning committee. Diplomacy and skill in working with colleagues will be essential to this process.
CHAPTER EIGHT: REPROGRAPHY
It is the production of documents. In every office there is need to obtain several copies of documents that are frequently used.
The copies can be obtained by:-
- photocopying
- duplicating
- use of Carbon paper or by
- printing
MANIFOLDING
- This is the production of various documents using several carbon papers through writing or typing.
- The carbon papers are interleaved with the typing papers so as to get as many copies of the document as is possible.
N.B. As many as 15 copies can be obtained on an electric typewriter and less than 10 on manual typewriter.
Advantages of Manifolding
- it is cheap in obtaining copies
- no special skill is required to obtain/make copies
- No license is required to posses a duplicating machine and therefore a cut on costs.
- The carbon paper can be re-used several times.
Disadvantages of Manifolding
- it is not easy to correct errors on copies
- the carbon copies fade out if kept over a long period of time
- quality deteriorates with time
- only a small number of copies can be produced at time
- The copies can easily come out untidy if the carbon paper is not carefully handled.
CORRECTION OF ERRORS ON CARBON COPIES
- Place a small sheet of papers between each sheet of carbon paper and typing paper in the position where the erasure is to be made.
- Erase the top copy
- Lift the first sheet of carbon erase the error on the copy and remove the piece of paper.
- Do the same for the other carbon copies
- Before typing in the correct word or letter, make sure all the pieces of paper are removed.
NCR (NO CARBON REQUIRED)
- This system eliminates the use of carbon paper
- The typing paper is coated with chemicals, which are colourless to allow copies to be made without carbon paper.
- When a mark is made on the top copy, it causes the chemically treated surface of the paper to reproduce copies on the copies beneath
Advantages of NCR (No Carbon Required)
- It saves time because the typing paper is usually ready to be inserted into the typewriter.
- Produced neat and mailable work
- No need for duplicating machine licence therefore, no maintenance costs
- It is easy to use cause the paper is simple, inserted into the machine.
- No special skill required producing copies
Disadvantages of NCR (No Carbon Required)
- the paper is more expensive than the ordinary papers
- errors cannot be corrected
- they paper can easily be spoil
- only a few copies are produced from a set of NCR stationery
- it cannot be reused – used only once.
NCR – It can be used for writing documents and reports. It can also be used for all types of receipts, writing school reports, delivery notes and invoices.
PHOTOCOPYING
This is the production of a facsimile (exact) copy of an original document. Photocopies do not require the original to e rewritten or typed; the original document has to be in a fit condition for reproducing. Methods of photocopying are by:
- Transfer diffusion
- Dycline
- Thermo graphic
- Electrostatic
The equipment consists of two parts:
- Exposure units where the original and the copy paper are exposed to a source of light. The exposure unit and the processing unit are usually in one equipment and the processing follows automatically.
- A processing unit in which the copy is developed. In some processes it is necessary to remove a copy from the exposure unit and feed it manually in the processing unit.
Advantages of Photocopying
- exact facsimile copies without any loss of detail are produced
- it is a fast method of obtaining copies
- it is cheap when few copies are required
- accurate copies obtained no errors
- colored copies can be obtained in some machines
- some machines can get large sized documents
- no special training required for operators of photocopying machines
- The quality of the original does not deteriorate with many running.
Disadvantages of Photocopying
- it is too expensive when many copies are required
- maintenance costs are high especially if the machine breaks down
- work can come to a stand still in case of power failure
- copies tens to fade over a long period of time
- Only selected colours can be obtained.
Applications
Invoicing, copying drawings and diagrams, copying incoming letters for circulation to different departments, statistical records copying contracts and other legal documents original. Replying letter by writing on the incoming letter and then photocopying it and sending it back.
INK DUPLICATING
A simple method of producing copies from a master, which has been prepared.
The two methods of duplicating are;
- stencil duplicating and
- spirit duplicating
The master is prepared by;
- Handwriting or drawing
- Typing
- Using a thermal heat copier
- Using an electronic Stencil cutting machine
Stencil duplicating
- In this process, the master is prepared first. The master called stencil, consists of a thin fibrous sheet through which ink will not pass.
- The stencil is prepared (cut) by Writing and drawing on this sheet with the use of a stylus pen.
- A plastic backing sheet should be used to avoid tearing the stencil.
- The stencil can also be cut using a typewriter. The stencil is inserted in the typewriter then the ribbon is disengaged. Before feeding the stencil into the typewriter the typefaces should be cleaned with a stiff brush.
- The keys should be slightly more heavily than the normal typing with an even impression.
Correction of errors on Stencil
1. Errors can be corrected by use of a special correcting fluid lightly over it. The fluid is given time to dry after which the correct letter or word is typed over the correction – using a fairly lighter touch – because you re striking through ink coating.
2. Another way of correcting the errors is by grafting. This is used when making major corrections. The faulty paragraph or section of the stencil is cut off and replaced by a new piece of stencil. The patch should be slightly larger than one cut off.
The patch is placed in the cut section and stuck all round by use of glue or correcting fluid. Give it enough time to dry before re-inserting the stencil into the typewriter then type in the correct words.
Thermal heat copying
The master in ink duplicating can also be prepared by use of a thermal heat copier. This is done by passing the stencil and the document through a thermal heat copper and the material is transferred from the original document on to the stencil. It can also be added by over-typing and running it through the machine again.
Electronic Stencil Cutter – (scanner)
This consists of two rotating cylinders on a common axis so that as the original rotates an electric cell, which transfers what it reads to the stencil, scans. It operates automatically and can produce a master from a document i.e. drawings, diagrams etc. After the master is produced, by any of the four methods described then the duplicating process may start. The stocking tray on the duplicating machine (ink duplicator)
- open the cylinder cover
- remove the carbon paper from the stencil
- fix the head of the stencil on the duplicator
- Turn the handles slowly. Allow the stencil to fall on to the cylinder smoothen out any creases as to revolves.
- Tear off the backing sheet
- Clip the bottom of the stencil under the tail flap
- Close the cylinder cover
- Rotate the cylinder slowly to get two copies to find out whether the printed matte is on the copies – if ink I sufficient or not
- Set the number of copies required and turn the handle to rotate the cylinder for the copies to be produced.
Advantages of Electronic Stencil Cutter
- It is quite cheap if the number of copies to be produced is between 30 and 5,000 (instruction manuals, reports, agenda, and minutes, house magazines).
- The stencil can be easily altered, and corrected using correcting fluid or the graft method
- The stencil can be stored to be re-used later
- There is good quality production and copies are permanent
- Photographic reproduction with electronic stencil is possible
- The copy paper is cheaper than the paper used in other processes.
Disadvantages of Electronic Stencil Cutter
- it is expensive if few copies are required
- separate runs are required for two or more colours
- only absorbent paper can be used which is not suitable for sale promotion literature
- the process is more time – consuming than photocopying
SPIRIT DUPLICATING
- In this process, the master is prepared by typing, handwriting, and drawing or by use of heat transfer copying system.
- The master is a piece of special hectographed carbon paper.
- This creates a reverse image in carbon on the back of the master copy.
- When the master is placed around the drum of the machine and operated, the copy is dissolved living a positive image on the copy paper.
- About 200-300 copies can be produced from each master before it is exhausted
- As many as 7 colors can be produced or obtained from the master simultaneously by the conceptive use of different coloured ribbons.
- Good quality, smooth surfaced paper is best for use as copy paper.
Advantages of Spirit Duplicating
- it is very cheap system as the copy papers and masters are not expensive
- the master can be prepared easily by use of a ball pen
- It is the only cheap method by which many colours can be duplicated simultaneously.
- The master can be filed away from future use but because they produce a maximum of about 300 copies – they need to be renewed sometimes.
Disadvantages of Spirit Duplicating
- There is no standard quality production. The image becomes weaker with time
- the quality of production is not as good as that of stencil duplication
- only a limited number 2000 – 3000 of copies can be obtained from each master
- the master cannot be altered if mistakes are made
- Copies tend to fade if exposed to light for a long period of time.
OFFFSET LITHO PROCESS
This process relies on antipathy i.e. common rejection of each other of water and grease. Moistened areas repel the greasy material.
- The image on the master is offset (transferred) to a rubber-covered roller, gilding a negative image on to a rubber blanket, which in turn is offset on to the copy paper in positive form.
- The master can be stored for re-use provides a preserving gum, which is applied on to the image to protect it.
Advantages of Offset Litho Process
- It has very good quality production especially for documents that need a pleasant and clear appearance.
- It is fast and is capable of producing large numbers of copies as many as 50,000 from metal plates and 2,000 from paper plates
- It is suitable for reproducing office forms – letterheads, leaflets, price lists. Large stocks of these need not be kept as metal plates can be stored and re-used when required.
Disadvantages of Offset Litho Process
- it is expensive when few copies are required
- the initial capital outlay is huge
- it requires trained and specialized staff
Points to remember when choosing a Reprographic Process i.e. choice of duplicating machine:-
- nature of the document
- number of copies required
- number of colours required
- The quality required.
- Urgency involved
In this respect, it is no different from using a typewriter.
MICROFILMING
- This is a process developed for a bulky coping of records, the records are copied in a film for storage
- This is a way storing loose leaf records in a film
Advantages of Microfilming
- It saves space and weight as bulky correspondence files are reduced to films.
- Documents can be sent by safely by post as reduced postal rates. This is economical when compared to posting originals
- There is little risk of misplacing information or losing records
- Films are more durable than paper and provide a more permanent record
- There is saving in terms of files and indexing equipment.
- Its is safely of original document
Disadvantages of Microfilming
- the necessity of using a reader every time reference is to be made could be inconveniencing and slow
- The information cannot be read by naked eyes so the information cannot be obtained instantly.
- It is an expensive method
- No indexing is possible, thus locating a particular film/document may be difficult thus causing frustration and delay
- Microfilmed information cannot be altered; no corrections or insertions can be made to the stored information.
- Poor processing of film may cause a document to be illegible
- The preparation of papers for filming can be time-consuming.
PRINTING
The production of books, newspapers, or other printed material.
Printing Methods
This section serves to inform you of the multitude of different printing processes that may be employed to print your printed product.
The types of printing:
- Digital Printing
- Flexography
- Letterpress Printing
- Offset Printing
- Rotogravure
- Screen Printing
Digital Printing
Digital printing is the reproduction of digital images on physical surface, such as common or photographic paper, film, cloth, plastic, etc. It can be differentiated from litho printing in many ways, some of which are;
- Every impression made onto the paper can be different, as opposed to making several hundred or thousand impressions of the same thing from one set of plates, as in traditional methods.
- The Ink or Toner does not absorb into the paper, as does conventional Ink, but forms a layer on the surface.
- It generally requires less waste in terms of chemicals used and paper wasted in set up.
Printing at home or in an office or engineering environment is subdivided into:
- small format (up to ledger size paper sheets), as used in business offices and libraries
- Wide format (up to 3′ or 914mm wide rolls of paper), as used in drafting and design establishments.
Some of the more common printing technologies are
- line printing — where pre-formed characters are applied to the paper by lines
- daisy wheel — where pre-formed characters are applied individually
- dot-matrix — which produces arbitrary patterns of dots with an array of printing studs
- heat transfer — like early fax machines or modern receipt printers that apply heat to special paper, which turns black to form the printed image
- blueprint — and related chemical technologies
- inkjet — including bubble-jet — where ink is sprayed onto the paper to create the desired image
- Laser — where toner consisting primarily of polymer with pigment of the desired colours is melted and applied directly to the paper to create the desired image.
Vendors typically stress the total cost to operate the equipment, involving complex calculations that include all cost factors involved in the operation as well as the capital equipment costs, amortization, etc. For the most part, toner systems beat inkjet in the long run, whereas inkjets are less expensive in the initial purchase price.
Flexography
Flexography, often abbreviated to flexo, is a method of printing most commonly used for packaging.
A flexo print is achieved by creating a mirrored master of the required image as a 3D relief in a rubber or polymer material. A measured amount of ink is deposited upon the surface of the printing plate (or printing cylinder) using an anilox roll. The print surface then rotates, contacting the print material which transfers the ink.
Flexo is so named because it was originally used as a method of printing onto corrugated cardboard, which has a very uneven surface. It is required that the printing plate surface maintain contact with the cardboard, which it does by being flexible. Also, unprinted high points on the cardboard must not get printed by ink remnants not on the plate surface, which is achieved by ensuring a sufficient depth for the non-print areas of the plate.
Originally flexo printing was very low quality. In the last 3 decades great advances have been made, including improvements to the plate material and the method of plate creation—usually photographic exposure followed by chemical etch, though also by direct laser engraving. Laser-etched anilox rolls also play a part in the improvement of print quality. Full colour picture printing now occurs, and some of the finer presses available today in combination with a skilled operator allow quality that rivals the lithographic process. One ongoing improvement has been the increasing ability to reproduce highlight tonal values, thereby providing a workaround for the very high dot gain associated with flexo print.
Flexo has an advantage over lithography in that it can use a wider range of inks and is good at printing on a variety of different materials. Flexo inks, like those used in gravure and unlike those used in lithography generally have low viscosity. This enables faster drying and, as a result, faster production; that means low cost. Printing press speeds of 450 meters per minute are regular with modern technology high end printers, like Windmoeller und Hollscher or Schiavi type. The main printing process worldwide for flexible packaging is rotogravure, for very large runs, and flexo for large and medium runs.
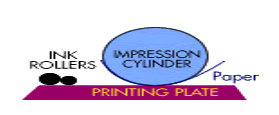
Also Known As:
- Flexographic printing
- Flexo
- Surface printing
Examples:
Some typical applications for flexography are paper and plastic bags, milk cartons, disposable cups, and candy bar wrappers. Flexography printing may also be used for envelopes, labels, and newspapers.
Letterpress Printing
Letterpress printing is a term for printing text with movable type, in which the raised surface of the type is inked and then pressed against a smooth substance to obtain an image in reverse. In addition to the direct impression of inked movable type onto paper or another receptive surface, the term letterpress can also refer to the direct impression of inked media such as zinc “cuts” (plates) or linoleum blocks onto a receptive surface.
Early Chinese woodblock printing used characters or images carved in relief from before 750AD, and this form of printing was widespread throughout Eurasia as a means of printing patterns on textiles. Printing of images, first on cloth, then from about 1400 on paper was practiced in Europe. In the 1400s, Johann Gutenberg (among others) is credited with the invention of movable type printing from individually-cast, reusable letters set together in a formed. This had previously been invented in Asia, but the two inventions were probably not connected. He also invented a wooden printing-press where the type surface was inked and paper laid carefully on top by hand, then slid under a padded surface and pressure applied from above by a large threaded screw. Later metal presses used a knuckle and lever arrangement instead of the screw, but the principle was the same.
With the advent of industrial mechanization, the inking was carried out by rollers which would pass over the face of the type and move out of the way onto a separate ink-bed where they would pick up a fresh film of ink for the following sheet. Meanwhile a sheet of paper was slid against a hinged platen (see image) which was then rapidly pressed onto the type and swung back again to have the sheet removed and the next sheet inserted (during which operation the now freshly-inked rollers would run over the type again). In a fully-automated 20th century press, the paper was fed and removed by vacuum sucker grips.
Rotary presses were used for high-speed work. In the oscillating press, the forme slid under a drum around which each sheet of paper got wrapped for the impression, sliding back under the inking rollers while the paper was removed and a new sheet inserted. In a newspaper press, a papier-mâché mixture (flong) was used to make a mould of the entire forme of type, then dried and bent, and a curved metal plate cast against it. The plates were clipped to a rotating drum, and could thus print against a continuous reel of paper at the enormously high speeds required for overnight newspaper production.
As computerized typesetting and imaging replaced cast metal types, letterpress began to die out, as high-speed photographic imaging onto smooth flexible plates (lithography) became more economical. However, photopolymer plates and the invention of Ultra-Violet curing inks has helped keep rotary letterpress alive in areas like self-adhesive labels. There is also still a large amount of flexographic printing, a similar process, which uses rubber plates to print on curved or awkward surfaces, and a lesser amount of relief printing from huge wooden letters for lower-quality poster work.
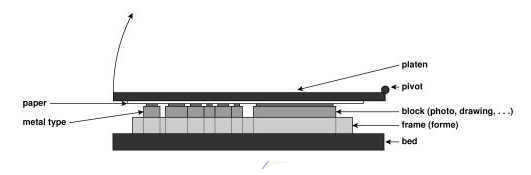
Also Known As:
- Offset Letterpress
- Relief Printing
Examples:
Mostly replaced by offset printing and other processes, letterpress printing is still used for some newspapers, books, and limited edition prints. Letterpress printing may also be used for printing business cards, letterhead, posters, and some forms.
Offset Printing
Offset printing is a widely used printing technique where the inked image is transferred (or “offset”) from a plate to a rubber blanket, then to the printing surface. When used in combination with the lithographic process, which is based on the repulsion of oil and water, the offset technique employs a flat (planographic) image carrier on which the image to be printed obtains ink from ink rollers, while the non-printing area attracts a film of water, keeping the non-printing areas ink-free.
Advantages of offset printing include:
- Consistent high image quality. Offset printing produces sharper and cleaner images and type than letterpress printing because the rubber blanket conforms to the texture of the printing surface.
- Quick and easy production of printing plates.
- Longer printing plate life than on direct litho presses because there is no direct contact between the plate and the printing surface.
Also Known As:
- Lithographic
- Offset
- Planographic
Examples:
Offset lithography is the most commonly used commercial printing process for the bulk of desktop publishing on paper. Offset lithography is used on both sheet-fed and web offset presses.
Rotogravure Printing
Rotogravure is a type of intaglio printing process, in that it involves engraving the image onto an image carrier. In gravure printing, the image is engraved onto a copper cylinder because, like offset and flexography, it uses a rotary printing press. The vast majority of gravure presses print on reels of paper, rather than sheets of paper. (Sheetfed gravure is a small, specialty market.) Rotary gravure presses are the fastest and widest presses in operation, printing everything from narrow labels to 12-feet-wide rolls of vinyl flooring. Additional operations may be in-line with a gravure press, such as saddle stitching facilities for magazine/brochure work.
In 1932 a George Gallup “Survey of Reader Interest in Various Sections of Sunday Newspapers to Determine the Relative Value of Rotogravure as an Advertising Medium” found that rotogravures were the most widely read sections of the paper and that advertisements there were three times more likely to be seen by readers than in any other section. The rotogravure process is still used for commercial printing of magazines, postcards, and corrugated (cardboard) product packaging.
In the latter quarter of the 19th centure, the method of image photo transfer onto carbon tissue covered with light-sensitive gelatin was discovered and was the beginning of rotogravure.
Gravure cylinders nowadays are typically engraved digitally by a diamond tipped or laser etching machine. On the gravure cylinder, the engraved image is composed of small recessed cells (or ‘dots’) that act as tiny wells. Their depth and size control the amount of ink that gets transferred to the substrate (paper or other material, such as plastic or foil) via a process of pressure, osmosis, and electrostatic pull. (A patented process called “Electrostatic Assist” is sometimes used to enhance ink transfer.)
A rotogravure printing press has one printing unit for each color, typically CMYK or cyan, magenta, yellow and key (printing terminology for black). The number of units vary depending on what colors are required to produce the final image. There are five basic components in each color unit: an engraved cylinder (whose circumference can change according to the layout of the job), an ink fountain, a doctor blade, an impression roller, and a dryer. While the press is in operation, the engraved cylinder is partially immersed in the ink fountain, filling the recessed cells. As the cylinder rotates, it draws ink out of the fountain with it. Acting as a squeegee, the doctor blade scrapes the cylinder before it makes contact with the paper, removing ink from the non-printing (non-recessed) areas. Next, the paper gets sandwiched between the impression roller and the gravure cylinder. This is where the ink gets transferred from the recessed cells to the paper. The purpose of the impression roller is to apply force, pressing the paper onto the gravure cylinder, ensuring even and maximum coverage of the ink. Then the paper goes through a dryer because it must be completely dry before going through the next color unit and absorbing another coat of ink.
Because gravure is capable of transferring more ink to the paper than other printing processes, gravure is noted for its remarkable density range (light to shadow) and hence is a process of choice for fine art and photography reproduction, though not typically as clean an image as that of sheet fed litho or web offset litho. Gravure is widely used for long-run magazine printing in excess of 1 million copies. Gravure’s major quality shortcoming is that all images, including type and “solids,” are actually printed as dots, and the screen pattern of these dots is readily visible to the naked eye. Examples of gravure work in the United States are typically long-run magazines, mail order catalogs, consumer packaging, and Sunday newspaper ad inserts.
Other application area of gravure printing is in the flexible packaging sector. A wide range of substrates such as Polyethylene, Polypropylene, Polyester, BOPP etc can be printed in the gravure press.
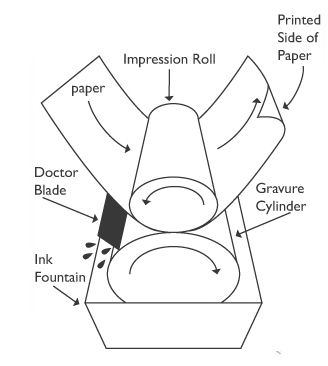
Also Known As:
- Gravure
Examples:
Gravure printing is often used for high-volume printing of packaging, wallpaper, and gift-wrap using fast-drying inks. Although less common, gravure printing may also be used for printing magazines, greeting cards, and high-volume advertising pieces.
Screen Printing
Screen printing is a printmaking technique that creates a sharp-edged image using a stencil. A screen print or serigraph is an image created using this technique.
A screen is made of a piece of porous, finely woven fabric (originally silk, but typically made of polyester or nylon since the 1940s) stretched over an aluminum frame. Areas of the screen are blocked off with a non-permeable material—a stencil—which is a positive of the image to be printed; that is, the open spaces are where the ink will appear.
The screen is placed on top of a piece of dry paper or fabric. Ink is placed on top of the screen, and a squeegee (rubber blade) is used to push the ink evenly into the screen openings and onto the substrate. The ink passes through the open spaces in the screen onto the paper or fabric below; the screen is lifted away and then the squeegee is pushed back across the screen, with the screen lifted, “flooding” the ink into the screen. The screen can be re-used after cleaning. If more than one color is being printed on the same surface, the ink is allowed to dry and then the process is repeated with another screen and different color of ink.
While the public thinks of garments in conjunction with screen printing, the technique is used on tens of thousands of items, including birthday cake designs, decals, clock and watch faces, and many more products. The vast majority of silk-screen printings are monochromatic.
Graphic screen printing is widely used today to create many mass or large batch produced graphics, such as posters or display stands. Full color prints can be created by printing in CMYK (cyan, magenta, yellow and black). Screen printing is often preferred over other processes such as dye sublimation or inkjet printing be
Also Known As:
- Silk-screening
- Serigraphy
Examples: Screen printing can be used to print images on T-shirts, hats, CDs, DVDs, ceramics, glass, polyethylene, polypropylene, paper, metals, and wood.
CHAPTER NINE: INK
Ink- is a liquid or paste that contains pigments or dyes and is used to color a surface to produce an image, text, or design. Ink is used for drawing or writing with a pen, brush, or quill. Thicker inks, in paste form, are used extensively in letterpress and lithographic printing.
Ink can be a complex medium, composed of solvents, pigments, dyes, resins, lubricants, solubilizers, surfactants, particulate matter, fluorescents, and other materials. The components of inks serve many purposes; the ink’s carrier, colorants, and other additives affect the flow and thickness of the ink and its dry appearance.
Types of ink
Ink formulas vary, but commonly involve two components:
- Colorants
- Vehicles (binders)
Inks generally fall into four classes:
- Aqueous
- Liquid
- Paste
- Powder
- Colorants
Pigment inks are used more frequently than dyes because they are more color-fast, but they are also more expensive, less consistent in color, and have less of a color range than dyes.
Pigments
Pigments are solid, opaque particles suspended in ink to provide color. Pigment molecules typically link together in crystalline structures that are 0.1–2 µm in size and comprise 5–30 percent of the ink volume. Qualities such as hue, saturation, and lightness vary depending on the source and type of pigment.
Dyes
Dye-based inks are generally much stronger than pigment-based inks and can produce much more color of a given density per unit of mass. However, because dyes are dissolved in the liquid phase, they have a tendency to soak into paper, making the ink less efficient and potentially allowing the ink to bleed at the edges of an image.
To circumvent this problem, dye-based inks are made with solvents that dry rapidly or are used with quick-drying methods of printing, such as blowing hot air on the fresh print. Other methods include harder paper sizing and more specialized paper coatings. The latter is particularly suited to inks used in non-industrial settings (which must conform to tighter toxicity and emission controls), such as inkjet printer inks. Another technique involves coating the paper with a charged coating. If the dye has the opposite charge, it is attracted to and retained by this coating, while the solvent soaks into the paper. Cellulose, the wood-derived material most paper is made of, is naturally charged, and so a compound that complexes with both the dye and the paper’s surface aids retention at the surface. Such a compound is commonly used in ink-jet printing inks.
An additional advantage of dye-based ink systems is that the dye molecules can interact with other ink ingredients, potentially allowing greater benefit as compared to pigmented inks from optical brighteners and color-enhancing agents designed to increase the intensity and appearance of dyes.
A more recent development in dye-based inks are dyes that react with cellulose to permanently color the paper. Such inks are not affected by water, alcohol, and other solvents. As such, their use is recommended to prevent frauds that involve removing signatures, such as check washing. This kind of ink is most commonly found in gel inks and in certain fountain pen inks.
History of ink
Ink drawing of Ganesha under an umbrella (early 19th century). Ink, called masi, an admixture of several chemical components, has been used in India since at least the 4th century BC. The practice of writing with ink and a sharp pointed needle was common in early South India. Several Jain sutras in India were compiled in ink.
Many ancient cultures around the world have independently discovered and formulated inks for the purposes of writing and drawing. The knowledge of the inks, their recipes and the techniques for their production comes from archaeological analysis or from written text itself.
The history of Chinese inks can be traced to the 23rd century BC, with the utilization of natural plant (plant dyes), animal, and mineral inks based on such materials as graphite that were ground with water and applied with ink brushes. Evidence for the earliest Chinese inks, similar to modern ink sticks, is around 256 BC in the end of the Warring States period and produced from soot and animal glue.The best inks for drawing or painting on paper or silk are produced from the resin of the pine tree. They must be between 50 and 100 years old. The Chinese ink stick is produced with fish glue, whereas Japanese glue (膠 “nikawa”) is from cow or stag.
The process of making India ink was known in China as early as the middle of the 3rd millennium BC, during Neolithic China. India ink was first invented in China, although the source of materials to make the carbon pigment in India ink was later often traded from India, thus the term India ink was coined. The traditional Chinese method of making the ink was to grind a mixture of hide glue, carbon black, lampblack, and bone black pigment with a pestle and mortar, then pouring it into a ceramic dish where it could dry. To use the dry mixture, a wet brush would be applied until it reliquified. The manufacture of India ink was well-established by the Cao Wei Dynasty (220–265 AD). Indian documents written in Kharosthi with ink have been unearthed in Chinese Turkestan.[11] The practice of writing with ink and a sharp pointed needle was common in early South India.[3] Several Buddhist and Jain sutras in India were compiled in ink.
In ancient Rome, atramentum was used, in an article for the Christian Science Monitor, Sharon J. Huntington describes these other historical inks:
About 1,600 years ago, a popular ink recipe was created. The recipe was used for centuries. Iron salts, such as ferrous sulfate (made by treating iron with sulfuric acid), were mixed with tannin from gallnuts (they grow on trees) and a thickener. When first put to paper, this ink is bluish-black. Over time it fades to a dull brown.
Scribes in medieval Europe (about AD 800 to 1500) wrote principally on parchment or vellum. One 12th century ink recipe called for hawthorn branches to be cut in the spring and left to dry. Then the bark was pounded from the branches and soaked in water for eight days. The water was boiled until it thickened and turned black. Wine was added during boiling. The ink was poured into special bags and hung in the sun. Once dried, the mixture was mixed with wine and iron salt over a fire to make the final ink.[12]
The reservoir pen, which may have been the first fountain pen, dates back to 953, when Ma’ād al-Mu’izz, the caliph of Egypt, demanded a pen that would not stain his hands or clothes, and was provided with a pen that held ink in a reservoir.
In the 15th century, a new type of ink had to be developed in Europe for the printing press by Johannes Gutenberg. According to Martyn Lyons in his book Books: A Living History, Gutenberg’s dye was indelible, oil-based, and made from the soot of lamps (lamp-black) mixed with varnish and egg white. Two types of ink were prevalent at the time: the Greek and Roman writing ink (soot, glue, and water) and the 12th century variety composed of ferrous sulfate, gall, gum, and water. Neither of these handwriting inks could adhere to printing surfaces without creating blurs. Eventually an oily, varnish-like ink made of soot, turpentine, and walnut oil was created specifically for the printing press.
In 2011 worldwide consumption of printing inks generated revenues of more than 20 billion US dollars. Demand by traditional print media is shrinking, on the other hand more and more printing inks are consumed for packaging’s.
Health and environmental aspects
There is a misconception that ink is non-toxic even if swallowed. Once ingested, ink can be hazardous to one’s health. Certain inks, such as those used in digital printers, and even those found in a common pen can be harmful. Though ink does not easily cause death, repeated skin contact or ingestion can cause effects such as severe headaches, skin irritation, or nervous system damage. These effects can be caused by solvents, or by pigment ingredients such as p-Anisidine, which helps create some inks’ color and shine.
Three main environmental issues with ink are:
- Heavy metals
- Non-renewable oils
- Volatile organic compounds
Some regulatory bodies have set standards for the amount of heavy metals in ink.[17] There is a trend toward vegetable oils rather than petroleum oils in recent years in response to a demand for better environmental sustainability performance.
Ink uses up non-renewable oils and metals, which have a negative impact on the environment.
Writing and preservation
The two most used black writing inks in history are carbon inks and iron gall inks. Both types create problems for preservationists.
Carbon
Chinese ink sticks; carbon-based and made from soot and animal glue.
Carbon inks were commonly made from lampblack or soot and a binding agent such as gum Arabic or animal glue. The binding agent keeps carbon particles in suspension and adhered to paper. Carbon particles do not fade over time even when bleached or when in sunlight. One benefit is that carbon ink does not harm paper. Over time, the ink is chemically stable and therefore does not threaten the paper’s strength. Despite these benefits, carbon ink is not ideal for permanence and ease of preservation. Carbon ink tends to smudge in humid environments and can be washed off surfaces. The best method of preserving a document written in carbon ink is to store it in a dry environment (Barrow 1972).
Recently, carbon inks made from carbon nanotubes have been successfully created. They are similar in composition to traditional inks in that they use a polymer to suspend the carbon nano tubes. These inks can be used in inkjet printers and produce electrically conductive patterns.
Iron gall
Iron gall inks became prominent in the early 12th century; they were used for centuries and were widely thought to be the best type of ink. However, iron gall ink is corrosive and damages the paper it is written on (Waters 1940). Items containing this ink can become brittle and the writing fades to brown. The original scores of Johann Sebastian Bach are threatened by the destructive properties of iron gall ink. The majority of his works are held by the German State Library, and about 25% of those are in advanced stages of decay (American Libraries 2000). The rate at which the writing fades is based on several factors, such as proportions of ink ingredients, amount deposited on the paper, and paper composition.
Corrosion is caused by acid catalysed hydrolysis and iron (II)-catalysed oxidation of cellulose Treatment is a controversial subject. No treatment undoes damage already caused by acidic ink. Deterioration can only be stopped or slowed. Some think it best not to treat the item at all for fear of the consequences. Others believe that non-aqueous procedures are the best solution. Yet others think an aqueous procedure may preserve items written with iron gall ink. Aqueous treatments include distilled water at different temperatures, calcium hydroxide, calcium bicarbonate, magnesium carbonate, magnesium bicarbonate, and calcium phytate. There are many possible side effects from these treatments. There can be mechanical damage, which further weakens the paper. Paper color or ink color may change, and ink may bleed. Other consequences of aqueous treatment are a change of ink texture or formation of plaque on the surface of the ink Iron gall inks require storage in a stable environment, because fluctuating relative humidity increases the rate that formic acid, acetic acid, and furan derivatives form in the material the ink was used on. Sulfuric acid acts as a catalyst to cellulose hydrolysis, and iron (II) sulfate acts as a catalyst to cellulose oxidation. These chemical reactions physically weaken the paper, causing brittleness.[20]
Indelible ink
Indelible means “unremovable”. Some types of indelible ink have a very short shelf life because of the quickly evaporating solvents used. India, Mexico, Indonesia, Malaysia and other developing countries have used indelible ink in the form of electoral stain to prevent electoral fraud. The Indian Scientist Dr. M.L. Goel is the founding father of indelible ink in India and gave the secret formula to NPL (National Physical Laboratory) of India.
The Election Commission in India has used indelible ink for many elections. Indonesia used it in its last election in Aceh. In Mali, the ink is applied to the fingernail. Indelible ink itself is not infallible as it can be used to commit electoral fraud by marking opponent party members before they have chances to cast their votes. There are also reports of “indelible” ink washing off voters’ fingers in Afghanistan
Fountain pens require ink. But what kind of ink? And why? And how?
First Principles
Good: Feed your fountain pen a steady diet of fountain pen ink
Period. This injunction may seem obvious, but it is not quite so obvious as it appears. Fountain pen ink is a solution. To the chemist, a solution consists of a fluid in which other substances are dissolved (the solvent), and the dissolved substances (the solutes). The solutes are actually reduced to the molecular level, the same as the solvent, and all the different molecules are mixed up evenly to create a uniform fluid, a pure liquid[1] that contains no microscopic particles of solid material. The solvent in fountain pen ink is distilled water, and the solutes are dyes, wetting agents, and mold inhibitors. Because it’s a solution, fountain pen ink contains no solid matter at all. This is an important point to remember.
BAD: Certain manufacturers of artists’ inks and paints, such as Winsor & Newton, market some of their calligraphy inks as being suitable for fountain pens. Don’t believe it. Calligraphy inks are pigmented; that is, they derive their color not from dissolved dyes but instead from finely ground solid matter — like paint. In theory, the pigment in these inks is so fine that it will remain in suspension under the impetus of Brownian motion in the liquid component of the ink. Unfortunately, this does not always happen. In a calligrapher’s dip pen any separation of solid components is not a problem because the nib is easy to remove and
clean and because there is no feed with hidden passages to clog. But as the ink passes through the very fine fissures of a fountain pen’s feed and the slit of the nib, pigment particles come in contact with the walls of these passages and are attracted to the surfaces. A layer of pigment builds up and will inevitably clog the feed, the nib, or both. The modern plastic feed shown here illustrates the myriad nooks and crannies into which ink can find its way before drying out to clog the works.
Note, however, that a new type of ink has appeared in the past few years. Called nanoparticle ink, it contains pigment — but the pigment is much more finely ground than in traditional calligraphy inks; so finely ground, in fact, that Brownian motion can easily keep it suspended. In general, nanoparticle inks can be considered safe for fountain pens, but I rate them as high-maintenance inks (see below) because the very existence of particulate matter brings with it more risk of clogging than is present with inks that are true solutions.
There are other inks, less obviously troublesome, that you should avoid. Right at the top of this list is inkjet-printer ink. This stuff might seem appealing; refills are inexpensive, and the colors — especially the ones rated for 70 years or longer — are remarkably permanent. But there are some very bad things in inkjet ink. It frequently uses pigment, not dye, for color, and there are also particulate resins for better adhesion. Various glycols (diethylene, alkylene, etc.) enhance penetration; these substances can exacerbate bleeding and feathering in a fountain pen. They also retard evaporation, making the ink take longer to dry on the paper.
Another kind of ink whose potential for disaster is not immediately obvious is whiteboard marker ink. Like inkjet ink, this stuff is based on pigment, not dye, and that means it can and will clog feeds. It also contains particulate resins for adhesion as well as various alcohols (such as ethanol and 2-propanol) that can damage the feed and barrel in some types of fountain pens.
UGLY: India ink, white-out, and other similar fluids are certain death to fountain pens. These fluids are pigmented, and they are frequently not water based. (India ink is water based; but it also contains gum arabic for permanence, and it takes great pleasure in gumming up fountain pens.)
From an email I received from Mike and Linda Kennedy at Indy-Pen-Dance: “The nib and feed in this image came out of a pen in which white-out was used. Just separating these parts required several rounds in an ultrasonic cleaner with Rapido-eze, and that’s when we took this picture. We were able to get the mess cleaned up, but it was an expensive learning experience for the owner of the pen. Believe it or not, we have received (and repaired) fountain pens that had been filled with latex paint and model paint!”
Maintenance: Low, Medium, or High
Even when you’re scrupulous about using fountain pen ink only, your pen can experience ink-related problems. These difficulties happen because even the best inks are not perfect; and when pen maintenance is also imperfect, writing performance can suffer.
Using fountain pens, like shaving with a cut-throat razor, is partly a sensual experience, and it involves ritual. Maintaining your pens is part of the ritual. Every ink requires you to commit a certain amount of time and effort to using your pens. Your choice of inks will depend on how much fiddling you enjoy balanced against how much you are willing to tolerate. But not all inks require the same amount of involvement; the less trouble a given ink requires, the higher its usability score. An ink’s usability score is a composite rating, so to speak, that reflects the amount of time and effort you have to put into using that ink. The composite is built on factors such as these:
- Inks that flow well — but not too well — score high because they don’t make the pen fight back when you’re trying to write with it. Inks with good flow will start readily and will flow evenly, without exhibiting a tendency to skip or to produce dry patches. Inks that flow too well often tend to feather or bleed, especially on cheap papers, and this sort of excessive flow lowers an ink’s score.
- Inks that stain little or not at all score high because they don’t make you disassemble and scrub out your transparent or partially transparent pens so you can see through them or polish the plating off your two-tone nibs trying to keep them bright. The color of a given ink affects its staining tendency; reds and other colors containing red dyes have a high tendency to stain (and therefore somewhat lower scores), while pure blues — especially washable ones — stain little or not at all.
- Inks that lubricate well score high because they give you a smooth glide instead of making your nib feel dry and gritty so that you have to push harder. Some users refer to inks that lubricate well as being “greasy,” but there is no actual grease in fountain pen ink.
- Inks that don’t clog score high because they don’t make you disassemble your pen to floss the nib and feed. Typically, the more intensely saturated the color is, the greater are the dye load and the concomitant risk of clogging.
- “Creepability.” This is a handy made-up word that refers to an ink’s tendency to display nib creep. Inks that tend not to creep score higher because they don’t make you take out a tissue and wipe the nib to no avail every few minutes. This also raises your spirits by reducing your stress level.
Waterman inks were the first high-scoring (low-maintenance) inks I discovered. On a scale of 1 to 10, I rate Waterman inks a solid 10. They flow remarkably well under a broad variety of conditions in almost any pen. They lubricate exceptionally well, imparting a glassy-smooth ride. They are not heavily saturated, and the dyes in them tend to be relatively nonstaining. Waterman Mysterious Blue is almost stain free. But Waterman’s palette is not the most inspiring in the world. Recently Diamine, which has been making inks since 1864, appeared in the marketplace with a much more exciting range of colors and with characteristics very similar to those of Waterman, so that now I rely almost entirely on these two brands, the majority of whose colors sport very high scores. Some Diamine colors, however, especially their reds and colors containing red dyes, such as pinks, violets, oranges, and browns, appear more prone to clogging issue, and these inks have much lower scores. As it happens, I use Skrip Red (made in Slovenia) in one pen at my workbench, and it’s remarkably good. Its being red reduces its score slightly, but not enough to be a major consideration for me.
Toward the middle of the scale fall the vast majority of inks, including Aurora, Pelikan, Parker Quink (except the black, which scores surprisingly low because it exhibits serious flow issues in Parker pens), J. Herbin, Lamy, Omas, Namiki, and many more.
On the high-maintenance (low scoring) end of the scale we find several brands of very heavily saturated “boutique” brands, most of which score in the range from 3 to 5. As described earlier, fountain pen ink is a solution; the solvent is water, and the solutes are the dyes, the surfactant, and the fungicide. The nature of chemical solutions is that as the temperature declines, the solvent can keep less of the solutes in solution. The more solute you start with, the more likely it is that some of it will precipitate out (come out of solution) as time passes and conditions such as humidity and temperature vary. As the dye comes out of solution it precipitates onto the interior surfaces of the pen — particularly the fissures in the feed. This leads eventually to a clog. See the Science Experiment to the right.
Some boutique inks also score lower because of differences in flow and drying rate among their various colors. Private Reserve Sherwood Green is a lovely color, but I give it a score of 2 because it sometimes never dries. (I’ve come back six months after writing something with it and smeared it while handling the paper.) On the other hand, Private Reserve Tanzanite, sometimes called “the Ex-Lax of inks,” stains badly and flows far too readily. It also scores a 2 or a 3. If you like the color of Tanzanite, try mixing Waterman Serenity Blue and Waterman Tender Purple in equal parts. The resulting color, which I have dubbed “Blurple,” is virtually indistinguishable from Tanzanite.
In the same way that a heavily saturated ink can precipitate in your pens, it can also do so in the bottle. In fact, if you habitually leave ink bottles open for extended periods, the water gradually evaporates, rendering the solution more saturated than the manufacturer intended. Even otherwise “safe” inks can do this. Do not shake an ink bottle before filling your pens from it — and if you ever see sludge in the bottom of an ink bottle, the wisest course if you want to avoid clogging is to discard the contents.
Let it be clearly understood that the designation of a given ink as high maintenance (by me or by anyone else) should not be construed as a warning to avoid said ink. With proper care, including more frequent flushing, use in opaque pens only, adjustment of nibs for richer flow, etc., these inks are eminently usable, so long as you use them in pens that like them and give them the attention to maintenance that they need. Please note also that I do not have a documented scale of maintenance levels. This is all a gut-feel sort of thing, based on experience and anecdotal information. Inks with a Non-Neutral pH: Your Pen Could Be on the Menu
Some ink manufacturers state that the pH (degree of acidity or alkalinity) of an ink is not a factor in whether that ink can damage pens. This assertion appears to be untrue.
Strongly alkaline inks can eat some organic resins, especially celluloid and Omas’ vegetal resin — which is very much like celluloid. (Omas’ own inks tend to be highly acidic.) Parker made the “51” of acrylic because its super-quick drying “51” ink turned out to like noshing on celluloid pens. (The problem was largely due to the ink’s alkalinity that contributed to quick drying by eating into the paper’s cellulose fibers.) Noodler’s Polar inks seem to be similarly harmful, at least to celluloid; it appears that these inks leach the camphor out of the celluloid. Because camphor is the plasticizing and stabilizing agent that turns guncotton into celluloid, the ink breaks down the celluloid and could conceivably return it to its original explosive state.
Most Japanese inks are alkaline. Alkaline inks are hostile to latex. I have experimental evidence that at least some of the Pilot Iroshizuku colors will destroy latex sacs. For this reason, I recommend that you avoid using Japanese inks in sac-filling pens as well as in pens that are made of organic resins and use the barrel for the ink reservoir (as described in the preceding paragraph).
More ugliness is contained in bottles labeled Parker “51” or Parker Super Chrome. These are vintage inks, but there are still some bottles in existence. Don’t be tempted to use them! Parker introduced the super fast-drying “51” ink in 1941 for use with the “51” pen — and no others. The problem was that “51” ink ate pens. It didn’t eat the “51”, but it did cause the diaphragm in the pen’s Vacumatic filling system to ossify very rapidly. With the 1948 introduction of the Aero-metric “51”, Parker withdrew”51” ink, replacing it with Super Chrome. The newer ink wasn’t as hostile to pens as the old, but it still had a pH of about 12, and it wasn’t good for them, and Parker withdrew it in 1956. The photo below shows what happened to the sterling silver breather tube from a “51” that had been used with Super Chrome.
Among modern inks, Noodler’s Baystate colors stain terribly and are also corrosive enough to destroy some plastics, including the materials from which Pilot and Lamy feeds are made and the resins used in the barrels of some makers’ piston-filling pens. (See the photos below, showing an undamaged Vanishing Point feed and one that has begun to die due to exposure to Baystate Blue, which has a measured pH of 4.53.)
Some Noodler’s inks do not play nicely together; this means that you cannot mix them. The Pelikan M1000 shown below was sent to Chartpak, Pelikan’s U.S. distributor, for repair. To remove the stuck-on cap, the Chartpak repairer had to disassemble it; then the pieces could be popped off the barrel. The section had come loose from the barrel, and the interior of the barrel was badly stained and seriously cracked. Because the pen was a gift to its owner from a now-deceased relative, the repair department manager at Chartpak sent it to Mike Kennedy at Indy-Pen-Dance in the hope that it could be saved instead of simply being thrown in the trash. No such luck. It is not known what exact inks had been used in it beyond that they were all Doodler’s inks that the owner mixed to produce a custom color, but what they did to the pen is horrifying. The pen was not reparable.
Sometimes an ink can undergo an adverse chemical reaction among its various components: the fungicide might react slowly with the dye and — over time — produce a slimy film or threadlike bits of slime. This is bad news. I’ve seen suggestions that filtering the slime out will leave the remaining ink usable, but it’s not really a good idea. There is no way to tell what the chemistry of the ink is anymore; if the reaction involved the fungicide, for example, the ink no longer contains sufficient mold inhibitor, and it can develop mold very suddenly — in the bottle or in your pen! One visit to a pen repairer to have the pen cleaned out will cost you at least the price of two bottles of ink. Is it worth the risk?
Mold
To a chemist, the aniline dyes used in fountain pen inks are organic in nature, and the very presence of these dyes in ink can give rise to mold because to mold they look like food. Mold spores are everywhere around us; every time a bottle of ink is opened, some spores find their way from the atmosphere into the ink. Inks contain chemicals to inhibit mold growth, but not all inks contain enough mold inhibitor.
I’ve left one particular type of ink until the end. Iron gall ink was invented more than 1500 years ago. It was used by innumerable nameless scribes to copy sacred manuscripts; by great secular writers and thinkers such as Voltaire, Shakespeare, and Leibniz; and by ordinary people. When fountain pens came into existence, iron gall ink made the leap to the new technology, and it is still in use today because it is a very permanent ink. But it has a couple of drawbacks. First, but of less serious consequence for most of us, is its reputation for destroying, over the course of centuries, the paper on which it is used. Of more concern to you, as a fountain pen user is that it is rather acidic: it can corrode metal pen parts such as steel nibs and cartridge nipples, and plated trim rings — every part that comes in contact with it. Only gold alloys are safe from its ravages; if your pen features a gold nib and has no other metal parts that are continually exposed to the ink (such as a metal cartridge nipple), you can use iron gall inks such as Montblanc Blue-Black and Diamine Registrar’s ink with impunity.
You should note that iron gall ink is not the only acidic ink that is currently available. Your best course, if you’re concerned about the pH of your inks, is to look for inks that advertise neutral-pH formulas.
The Bottom Line
Be sensible. Know what inks you are using and how to handle them; and take good care of your pens to ensure that they’ll deliver the writing performance that was designed into them. If you’re like most collector/users, you have more pens than you want to use at one time — when you take a pen out of your rotation, flush it thoroughly), and let it dry uncapped overnight before putting it into your pen chest for a bit of well-earned relaxation.
Ink corrosion – Chemistry
A major issue is often overlooked in light of the drastic statistics on deterioration of library archival holdings: important historical objects in libraries and archives, i.e. documents, illuminated manuscripts, colored prints and maps, all suffer very serious damage as a result of the destructive effects of iron gall inks and are therefore actually endangered.
The reasons for this destruction are not fully understood yet, although numerous theories have been proposed to explain the degradation of papyrus, paper and parchment objects. The desire to conserve these items necessitates the development of effective treatment methods, which can only be possible after determination of the chemical causes for deterioration. Thus, given the historical and material value of these threatened objects, every effort of scientific research to combat further progress of decay is justified. Recent scientific research undertaken at the Netherlands Institute for Cultural Heritage can be regarded as a decisive step forward for a deeper scientific insight in the decomposition mechanisms and created the basis for the development of a new approach for a suitable conservation intervention.
The origin of the destructive mechanism of inks is a result of a complex overlapping of different processes. Of importance in this context are the natural ageing of paper, the composition of the inks and their ability to create chemical reactions with the carrier or the medium. The reactions between the inks and the carrier materials are strongly influenced by environmental and storage conditions, especially temperature and humidity and – as in the case of paper as a support medium for drawings or writing, by sizing and inorganic fillers.
In principle deterioration of paper by iron gall inks is largely a result of the action of the inks consisting of iron of diverse other transition metal ions, e.g. such as copper or zinc. The damage to the support material goes through various stages. Firstly fluorescence in the immediate vicinity of the ink writing under UV-light is noticeable, which is followed by a brown discoloration of the support in this area. This especially occurs in case of broad pen or brush strokes. The brown discoloration spreads through the support and very often an offsetting to neighboring pages is observable. Finally, the degradation of paper is so severe, that whole areas, especially along the written or drawn lines, fall apart and the information are lost. In both degradation processes, the relatively flexible support – paper and parchment – becomes brittle and friable as a result of ageing complicated by the influence of apparently destructive inks. The support material suffers an extensive decline in its natural properties which finally makes its further use as an information medium impossible.
As early as about 100 years ago the head of the Vatican Library F. Ehrle worried about the problem of ink damage and warned of the impending destruction of numerous documents and manuscripts. The conference he called in to St. Gall in I898 was the starting point for the systematic and scientific research for an explanation of the causes of this degenerative process. Since then the scientific literature names the following reasons for ink degradation of paper:
- the high acidity of some inks which contributes to the hydrolytic splitting of the cellulose;
- The efficacy of soluble iron compounds as catalysts for the oxidative decomposition of cellulose.
Among the numerous publications which appeared until the 1970s and dealt with the chemical causes of ink degradation, the leading articles are the work of Haerting, Herzberg, and Brannahl & Gramse. Haerting investigated the interesting fact that the damage caused by ink occurred not only in objects with a high mineral-acid content i.e. sulphuric acid, but also in those which were totally acid-free. His research led to the conclusion that only inks containing iron (II) salts can cause ink degradation damage. The other components of the ink – even the sulphuric acid present, according to his research, do not cause noticeable damage to the support medium. Herzberg also explained the appearance of ink deterioration with the presence of iron (II) compounds, but limits Haerting’s results in describing all iron gall inks as detrimental and considered the acidity of an ink as most important for the damage. Brannahl & Gramse were able to prove that in many iron gall inks excess FeSO4, (iron (II) sulphate) is present and the permanence of such ‘unbalanced inks’ is questionable.
Investigations which deal mainly with the additional influence of biological infestation on ink deterioration, lead to similar results. Kowalik in particular published a great deal on microbiological factors as causes for ink digestion. During growth, fungi can generate organic acids like citric acid, enzymes such as cellulose which are both paper splitting catalysts, and oxidizing agents, such as hydrogen peroxide. However further experiments undertaken could demonstrate, that fungi growth from iron gall ink is rather poor; and cellulose and organic acids have to be taken in account as biological destructive agents to a lesser extent. By far the strongest effect on deterioration has proved to be the radical mechanism catalyzed by iron (II) compounds, even under neutral conditions. The effect of iron (II) compounds was proved to be much stronger than the destructive action of acids.
These results have been strongly supported by later research. Especially Neevel could evaluate from analytical investigations the frequent use of unbalanced iron gall inks on historical documents. Furthermore he could clearly prove a correlation between excess iron (II) sulphate in the inks and the occurrence of ink decay on paper documents. It is a well-known phenomenon that organic materials are oxidized by the transformation of Fe2+ to Fe3+. This kind of redox-reaction in an aqueous system or a moist atmosphere leads to the formation of unstable complexes of the metal ions with molecular oxygen which can in turn lead to the formation of free radicals in the presence of an organic substrate. In the equations below iron (Fe) stands for a metal ion which is involved in the mechanism in the oxidation states 2+ and 3+. R-H indicates an organic compound with at least one hydrogen atom e.g. cellulose. The organic radicals (R ·) and the perhydroxyl radicals (HOO ·) formed, start further radical chain reactions thus decomposing the organic substrate. Without going into details, it should be stated that research results suggest this type of mechanism for the decomposition of wood cellulose through iron (II) salts in a slightly acid environment. A similar reaction process can be proposed for the decomposition of paper by iron gall inks.

Although the knowledge about the chemical mechanisms of ink destruction is still incomplete some important conclusions can be drawn. The deterioration of paper is a result of the oxidizing action of soluble transition metal compounds – iron and in addition minor contaminants or trace elements, such as copper; zinc and others on the cellulose.
The presence of acidity is an important factor; as an acid environment accelerates the decomposition reactions. Nevertheless, deacidification alone will not stop the decay without removal of soluble transition metal compounds from the paper web or at least their conversion to chemically inert compounds.
Composition of ink
Constitutes basic/ primary and secondary which determines the qualities and properties of the ink. Primary/basic ingredients of ink
Colouring matter-this provides a characteristics colour of ink. It’s a achieved by the effect of the pigments and dye which can be of the natural of synthetic origin pigments and dyes are used as ink print
Solvents– these are Fluids in which the ingredients are dissolved and diluted to ensure the smooth flow of ink over the materials. The most common solvents used in calligraphic inks (art of writing) and typographic inks (printing inks) are water an oil based respectively.
Adhesives/binders-these are chemicals substances that bind the particles of pigments together in the ink so that they do not conglomerate i.e. for the ink to become homogeneous not to precipitate’s. Does not come into lumps.
Examples of adhesive used are
- Gum Arabic
- Senegal gum
- Sugar
- Molasses
- Starches such as gelatin, casein albumen, fish glue and various synthetic substances among the protein.
Mordents/ fixers-these are acids used to fix ink on paper.some ink contain mordents instead of adhesives. The use of mordents in the manufacturing of ink is a major source of acidity which leads to alteration of library and information materials.
Secondary composition of ink
These are important because they add to ink certain defined characteristics they include.
Thickeners-are used to control the density of ink. Density is the closeness of substances.
Examples include;
- Sodium carbonate
- Heavy spur
- White barium
Humidifiers-these are used to control the speed of the drying processes and help the binding properties and flexibility of the ink. If it dries fast then its going to be quality ink.
Examples of humidifiers;
Glycerol-it’s a colourless liquid which is found as aby-product of fats which sometimes used as an ointment.
Glycol
Antiseptic –these are meant to stop sterilize defer or inhibit insects and other biological pests
Examples of antiseptics
- Barox acid
- Phenol
- Mercuric dichloride
- Alum rosin
- Nephthanol
Scents-these are substances that give ink a pleasant smell or odour or any disagreeable smell. Examples include essence of musk, ambergris and terpineol.
Brighteners –these are chemicals that enhance the colour of the ink. They add shine and luster to ink.i.e. Loading agents like oil and synthetic types of these facilitates the dissolving of pigments in the ink.