
Booting Up
It is useful to understand what happens behind the scenes when you switch on your computer from an idle machine to an operable and functional system. There are essentially two forms of booting – the soft boot and the hard boot. The warm boot or hard boot involves powering the computer up from an initial zero power supply. A cold boot on the other hand takes place when a software application or operating system triggers the computer to perform a reboot.
A successful boot is dependent on 3 conditions – the hardware, BIOS and operating system files to function without errors. When an error occurs, you will be notified by error messages, beeping sounds or in the worst scenario, a blank screen.
Boot–up Process
The boot-up process is a list of detailed procedures that the system undergoes to perform all system checks and load all necessary files to bring the computer to an operable state.
The Windows XP boot-up process comprises of the following procedures:
- The Power-On Self Test Phase b. BIOS ROM Phase
- Boot Loader Phase
- Operating System Configuration Phase
- Security & Logon Phase
4.2 Logging On to Windows XP
You must log on to the PC before you can use it. Each user is given a user name and a password which must be entered in the log-on screen before Windows will start up. When you log on you will have access to your own personal space.
The default Login screen for Windows XP computers is appears when you
switch on the machine. To login; Enter your user and password in the respective boxes.
When you enter your password, Windows XP will display a series of
- ●●●●●●●●●● s to protect your password from wandering eyes.
Press ENTER on the keyboard or click OK
4.3 Windows XP Desktop
Desktop is your work area on which program and files icons are located. it is basically a workspace where you can access everything you need to operate your computer, such as system components, applications, the Internet, etc.
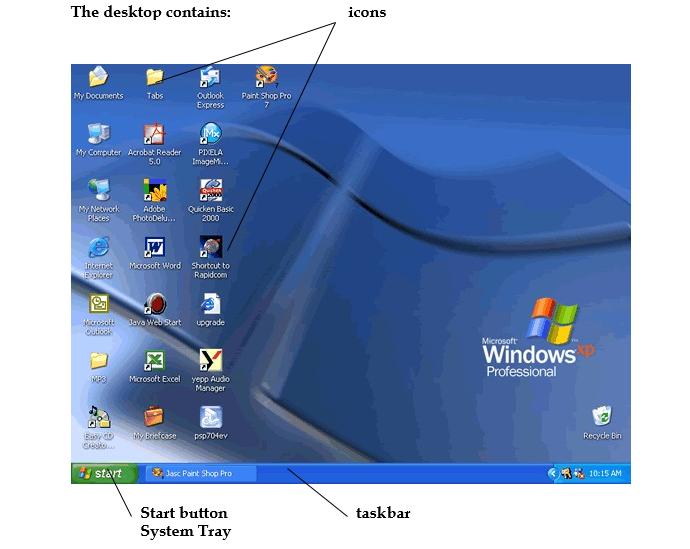
The desktop contains:
Start button: one of the most important tools you will use while working with Windows XP. The Start button allows you to open menus and start applications.
Taskbar: primarily used to switch between open windows and applications
Icons (or graphical pictures): represent applications, files, and other parts of the operating system. By default Windows XP provides you with one desktop icon, the Recycle Bin. Learn more about the Recycle Bin in a later module.
My Computer. The My Computer icon provides access to the resources on your computer. You can access your drives and other peripherals by clicking on the My Computer icon. You can also access the Control Panel through My Computer.
Internet Explorer. The Internet Explorer icon launches the Internet Explorer browser.
My network places. If you are working on a network, this displays all of the computers on the network
System Tray. The part of the taskbar that holds the clock, volume control, and icons for other utilities that runs in the background of your system.
Recycle Bin. This is where you dump any files you want to delete.
4.4 Starting a Program
- Click the Start button, the Start menu will pop up.
- Point your cursor to All Programs. A Menu listing the different program categories pops up.
- Point your cursor to Microsoft Office Another menu will appear to the right of the All Programs menu, as shown below.
- Click on Microsoft Word.
Parts of a Window
Windows contain buttons and menus to control the program and window. Windows are used in most programs, but the good news is once you learn the window of one program, you will be familiar with the windows for most programs since the window, menu and button layout appears in just about every window program.
Close Button Closes the window or program, removing it from the screen and the computer‟s memory. Minimize Button Minimizes a program from view. The program is still ready for use and can be found in the task bar.
Maximize Button Enlarges the window so that it fills the entire screen, allowing you to see your entire workspace. Notice, when a window is maximized, this button is not shown.
Restore Button When a window is maximized, this button is shown. Clicking it will make the window smaller.
Tab Controls what a program does. The menu functions listed will change from program to program, but the bar is always located at the top.
Status Bar Displays information about the program, such as instructions or special information.
Title Bar Displays the name of the program and name of the file in use.
Main Window .This is where you work within a program. If it is Microsoft Word, this is where you would type, if it is a web browser this is where the web page would be displayed.
Ribbon. Have shortcuts to the menu items
Log off and Switch Users
More than one person may use your computer. For example several coworkers may be able to access your computer on a computer network. Windows XP allows everyone who uses your computer to have separate computer accounts. A computer accounts tracks each person’s unique settings, documents, and email accounts.
Windows XP even enables you to log off the computer so someone else can log on without having to restart the computer.
To log off/switch users:
Click the Start menu and click Log Off.
A dialog box appears asking you if you want to Switch User or Log Off. Switch User allows someone else to log on to the computer. If you choose to Switch User, your applications will continue to run in the background while the new user logs on.
If you choose Log Off, your applications will close.
In any case, you’re taken to a Windows XP logon screen where you’re
prompted to enter your username and password.
Turn Off and Restart the Computer
When you’ve finished using Windows XP, be sure to turn off (or shut down) the computer correctly.
To turn off the computer:
Click the Start menu.
Click Turn Off Computer.
A dialog box opens. Click Turn Off.
If you’re experiencing computer problems or have installed something new, you can simply restart your computer.
To restart the computer:
Click the Start menu.
Click Turn Off Computer.
A dialog box opens. Click Restart.
Always turn off or restart your computer using this method. Do not turn off your computer by switching the power off and on. If you do so, you may damage Windows XP.
4.5 Working With Files and Folders
Open your Folders
Double click my computer and locate your file. Double click on the folder.
The contents of the folder will be displayed in the open window. To get back to the previous folder, click the Back Button.
Creating a Folder
Locate the place to create your folder e.g. My Documents, Desktop, C Drive
Go to File – New – Folder. Or if creating on the desktop right click on the desktop and use the new option to create a folder.
The folder will appear at the bottom of your list. When it displays as a
black rectangle with the words New Folder highlighted in blue, it is prompting you to give it a name. Type the name of your folder and hit
Enter.
Renaming a Folder
To rename an existing folder, move your mouse over the name and right click. A menu will appear. Close to the bottom you will see the word Rename. Click it, and the black rectangle with the word highlighted in blue will appear. Rename your folder and hit Enter.
Deleting a folder
Right click on the folder and select delete or. Select the file, go to file menu and select delete
A dialog box appears asking if you want to delete the folder, click yes
Once files are deleted they go to the recycle bin which is a holding or storage location for files not required. Such files are still in the hard disk. These files can
be retrieved from recycle bin as long as recycle bin have not been emptied.
Retrieving files
Go to recycle bin.
Locate the file and right click on it and select restore.
Moving and copying files in folders
Using menu command
Select the file
Go to edit and click on copy
Select the folder
Go to edit and click on paste. By dragging
Click on the file and hold
Drag it to the folder and release the button
Procedure of creating shortcuts
Locate the item
Right click and select shortcut
Drag the shortcut created to the desktop.
To set a program to start when windows start
Right click on the start button and select open.
Click on the program or file you want and hold and drag it to the start menu on the icon for programs.
Printing
If any printers are already set up their icon appears in the printer folder (on start, then printers and faxes).
To set up a printer;
Click start menu, control panel. Select printers and other hardware.
4.6 Chapter Review Questions
- Which of the following is not contained in the Windows XP desktop
(a) Recycle Bin
(b) Task Bar
(c) Start Button
(d) File menu
- Which of the following has the command for turning off the computers system
(a) Recycle Bin
(b) Task Bar
(c) Start Button
(d) File menu
- A user can create a folder on the desktop. True or false
- Which of the following is not part of a window?
(a) Task Bar
(b) Menu Bar
(c) Title Bar
(d) Close Button
- Explain the steps you would follow to create a folder in my documents location.