
21.0 WOODWORK (444)
21.1 Woodwork Paper 1 (444/1)
1 (a) SAFETY ATTIRE
(i) Apron/overall
(ii) Gloves
(iii) Goggles
(iv) Helmet
(v) Boots
(Any 4 x 1/2 = 2 marks)
(b) UTILIZATION OF WASTE WOOD
(i) Fuel
(ii) Toys
(iii) Ornament
(iv) Manufactured board
(Any 4 x 1/2 = 2 marks)
2 (a) ORDER FOR PLYWOOD
(i) Number of veneers
(ii) Surface finish
(iii) Face veneer type
(iv) Nominal thickness
(v) Sheet size
(Any 4 x 1/2 = 2 marks)
(b) METHOD OF CONVERSION
(i) Log size/diameter
(ii) Type of Wood
(iii) Structural defects
(iv) Timber use
(v) Type of sawing machine
(vi) Proportion of heartwood to sapwood
(Any 4 x 1/2 = 2 marks)
3 DRILLING HOLE USING EXPANSIVE BIT
(i) Locate and mark the centre position of the hole (1/2 mark)
(ii) Set the expansive bit at 0 60 mm and drill hole midway (1 mark)
(iii) Set the bit at (5 30 mm and continue drill the hole till the screw tip shows on the other side. (1 mark)
(iv) Turn the work and finish drilling from opposite side (2 mark)
4 (a) REASONS FOR SETTING SAW TEETH
(i) To provide a ken” which is wider than the saw blade
(ii) To prevent blade from jamming when sawing
(2 X 1 = 2 marks)
(b) SETTING SAW TEETH
(i) Mount the saw blade between holding block and fix in a vice
(ii) Select appropriate setting tool
(iii) Bend every alternate tooth in one direction and the remaining teeth in opposite direction
(iv) Check to confirm alignment of teeth.
(Any 4 x 1/2 = 2 marks)
5 RECONDITIONING THE BLADE
(i) Set the correct grinding angle (20 – 25°) on the grinder
(ii) Grind the blade square till the nicks disappear
(m) Hone the cutting edge to correct sharpening angle (25 – 30°)
(iv) Flip the blade to remove the burrs at the back
(4 x 1 = 4 marks)
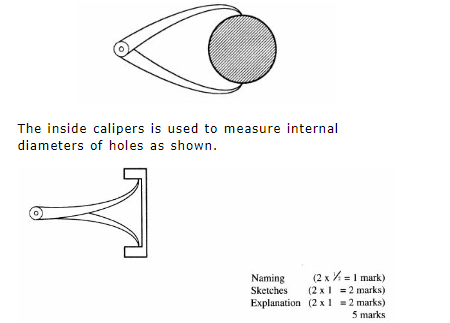
6. The outside calipers is used to measure external diameters of shafts as shown.
7 (a) Router plane (1 mark)
(b) PROCEDURE
(i) Select the correct size of the cutter
(ii) Mount the cutter
(iii) Mark the location of the cut
(iv) Cut the groove
(Any 4 x Z = 2 marks)
8 HINGE FAULTS
Protruding screw heads
Door will not close fully or screws will dig into its edge
Hinge set too far inside
Door carcase will bend on outside edge
Recess cut too deep
Screws will loosen on closing the door
Recess cut too shallow
A gap will be left between the door and carcase
Recess being out of square
Door will not align with carcase (any 3 marks)
9 (a) REASON FOR USING WOOD FILLERS
To cover cracks, dents, gaps etc. on Wood surfaces.
(b) FUNCTIONS OF WOOD STAINS
(i) Bring wood surface to desired colour
(ii) Bring out the beauty of the grains
12 (a) REASONS FOR GROOVE IN A DOWEL
(i) To allow air to escape while driving a dowel
(ii) To allow excess glue to flow out when driving a dowel
(b) PREPARING A DOWEL
(i) Prepare a square piece with sides slightly larger than required diameter
(ii) Taper one end of the square piece
(iii) Select the correct size of the hole on the plate
(iv) Drive the square piece through the hole
(v) Cut to required length of the dowel
(5 x 1 = 5 marks)
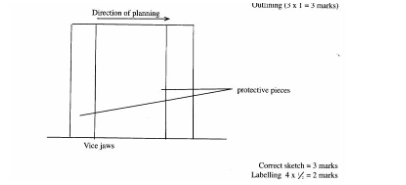
(c) PLANNING THE END GRAINS
(i) Clamp protective pieces level with the top of the Work piece
(ii) Mount the work in a vice allowing sufficient height for planning
(iii) Plane the end grains with a block or smoothing plane
Outlining (3 x 1 = 3 marks)
13 (a) MANUFACTURING CHIPBOARD
(i) Chip the raw material
(ii) Dry the wood particles
(iii) Grade the particlesinto sizes
(iv) Blend of mix With a suitable binder
(v) Form the board and press the board applying sufficient heat and pressure
(vi) Cut the board to size
(6 X 1 mark = 6 marks)
(b) TIMBER DEFECTS
(i) Cupping
This is the distortion of timber from a square cross section to a rhombus cross section. Caused by

This is the spiral distortion where a length of timber raises from normal flat run. Also known as ‘wind’ caused by lack of uniform pressure on boards when seasoning.
Sketch 1 1/2 marks Description 1 1/2 marks (3 x 3 = 9 marks)
14 (a) CUTTING LIST

15 (a) PAINTING A NEW SURFACE
(i) Prepare the surface by planning and sanding (1)
(ii) Apply the first coat or the priming coat (1)
(iii) Seal all the cracks, dents etc. (1)
(iv) Apply the undercoat and allow to dry (1)
(v) Apply the final coat (1/2)
(Total 4 1/2 marks)
(b) i