

Art and Design Paper 1 (442/1)
1. (a) i)(Value (1 mark)
(ii) By counter balancing dark and light areas / by use of light and desk shades / by shading. (1 mark)
(b) (i) low plasticity / elasticity (1 mark)
(ii) By adding clay with high plasticity. (1 mark)
(C) A principle of Art and Design which makes an element or object stand out in the work.(1 mark)
(d) (i) Motif – a single unit / design in a pattern. (1 mark)
(ii) Pattern – an arrangement / repetition of lines, shapes or colours in a design. (1 mark)
(iii) Print – an image made by a printing block or other object covered with ink or it paint and then pressed on a flat surface or a stencil. (1 mark)
(e) – Residual (1 mark)
– Sedimentary (1 mark)
(ii) Cutting, pounding and kneading clay to mix it and remove air bubbles until it has a smooth and even texture ready for use.(1 mark)
(f) (i)Textural effect created by the different materials.
(ii) 3-dimensional effect.
One mark each 1 x 2 (2 marks)
(g) (i) Variety of shapes and lines are used in both sides of the upright pole to create asymmetrical balance. (1 mark)
(ii) Progressive repetition and alternation of different shapes and lines create rhythm and movement. (1 mark)
(h) (i) Shape of wood in relation to the subject matter. (1 mark)
(ii) Appropriate wood suitable for the carving technique. (1 mark)
(I) (i) Control temperature of the wax.
(ii) Safety precaution to ensure wax doesn’t catch fire.
Any 1 mark = 1 mark
(j) (i) Chromatic colours are those with hues e.g. red, blue, yellow etc. (1 mark)
(ii) Achromatic colours are those without hues e.g. white, black, grey etc.(1 mark)
2. (a) Simulated / visual texture.
(b) (i) Defines forms in the picture.
(ii) Creates rhythm and movement.
(iii) Enhances aesthetic appeal (beauty)
(iv) Creates depth and distance / 3 D effect
Each 1 mark x 4 = (4 marks)
Total = 5 marks
3. (a) Waist
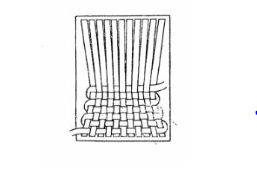
(b) Tight tension of the wefts or loose warps.
4.
5. (a) Measure the size of the pendant to be made.
(b) Cut the two pieces, one for the pendant and another small one for the loop.
(c) Bend the small piece to create a loop.
(d) Finish the edges of the two pieces.
(e) Join the two pieces to create a loop for the wire to pass through.
Each 1 mark x 5 = (5 marks)
6
SECTION C
(a) Poster type
– Advertisement / commercial poster. (1 mark)
Function of the type of poster
– Advertisement / markets the product. (1 mark)
(b) Effectiveness of the poster
(i) Relevance – It is relevant to the product.
(ii) Legibility – text and illustrations legible.
(iii) Impact – eye catching / attractive.
(iv) Identifies the product – for washing.
(v) Highlights the quality of the product – clear white / clean cloths
(vi) Explains the product – a soap
(vii) Simplicity and clearity – forms clear and simple.
(viii) Advertises – martets the product.
Any 4 2 x 4 = (8 marks)
(c) Process
(i) Transfer the image and cut the negative areas of the lino block.
(ii) Cut out the negative areas.
(iii) Rolling ink on a glass pane and apply onto the block by rolling.
(iv) Press the block onto the surface to be printed.
(v) Remove the block and leave to dry.
1 mark each 1 x 5 = (5 marks)
Total = 15 marks
8 (a) Materials
Different coloured clay slips / oxides.(1 mark)
Tools, sharp cutting tool e. g. knife, blades, syringe / slip trailers.
One mark each 1 x 2 (2 marks)
(b) Process
(i) Draw / plan / design the floral design.
(ii) Transfer the design onto the clay article.
(iii) Using a sharp tool cut (incise) and scoop out clay from parts to be in layed.
(iv) Prepare coloured slip according to the design.
(v) Fill the scooped areas with the slip according to the design using a syringe / slip trailer.
(vi) When the in laid slip hardens scrap off any that is protruding above the surface. Two marks each 2 X 6 = 12 marks
Total = 15 marks
9. (a) Technique:
Screen printing(1 mark)
(b) Process:
(i) Draw / plan / sketch the design.
(ii) Transfer the design onto a suitable paper.
(m) Cut out the design to create a stencil.
(iv) Attach the stencil onto the underside of the screen using masking tape.
(v) Lay out the surface to be printed on a flat even surface.
(vi) Place the screen on the surface to be printed.
(vii) Pour ink along the far edge of the screen.
(viii) Using a squeeze firmly and quickly spread the ink by pulling the squeeze to wards you maintaining a constant downward pressure.
(ix) Lift up one end of the screen carefully while supporting it and remove the print.
(x) Leave it to dry.
One mark each 1 x 10 = (10 marks)
Total = (15 marks)
(c) Mounting:
(i) Trim the print
(ii) Cut out the mounting paper / board to size.
(iii) Measure and mark the area for fixing the print.
(iv) Carefully fix the print within the marked area.
One mark for each 1 x 4 = (4 marks)
Total = 15 marks