
Introduction
In this chapter, we shall undertake a case study entitled A school canteen management system. The objective of this case study is to help the students to apply the programming techniques learnt in Form 3
Preamble
A school canteen operator sells confectionaries and toiletries to the students. The canteen operator requests you to develop a canteen management system that will accomplish the following:
- Allow storage of stock records in a file.
- Enable searching of a file to retrieve a particular record for editing and adding new stock.
- Process sales transactions and calculate the total bill and change due to a customer. 4. Generate daily sales report showing all the items sold for a particular day.
Problem recognition and definition
A careful analysis of the above scenario reveals that the system will need the following tasks:
- Entering stock records and storing them in a file.
- Searching for the stock file to retrieve records.
- Processing of daily transactions.
- Recording of any sale transactions in a transaction file.
- Generating sales reports for a specified date.
Developing algorithms
Before coding, the programmer needs to develop algorithms for each task. These algorithms will enable the programmer to develop the code for each of the processes.
Algorithm for entering new stock records
The new stock module should enable the user of the system to continually enter new stock records in the file until he/she is through with the process. Therefore, the computer should request the user to key in records until the last item is entered. The following pseudocode extract can be used to represent the algorithm:
Output “Enter a new item?” Enter “yes” or “no”
Input reply
While Reply <> No
Output “Enter stock item details”
Write to stock file
Output “Are you through with entering the records Yes/No”
Input Reply loop
End While
Algorithm for searching for a record
This process will enable the user to access the records in a stock file and retrieve a particular record. The record search can be done as per the identification number of each record i.e. record ID. The search algorithm can be represented as follows:
Begin
Enter the code of the record
Open stock file for reading
While Not end of file Begin
If code entered = record itemcode Then
Output record details
Else
Output ‘Record not found’
End if loop End while Close file End
Algorithm for processing sales
Sales processing requires that the stock file be opened in order to read details of the items bought. The sales module then calculates the amount of the sale and the change owed to the customer. The module should also update the quantity of the items in stock. The following algorithm will be used:
Begin
Retrieve item from stock file by record ID
Specify quantity to be sold
Compute bill and customer change
Save transaction in sales file
END
Saving a sales transaction
After selling an item, the sales details must be stored in the system for future reference. In our case, the current transaction has to be stored in a file which we shall refer to as a sales file.
Constructing the system in Visual Basic
Open Visual Basic and create a new project called Canteen.vbp. Create five forms in the project window i.e. Form1, Form2….Form5. To create a form, simply Click Project then Add Form command. Save the forms with the following names:
Form Name
Form I UserInterface
Form2 AddNewStock
Form3 SellItem
Form4 SearchItem
Form5 SalesReport
Remember while saving that all Visual Basic forms have the extension .frm. After saving, change the Name property for each form in the properties window to start withfrm e.g. frmCanteenManagementSystem for Form 1. Change the captions for each form as you proceed through the project. At the end of this activity, the forms in your project should look as shown in Figure 6.1 in the Project Explorer window.
NB: Simply click the Project explorer icon to view this window. Alternatively, click View project Explorer on the menu.
It is now time to start placing objects on the forms and entering the code associated to each of the objects.
Creating the user-interface form
- Double click UserInterface.frm in the project explorer window and design it as shown in Figure 6.2.
NB: Change both the Name and caption properties of the command buttons as shown below:
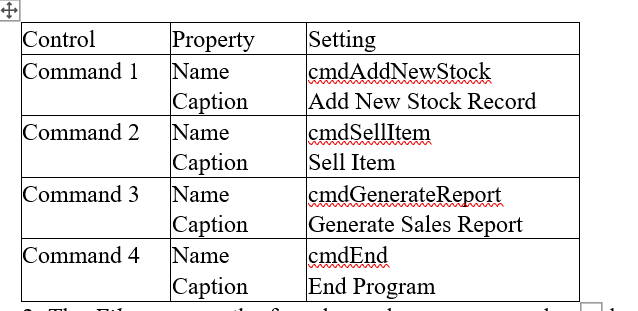
The File menu on the form has only one command namely: Exit used to close the program when clicked.
To add this menu clicks the Menu Editor icon on the toolbar. Alternatively click, Tools then select: Menu Editor Command. Create the menu as shown in Figure 6.3 of the menu editor window:
To place the command buttons on the form, simply double click their icons on the toolbar.
Since this is the first form that the user will see when the project is run, the various controls are meant to help the user access other forms in the project.
Adding code the “Canteen management system” form
This is the main form that has commands that enable the user to access other forms.
- Click the File menu then command Exit. Notice that the code window for the Exit command opens on the screen. Type the word “End” in the body of the event procedure as shown below:
Private Sub mnuExit – click()
End
End Sub
This means that when the Exit command is clicked, the program will stop executing. Save and close this code window.
- Double click the “Add New Stock Record” button and add the code below in the body of the event procedure as shown: Private Sub cmdAddNewStock- Click() Load frmAddNewStock frmAddNewStock Show
End Sub
This code loads frmAddNewStock form and display it on the screen when the user clicks Add New Stock record command button.
- Double click the “Sell Item” button and add the following code in the body of the event procedure as shown:
Private Sub cmdSellltem – Click()
Load frmSellltem frmSellltem.Show End Sub
- Double click the “Generate Sales Report” button and add the following code in the body of the event procedure as shown: Private Sub cmdGenerateReport – Click() Load frmDailySaleReport frmDailySalesReport.Show End Sub
- Double click the “End Program” button and add the following code in the body of the event procedure as shown: Private Sub cmdEnd – Click()
End
End Sub
Designing and adding code to the” Add New Stock to File” form Design your AddNewStock form to look like Figure 6.4 below:
- Double click the “Click Here to Add New Stock Item” button and add the following code in the code window that appears. Ignore the line numbers. 1 Private Type Item
- ID As Integer
- ItemName As String * 20
- Q As Integer
- CostPrice As Integer
- SellPrice As Integer
- End Type
- Private Sub cmdAddStock- ClickO
- Dim ItemRecord As Item
- Dim Old File As String
- Dim Count As Integer
- Dim Number As Integer, Reply As String
- ‘CommonDialog CancelError = True
- ‘CommonDialog1.Filter = ”Data file (*.dat)l*.dat”
- ‘CommonDialog 1.ShowOpen
- ‘Old File = FileName
- Open “c:\Program FilesIMicrosoft Visual
Studio I VB98 \ Old File. dat” For Random As #1 Len = Len (ItemRecord)
- Reply = “No”
- Do While Reply <> “Yes”
- ID = InputBox(“Enter Record ID If”,“ItemRecord.ID ”)
- ItemName = InputBox(“Enter Record Name”,”ItemRecord.Name ”)
- Q = InputBox(“Enter Quantity”,”ItemRecord. Q”)
- CostPrice = InputBox(“Enter the Cost Price”,”ItemRecord. CostPrice”)
24ItemRecord.SellPrice = InputBox(“Enter the Selling Price”,”ItemRecord.SellPrice ”)
- Put # 1, , ItemRecord
- Reply = InputBox(“Are you through with record entry? Yes/ No”, “Reply”)
- Loop
- Close #1
- EndSub
Explanations
Line 1: Declares a user defined data type called Item. The data type is a record.
Lines 2 – 6: Declares the fields in the record.
Line 7: Ends the type declaration.
Line 8: Declares an event procedure or subroutine which is executed on clicking a button called AddNewStockltem. You double click this button in order to get the code window.
Lines 9 – 12: Variable declarations.
Lines 13 -16: Notice that they are commented off, hence the computer will not execute them. However, if they are not commented, they would display the Open dialog box when the button is clicked
Line 17: It opens a file called OldFile.dat stored on the disk. This is the file in which all stock records are kept. Notice that the full path to the file has to be specified. This eliminates the need for an Open dialog box. The whole statement should be on the same line.
Lines 18 – 19: It sets a looping condition that will stop only when the variable Reply has a value of “Yes”. Each numbered statement should be on the same line.
Lines 20 – 24: Displays an input box on the screen which requests the user to input the various data elements of the record such as the ID, Name etc. Note the syntax of display a standard input box.
Line 25: It outputs a record to the file. The blank (, ,) ensures that the next record is written after the last Put operation. However if you want the record to be written to a
particular position in the file, then you can specify e.g. Put # 1 ,1, ItemRecord, which means write the record at position 1 in the file.
Line 27: It encloses all the code that will be repeatedly executed in the loop.
Line 28: Closes the file after writing to it. Line 29: Ends the event procedure.
- Double click the “Click Here to Update Existing Record” button and add the following code:
Private Sub cmdUpdateRecord – Click() Load frm UpdateRecordDetails frm UpdateRecordDetails, Show
End Sub
Save the code and exit from the code window.
Designing and adding code to sell Item form
In the Project Explorer window, double click frmSellItem and design it as shown in Figure 6.5. Remember that this form is loaded by
Fig. 6.5: Sell item clicking the “Sell Item” command button that you created in the user-interface form.
- Design’ a menu bar on the form with the following commands:
- File
.. .. Open
…..Exit
- Transaction
….Save Transaction
Enter the following code in the mnuOpen code window:
Private Type Item
ItemID As Integer
ItemName As String * 20
Q As Integer
CostPrice As Integer
SellPrice As Integer
End Type
Private Sub mnuOpen – Cliek()
Dim ItemReeord As Item, Quantity As String, Last As Integer
Dim Target As Integer, Current As Integer, First As Integer
CommonDialog 1. CaneelError = True
CommonDialog1.Filter = “Datafile (*.dat)/*.dat”
CommonDialog 1.ShowOpen
Old File = CommonDialog 1.FileName
Open “c: \Program Files \Microsoft Visual Studio \ VB98 \ Old File. dat”
For Random As #1 Len = Len(ItemRecord)
First = 1
Target = InputBox(“Please Enter ItemID of Item to be sold”, “Target”
Quantity = InputBox(“How many units are you selling”, “Quantity”)
Last = LOF(1)/ Len (ItemRecord)
Do While First < = Last
Get #1, First, ItemRecord
Current = ItemRecord.ItemID
If (Current = Target) Then txtItemID. Text = ItemRecord.ItemID txtItemName. Text = ItemRecord.ItemName txtUnitPrice. Text = ItemRecord.SellPriee txtQuantitySold. Text = Quantity
txtQuantityInStoek. Text = ItemRecord. Q – Quantity
ItemRecord. Q = Int(txtQuantityInStoek.Text)
End If
First = First + 1
Loop
Close #1 End Sub
Explanation
This code enables the user to open a file on the disk called OldFile.dat by selecting it in the open dialog box. The use can then select a particular record from the file by entering its identification number (ID).
To sell another item after the first, you need to search for it in the file again. You can add the “Sell Next” button on the form having the same code as the one for the mnuOpen command.
Add the following code to the mnuSave _Transaction command that enables the user to save the details in the transaction file called SaleFile.dat
Private Type ItemSold
ItemID As Integer ItemName As String * 20
QSold As Integer
Sell Price As Integer DateSold As String * 9
Sale Value As Integer
End Type
Private Sub mnuSave – Transaction – Click()
Dim Sale As ItemSold
Dim First As Integer, Last As Integer
Open “c:\Program FilesIMicrosoft Visual
Studio \VB98 \SalesFile. dat” For Random As #2 Len = Len(Sale)
Last = LOF(2) / Len (Sale)
RecordNumber = Last + 1
Sale.ItemID = Int(txtItemID. Text)
Sale.ItemName = txtItemName. Text
Sale. QSold = Int(txtQuantitySold. Text)
Sale.SellPrice = Int(txtUnitPrice. Text)
Sale.DateSold = txtTodaysDate. Text Sale. Sale Value = Val(txtBill. Text)
Put #2, RecordNumber, Sale
Close #2
End Sub
Double click the compute totals button and then add the code listing below in its event procedure.
Private Sub cmdComputeTotals – Click() Dim Cashgiven As Integer, ItemRecord As Item txtBill. Text = txtQuantitySold * txtUnitPrice. Text
Cashgiven = InputBox(“How much money has the customer given”, “Cashgiven”)
IblChange. Caption = Cashgiven – txtBill. Text
Open “c: \Program FilesIMicrosoft Visual
Studio\VB98\0IdFile.dat”
For Random As #1 Len = Len(ItemRecord)
ItemRecord.Q = Int(txtQuantityInStock.Text) Close #1
End Sub
Finally double click the “Cancel” button and then add the code listing below in its click event procedure
Private Sub cmdCancel- Click() Unload frmSellItem
End Sub
Designing and adding code to controls on Search Item form
This form lets the user add or edit the fields of an existing record in the stock file. For example, when you buy some more items, you enter the item quantity in the quantity control. Design the form as shown in Figure 6.6.
Double click the button labelled “Search” and add the following code to it:
Private Type Item
ItemID As Integer ItemName As String * 20
Q As Integer
CostPrice As Integer
SellPrice As Integer
End Type
Private Sub cmdSearch – Click()
Dim ItemRecord As Item
Dim Target As Integer, Current As Integer
Dim RecordNumber As Integer, Stock Value As String
Open “c: \Program Files\Microsoft Visual Studio \VB98\OldFile. dat”
For Random As #1 Len = Len(ItemRecord)
First = 1
Target = Int(txtRecordId.Text)
Last = LOF(1) / Len (ItemRecord)
Do While First < = Last
8484
Get #1, First, ItemRecord
Current = ItemRecord.1temID
If (Current = Target) Then
Label3.Caption = “Search successful: Now edit details and Click Save”
txtName. Text = ItemRecord.1temName txtQuantity. Text = ItemRecord.Q txtCostPrice. Text = ItemRecord.Cost Price txtSellingPrice. Text = ItemRecord.SellPrice Stock Value = txtCostPrice. Text * txtQuantity.Text
IblStockValue. Caption = Stock Value ‘display total value of item in stock” End if
First=First+1
Loop
Close #1
End Sub
Explanation
The code searches for a record whose ID is typed in the Record ID text box. After editing the retrieved record, the changes can be saved by clicking the “Save” button. Below is the code for save button:
Private Sub cmdSave – Click()
Dim ItemRecord As Item, Stock Value As String
Open “c: \Program FilesIMicrosoft Visual Studio \ VB98\OldFile.dat”
For Random As #1 Len = Len(ltemRecord)
Target = Int(txtRecordID.Text)
First = 1 ‘first record in file is at position 1
Last = LOF(1) / Len (ItemRecord) ‘length of file equals record length
Do While First <= Last
Get #1, First, ItemRecord ‘get the record that was edited
Current = ItemRecord.ID
If (Target = Current) Then ‘search whole file for correct record
ItemRecord.ID = Int(txtRecordID. Text)
ItemRecord.ItemName = txtName. Text
ItemRecord. Q = Int(txtQuantity. Text)
ItemRecord. Cost Price = Int(txtCostPrice. Text) ‘save fields as record
ItemRecord.SellPrice = Int(txtSellingPrice. Text)
Put #1, First, ItemRecord
Stock Value = txtCostPrice. Text * txtQuantity. Text
IblStockValue. Caption = Stock Value
End If
First = First + 1
Loop
Close #1
End Sub
Explanation
The code takes the contents in the text boxes of the form and saves them as a record in the file. Code for the cancel button is Private Sub cmdCancel- Click()
Unload frmUpdateRecordDetails End Sub
Designing and adding code to controls on Sales Report form
This form is used for displaying the daily transactions when the user specifies a particular date in the fomart mm/dd/yyyy. Design the report interface as shown in Figure 6.7.
Code for the sale report
.Double click the “show report” button and add the following code that will search for all the items sold on a particular day and display them on the form:
Private Type ItemSold ItemID As Integer
ItemName As String * 20 QSold As Integer
SellPrice As Integer DateSold As String * 9
Sale Value As Integer
End Type
Private Sub cmdShowReport_Click(),
Dim Sale As ItemSold, Daysale As Integer
Open “c:\Program File&\Microsoft Visual
Studio\VB98\SalesFile.dat” For Random As #2 Len = Len(Sale)
First = 1
DaySale = 0
Last = LOF(2) / Len (Sale)
Target = txt Target Date. Text
Print “”
Do While First <= Last
Get #2, First, Sale
Current = Sale.DateSold
If (Current = Target) Then
DaySale = DaySale + Sale. Sale Value
Print “”
Print Sale.ItemID, Sale.ItemName, Sale. QSold, Sale.SellPrice* Sale. QSold
End If
First = First + 1
Loop
Print “”
Print “Total sales/or”, Target, “Are: Ksh, DaySale” Close #2
End Sub
Running the project
To run the project click the Start button on the toolbar. Alternatively, click the Run then Start command on the menu. The user-interface screen comes on the screen as shown in Figure 6.8.
Before doing anything else, we need to create two files on drive C and enter all the records for the stock available. This program accesses the files in a folder called VB98 through the path: c: \Program Files \Microsoft Visual Studio \ VB98
Open Microsoft Windows Notepad and save two blank files in the folder
VB98 having the names: OldFile.dat and SalesFile.dat
- Click the “Add New StockRecord” button and add the following records to the file that will hold all stock. This should be the OldFile.dat that you created on drive C. Enter the following records:
ID Name Quantity Cost Price Selling Price
100 Bread 120 25 30
200 Milk 50 20 40
300 Jelly 200 40 50
400 Cake 300 15 30
500 Biscuit 1000 10 20
Figures 6.9 (a) to (f) shows sample input boxes for an item for sale. After entering all the records, type Yes in the input box (f) to stop this process.
Opening the stock file to sell an item
Click the “sellitem”command to display the form in Figure 6.10.
Click the open command. Open dialog box of figure 6.11 appears.
Locate for the file OldFile.dat and open it. Notice that you have to provide a record number so that when the file opens, the record requested for is displayed on the form. Click the compute totals button. You will be prompted to state how much money the customer gives. This will compute the change due to the customer. Figure 6.12 shows a form with the amount payable and change due to the customer. The units in stock for the item sold also are updated automatically.
Save the transaction by clicking the “transaction” menu, then Save transaction command. To sell another Item, click the “Sell Next” button
Viewing a sales report
Click the “generate Report” button. The Daily Sales Report appears. Enter the date of the transactions you want to view then click the show report button.