
ADOBE PAGEMAKER
Introduction
Adobe PageMaker is a Desktop Publishing program that can be used to set page-layout text design using a Personal Computer (PC). It helps one produce professional-looking publications.
Starting Adobe PageMaker.
- Click the Start button, then point to Programs.
- Open the Adobe group, then click Adobe PageMaker 6.5 or0.
The PageMaker program starts, and automatically displays the Document Setup dialog box for your new publication.
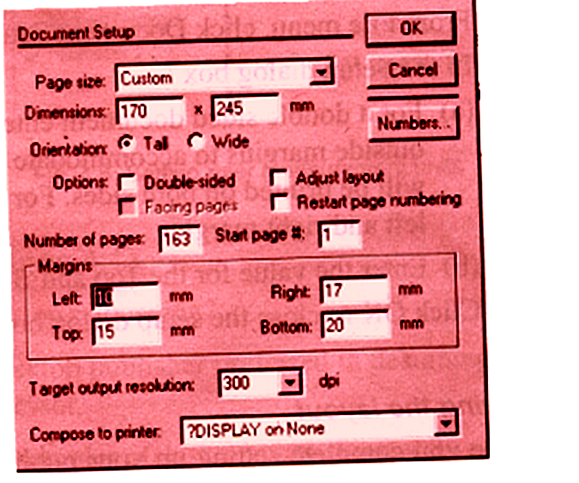
- In the Document Setup dialog box, specify the publication setup options.
- In the Page size list box, select the appropriate page size. The dimensions of the page size you select are displayed in the Dimensions text boxes.
- Click a button to specify the page orientation.
Select “Tall” (for Portrait), or “Wide” (for Landscape).
- Click the Numbers button to display the Page Numbering dialog box, where you define or change the page numbering style for your publication.
- In the Start Page #, type the starting page number for your publication.
- In the Number of Pages list box, type the number of pages you initially want in the publication. You can add or delete pages later.
- In Compose to Printer, choose the name of the printer you will use to print the final copy of your publication.
- Under Margins, specify the placement of page margins.
- Double-sided lets you format your publication for printing on either one or both-sides of the paper.
If you select Double-sided, then set Inside and Outside margins to accommodate binding on pages that will be printed on two sides.
Inside margins are on the right-side of the left pages & on the left side of the right pages.
Outside margins are on the left-side of the left pages & on the right side of the right pages.
To print your publication on one side of the paper, Double-sided should be unchecked.
- Facing pages lets you display & work on left & right pages together. This option is available only if Double-sided is selected.
- Click OK to apply the selected options, and display the publication window.
PAGEMAKER SCREEN LAYOUT
When you create a publication, PageMaker opens the Publication window, which contains an empty page or facing pages of your current document centered on the Pasteboard.
A PageMaker publication window is made up of the following layout components:
- Palettes
- Printable area.
- Title bar.
- Menu bar.
- Scroll bars.
- Page icons. Pointer
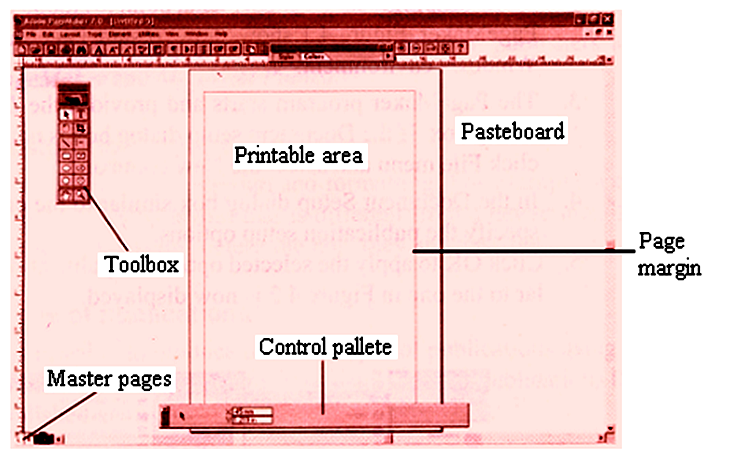
The Pasteboard
The Pasteboard is the large blank area surrounding the page. This is where text and graphical objects are placed before arranging them neatly on the printable area.
Note. You can move text and graphics to the Pasteboard until you need them again.
The Printable area
This is the area that looks like a page surrounded (enclosed) by margins on the pasteboard. Any object or text that is intended for printing should be placed on the printable area.
The Toolbox
It contains a set of buttons that represent the various tools that can be used to create and manipulate publications.
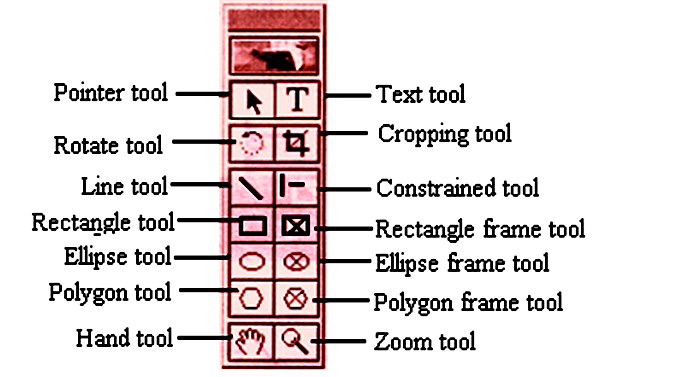
Tool Purpose
Pointer tool select, move, and resize blocks of text and graphical objects.
Text tool type and select text.
Rotating tool rotate selected graphics or text blocks.
Cropping tool trim imported graphics.
Line draw straight lines in any direction.
Constrained tool draw vertical or horizontal lines.
Rectangle draw rectangles and squares.
Ellipse draw circular objects
Ellipse frame create a circular or oval placeholder for text and graphics
Polygon helps to draw basic polygons such as triangle, pentagons, stars, etc
Hand scroll the page
Zoom (magnifier) magnify or reduce an area of the page.
- To select a tool, click on it.
- If the toolbox restricts the view of your work, drag its title bar to move it.
Displaying or hiding the Toolbox,
- Click on Window, then choose Hide Tools (to close the toolbox) or click Show Tools (to display the toolbox)
Rulers
Each publication window has a horizontal ruler that extends along the top & a vertical ruler that extends along the left borders of the window.
Rulers are used when you want to position text & graphics accurately on the page. They help the user to create ruler guides & measure an object size manually.
Note. You can display rulers when you need them, and hide them when you want more room on the screen to view a publication.
Page icons (Page thumbnails)
They are found at the bottom left-corner of the publication window. Each icon represents a page in the publication.
Each publication has 2 types of Page icons:
- Master page icon, i.e., the icons marked L and R.
- Actual page icon.
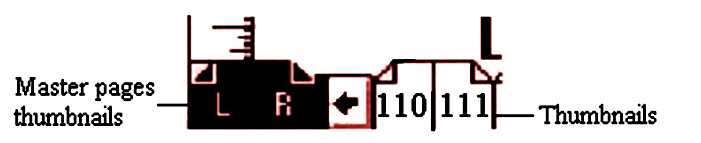
- To move to a page, just click its thumbnail.
- To display a master page, click a master page thumbnail.
A Master page is used to design the general layout that needs to be applied in all other pages of the publication.
The Palettes
These are windows that contain the tools you can use to add and change text & graphics in your publication.
There are 4 commonly used palettes in Adobe PageMaker:
- Color palette.
- Control palette.
- Master page palette.
- Tools palette.
Control palette
It is a shortcut toolbar (or a strip) that contains text & paragraph formatting command buttons and list boxes. It enables the user to assign attributes to text and graphical objects.
Color palette
Can be used to apply colors or view the kind of color applied to the selected text or object.
- To display or hide the Colors palette; click on Window, then choose Show Colors or Hide Colors.
Tip. Drag the palette to a convenient place on your desktop and leave it open while you work.
Pointer
This is a position pointer on the screen & its shape depends on what you are doing.
- An Arrow (ë) – to point & select objects.
- An (I ) beam – to write and edit text.
- A Hand (N) – to grab the screen.
- A Cross-hair cursor (Ç) – to draw.
Menu bar
It is a pull-down menu at the top of the screen.
Zero Lock
These are page position gridlines of the Horizontal & Vertical ruler that mark the page to start at 0 (zero) on both rulers.
Scroll bars
They are used for moving vertically and horizontally on the publication.
Comparison between DTP software & Word processor software application window
- Both have a title bar, menu bar and scroll bars.
- Word processing software has a Status bar; DTP software has no Status bar.
- DTP software has its printable work area centered on a pasteboard.
Changing the Document Setup.
To change setup options of a publication, e.g., page size, orientation, margins:
- Click on File, then choose Document Setup, then select the required page setup options.
WORKING WITH MASTER PAGES
A Master page (also called the document master) is a page used to design a common layout to be applied in all the other pages of a publication.
A master page normally contains basic design elements such as headers and footers, page numbers, & layout guides (i.e., column guides, ruler guides, & margin guides) that are common to all pages in your publication.
Note. Master pages are important especially when creating a publication that has several pages such as a book or a project report. It ensures that there is consistency among all the pages in the publication.
Setting up a publication using master pages.
Every publication has 1 or 2 blank Master pages identified by letter ‘L’ for left and ‘R’ for right. Letters L & R mark the master page icon for facing pages, while R alone marks a single-sided publication.
These icons appear at the lower left corner of a publication window.
To switch to master pages, click the master page icon, then:
- Place non-printing ruler guides on the master pages.
Non-printing ruler guides are vertical or horizontal lines you place on the printable area. They assist you to place text & graphics accurately & consistently throughout the publication.
To place ruler guides; point to the ruler, then drag the guide to the required position.
- Create basic design elements on the master pages, including the text & graphics that you want to appear on each page in your publication.
Creating a new master page based on a publication page.
- Switch to the publication page on which you want to base the new master.
- Click on Window, then choose Show Master Pages.
- From the Master Pages palette menu, choose Save Page As.
- Type a name, then click Save.
Objects and guides applied to the selected publication page are copied to the new master. The new master page then becomes active and its name appears on the Master Pages palette.
- To open the Master Pages palette menu, click the right-facing arrow at the right corner of the palette.
- To turn to the master applied to the current publication page, click the name of the master page.
Displaying master pages and master page items.
Method 1:
- Right-click the master page icon at the bottom of the publication window to display the list of masters, then select the master you want to view.
Method 2:
- Click on Layout, choose Go to Page, and then select the name of the master you want.
Adding, or modifying guides & objects on a master page.
You can add or manipulate text and graphics, and change guides or rulers on a master page. When you modify a master page, the changes appear instantly on associated publication pages.
To modify or rename a master page:
- Display the master page you want to add or modify text, graphics, or nonprinting guides.
- To change the master’s name, page margins, or column guides;
- Press CTRL and double-click the name of the master page you want to modify or edit.
- Type the new name, and the new values you want for margins or columns.
- If you want the objects and guides (i.e., margins and columns) on the associated pages to be repositioned or resized as appropriately as those of the master you are editing, select Adjust Layout.
- Click OK.
Deleting a master page and all the objects on it.
- Click on Window, then choose Show Master Pages.
- Select the master page to delete, then click the trash button on the bottom of the palette.
- When prompted, click OK.
Setting up margin guides
Margin guides are very important because; they define the printable area of your publication.
To change margin settings;
- Click on File, then choose Document Setup.
- For a double-sided document (i.e., a document that will be printed on both sides), enter the values for inside & outside margins to accommodate binding. For single-sided pages, set the Left & Right
- Enter the values for the Top & Bottom
- Click OK.
Displaying and hiding rulers
- To display the rulers, click on View, then select Show rulers. To hide the rulers, click on View, then select Hide rulers
Setting measurement units of a ruler
You can set the measurement units on both the vertical and horizontal ruler.
- Right-click each ruler separately, to display a list of the available measurement systems.
- Select the measurement unit you want to use, e.g., millimeters, inches, etc
SAVING THE LAYOUT OF YOUR PUBLICATION
Once you set up your publication layout, it is important to save it before you start entering text and graphics.
To save a publication for the first time.
- Click on File, then choose Save or Save As (or press CTRL+’S’).
- In the Save Publication dialog box, type a name for the publication, then select a drive or folder in which to store the publication.
- Click Save.
After you name and save a publication once, the Save and Save As commands function differently:
To save changes made to a publication.
- Click on File, then choose Save (or click the Save button on the toolbar).
This saves the changes made to your publication with the same filename.
Using the ‘Save As…’ command.
Save As can be used if you want to:
- Name and save a new publication.
- Save a publication on a different disk drive or in a different folder.
- Make a copy of an existing publication with a new name, leaving the original publication unchanged.
To save a publication with a new name or in a different location.
- Click on File, then select Save As.
- In the Save Publication dialog box, select the new location you want to save your publication in and/or type a new name.
- Under Copy, select an option.
- No additional files – saves the current publication only.
- Files required for remote printing – copies all the files needed to print the publication to one location.
- Click Save.
Reverting to the Last Saved version.
Sometimes, you may make changes to a document that make the document more confusing. To abandon all the changes and restore the most recently saved version of your publication;
- Click on File, then select Revert.
- In the prompt that appears, click OK.
This deletes all changes made since the last time you saved the publication.
Closing a publication.
This closes the active publication and returns to the PageMaker window.
- Click on File, then choose Close.
If you have made any changes since you last saved the publication, PageMaker asks if you want to save those changes. You can save the changes, or ignore them.
Opening an existing publication.
- Click on File, select Open (or press CTRL+’O’).
- In the Open Publication dialog box, select the drive or folder that contains the document.
- Select the filename of the publication you want to open.
- Choose whether to open it as Original or a Copy, then click Open.
To quickly open a recently saved publication.
PageMaker keeps track of the last eight publications you opened and saved.
- Click on File menu, then choose Recent Publications.
- Select the publication you want to open from the Recent Publications
Review Questions.
- Identify four common features in word processing and desktop publishing software.
- Differentiate between the Pasteboard and Printable page.
- (a). What are Master pages?
(b). Why are master pages important in a publication?
- What commands are used in place of portrait and landscape page orientation in PageMaker?
- Explain the importance of the following tools on the PageMaker’s toolbox.
- Pointer tool
- Text tool
- Rotate tool
- Line tool
- Hand tool
- Zoom tool
WORKING WITH TEXT
Adding text to a PageMaker publication.
Text can be entered into a PageMaker publication in 2 main ways:
- Typing the text directly into a page.
- Importing the text from another program.
Method 1: Typing text directly into the page.
- Click the Text tool (T) from the toolbox. The pointer turns into an I-beam (insertion point).
- Click at the point where you want to insert text on the page, then type the text.
–Or–
Drag a rectangular area to define a text block or text frame, then type the text.
A text frame defines the space you want the text to occupy. It confines the text to the area you’ve selected.
- To display the boundaries of the text block you’ve created, select the Pointer tool and click anywhere in the text.
Method 2: Pasting text from another Window-based program.
- Select the text you want to copy, e.g., in Microsoft Word.
- Click on Edit, then choose Copy.
- Switch to the PageMaker program, e.g., using ALT+TAB.
- Click to place the insertion point where the pasted text should start.
- Click on Edit menu, then choose Paste.
Changing the view of a Page.
After typing text into a PageMaker publication, you may need to increase or decrease the page view to see either all the text and graphics or to magnify a portion of the page.
- Click in the text or select the graphic you want to see clearly so that when you magnify, it comes to the center of the screen
- Click on View menu, then choose:
- Actual Size – to see text and graphics as they will appear when printed.
- Fit in Window – to check the overall composition of a page or a two-page spread.
-Or-
- Choose Zoom To, then click the desired view from the list that appears, e.g., 25%, 50%, 75%, 100%, etc.
- Entire Pasteboard – to view objects on the pasteboard.
Selecting text in a PageMaker publication.
All text in PageMaker is contained either in text blocks or in text frames.
Method 1: Selecting text using the Text tool (T).
When the text is selected using the Text tool, you can type, edit or change the text attributes, e.g., Bold, Underline, etc.
- Select the Text tool from the toolbox.
- Move the cursor to the beginning of the text to be worked on, then drag the I-beam to select a range of text.
Alternatively;
- To select a word, double-click the word.
- To select an entire paragraph, triple-click the paragraph.
- Choose the desired command to apply to the text.
Method 2: Selecting text using the Pointer tool (ë).
The Pointer tool is used to select a text block. When you click the text using the Pointer tool, a line appears at the top and at the bottom of the text block.
This method is used if you want to:
- Move the text block.
- Change the size of the text block.
- Delete the text block.
Method 3: Using the Select All command.
This selects all the objects and/or text in a text block.
- Using the Text tool, click anywhere inside the text block.
- On the Edit menu, click Select All (or press CTRL+’A’).
To deselect, click an empty part of the page (or choose Deselect All from the Edit menu).
Selecting objects.
- To select a single object, click the object with the Pointer tool to display the object’s border.
- To add objects to a selection, hold down SHIFT as you click other objects.
- To select several objects at once, drag the pointer tool around multiple objects. Make sure you include each object’s bounding box (as indicated by its selection handles).
- To select an object underneath another object on the same layer, press CTRL and click the object you want to select.
Editing a publication.
The term editing means making changes to a publication.
PageMaker has two special editing tools:
- The Find and Change tool, and
- The Spelling
Therefore editing a publication includes the process of correcting spelling mistakes, and replacing of words.
Note. Before editing the publication, you must open it in the story window.
PageMaker defines each text block as a story. A Story is a collection of text that PageMaker recognizes as a single unit for editing purposes.
A story can be just one letter or several hundred pages of text.
Searching for and replacing words in the publication.
The Find and change tool helps a person to search for specific occurrences of a particular word or a group of words in a publication and replace it with another one.
To find and change a word or a phrase in the publication:
- Using the Text tool, click an insertion point in a story, or select a range of text if you want to limit your search to that section.
- Click on Edit, then select Edit Story. The publication now opens in the story window showing only the text but not the graphical objects.
- Click on Utilities, then select Find or Change. A dialog box is displayed.
- In the Find What textbox, type the word you want to find. To change the word, type the new word to replace with in the Change To
- Under Search document, select an option to determine the scope of the search, e.g., Current publication or in all open publications. If you search the current publication only, select an option in the Search Story.
- Click Find in the dialog box to begin the search. To continue with the search operation, select Find Next.
- Once you are through, click on Story, then choose Close Story.
Spell-checking the publication.
- Click the I-beam anywhere in the publication or select the range to be spell checked.
- Click on Edit, then select Edit Story.
- Click on Utilities, then select Spelling. A dialog box is displayed with the following options:
- Change To: – displays the word PageMaker does not recognize. Type or select the correct word from the list in the Suggestions
- Ignore: –
- Replace: – replaces the misspelled word with the one you have typed in the Change To box, or selected in the Suggestions
- Add: – opens the Add word to user dictionary dialog box in which you specify the word you want to add to or remove from the dictionary.
- Under Search story, specify the scope of the search, e.g., in selected text, in the Current story only, or in All stories in the publication.
- Specify spell checking options:
- Alternate Spellings – it lets you see suggested replacements for misspelled words.
- Show Duplicates – displays repeated words.
- Click the Start button to begin spell checking.
Deleting text.
- Select the text to be deleted.
- On the Edit menu, select Clear (or press the Delete key).
Moving and copying text.
- Select the text to be moved or copied.
- On the Edit menu, click Cut (or press CTRL+’X’) to move the text to a new location, or click Copy (or press CTRL+’C’) to make a duplicate of the selected text.
- Click or select where you want to move or copy the text to.
- On the Edit menu, click Paste (or press CTRL+’V’).
Formatting a publication.
Formatting refers to applying special attributes to text, graphical objects and pages in order to make them attractive & appealing to the eye.
Formatting may include; changing font size, bolding, changing text colour, adjusting picture brightness and contrast, and formatting columns on the page.
Text formatting.
To format text in your publication, use the commands in the Type menu or the Control palette.
To display the Control palette;
- Click on Window, then click Show Control Palette.

A – Apply button H – Type style
B – Character view I – Case options
C – Font option J – Position buttons
D – Type size option K – Leading option
E – Expert tracking option L – Horizontal scale
F – Kerning option M – Baseline shift option
G – Paragraph view
The contents of the Control palette vary depending on which tool is selected from the toolbar.
There are 2 types of control palette modes:
- Object mode.
Selecting a graphical object in object view, enables you to apply attributes related to the object such as rotating, moving, resizing, etc.
- Text mode.
The Text mode can be selected by clicking the Character view or Paragraph view button.
There are 2 types of Text modes:
- Character view.
- Paragraph view.
Character view is when the T tool on the control palette is selected. This means that, you can apply character attributes such as font type, size, or style (bold, italic or regular) to the selected text.
Paragraph view is when you select a paragraph, and then click the ¶ button below the T tool on the control palette. This means that, you can apply paragraph styles, select alignment options, and other paragraph attributes.
To format text:
- Use the Text tool to select the text you want to format.
- Click on Type, then choose the formatting attribute you want, i.e., font, size, alignment, type style (bold, italic, underline).
-Or-
In Character view, choose the formatting attribute you want from the Control palette.
Changing the font (typeface) of your text.
- Select the text whose font you want to change.
- Click on Type, select Font, then select the font you want to use from the list.
Changing the Size of characters.
It lets you specify the printed point size of the selected text.
- Select the text whose size you want to change.
- Click on Type, select Size, then click the size you want to use.
Making text Bold, Italic and Underlined.
- Select the text you want to make bold, italic or underlined.
- Click on Type, select Type Style, then click Bold, Italic, or Underline.
To remove bold, italic or underline from text, click Normal.
Note. To remove each of the above commands individually;
- Select the text.
- Click on Type, select Type Style, then click the item with a tick to deselect it.
Changing the Colour of text.
- Select the text whose colour you want to change.
If the Colour palette if it is not displayed, click on Window, then choose Show Colors, then click the Colors tab.
- Select the colour you want to apply.
Changing the Leading.
Leading refers to the space between adjacent lines.
- Select the text whose leading you want to change.
- Click on Type, select Leading, then click the leading you want to use.
Note. The bigger the leading, the more the space between lines.
Changing the Tracking.
Tracking refers to changing the visual denseness or openness of characters in a line.
To change the distance between characters;
- Select the text whose track you want to change.
- On the Type menu, then select Expert Tracking.
- Click the track you want to apply, i.e., No Track, Very loose, Loose, Tight or Very Tight.
Note. If the track is Very Loose, the characters are further apart.
Formatting text to superscript and subscript.
Superscript refers to text that is positioned slightly higher than the rest on the same line, e.g., 3 in 103. Subscript refers to text slightly below the rest on the same line, e.g., the number 2 in H2O.
To format text to superscript or subscript;
- Select the text you want to change to superscript or subscript.
- Click on Type, then choose Character.
- In the Character Specifications dialog box, select subscript or superscript from the Position list box.
- Click OK.
Note. To remove the superscript or subscript format, select Normal from the Position list box.
To format several text attributes at once.
- Using the Text tool, select the text you want to format.
- Click on Type, then choose Character.
- In the Character Specifications dialog box, select text attributes such as font, size, type style, colour, position (normal, subscript, superscript), case (normal, All caps, small caps), leading, or tracking.
- Click OK.
Kerning of characters
Kerning refers to fixing of particular pairs of letters that are too close or too far apart from each other.
To automatically kern a pair of characters;
- Select the text you want to kern.
- Click on Type, then choose Expert Kerning.
- In the Expert Kerning dialog box, click the appropriate slider button to make the text either tighter or looser.
- Click OK to apply.
Changing the Case of a given text.
This allows you to change a typed text into capitals or small letters.
- Select the text whose case you want to change.
- Click on Utilities, point to Plug-ins, then click Change Case. The Change Case dialog box is displayed.
- Select the case option you want, e.g., lowercase, uppercase, sentence case, title case, or toggle case, then click Apply to preview the change.
- Choose OK to close the dialog box.
Applying a Drop Cap to a given text.
Drop cap refers to text formatting where the first character in a line is bigger and drops down to occupy the space in the next lines.
To apply a drop cap;
- Select the first character of your paragraph.
- Click on Utilities, point to Plug-ins, then click on Drop Cap.
- Specify the number of lines you want the character to occupy in the Size box, and then click Apply to preview the format.
- Click Close.
To remove the dropped capital, display the Drop cap dialog box, then click Remove.
Counting characters in your document.
- Click in the document whose characters, paragraphs, sentences, etc you want to count. To count a specific text, select the text.
- Click on Utilities, point to Plug-ins, then click Word Counter.
Paragraph formatting.
A Paragraph in PageMaker is any amount of text that ends with a paragraph mark, which is created by pressing the ENTER key.
To format a paragraph, use the Paragraph command in the Type menu, or the Control palette.
Adding space above or below paragraphs.
You can increase or decrease the amount of vertical space before or after selected paragraphs:
- Select the paragraph you want to space.
- Click on Type, then choose Paragraph to display the Paragraph Specifications dialog box.
- Under Paragraph space, type the values you want in the Before and After
Setting a word or letter spacing.
- Select one or more paragraphs.
- Click on Type, then choose Paragraph.
- In the Paragraph Specifications dialog box, click the Spacing button to display the Spacing Attributes dialog box.
- Type new values under Word space or Letter space text boxes.
- Click OK.
Inserting page and column breaks
Sometimes you may want a certain text, paragraph or a new chapter to start at the top of a column or page.
To set a page or column break:
- Select the paragraph or text you want to move to another column or page.
- Click on Type, then select Paragraph.
- In the Paragraph Specifications dialog box, select the Column Break Before checkbox so as to force the paragraph to start at the top of the next column, or select the Page Break Before checkbox to force the paragraph to start at the top of the next page.
- Click OK.
Changing the Alignment of text in paragraphs.
Method 1.
- Select all the paragraphs with text whose alignment you want to change.
- Click on Type, point to Alignment, then click the desired option; Left, Center, right or Justify.
Method 2.
- Select all the paragraphs.
- Click on Type, select Paragraph.
- Click the arrow in the Alignment box, select the desired option; Left, Center, right or Justify, then click OK.
Indents and Tabs
Indents and tabs are powerful tools for positioning text.
Setting indents.
Indents are used to set temporary left and right margins for the paragraph. They move text inwards from the right & left edges of a margin.
You can set indents by:
- Typing indent values in the Paragraph dialog box, or
- Typing indent values on the Control palette in paragraph view.
Setting an indent using the Paragraph command;
- Click an insertion point in a paragraph, or select the paragraphs whose indents you want to change.
- Click on Type, then select Paragraph.
- Under Indents, type the desired values for Left, First and Right indents, then click OK.
Setting an indent using the Control palette;
- Select a paragraph or paragraphs you want to indent.
- On Control palette, click the paragraph-view
- Type the desired values for the indents in the Indent text box, then press the ENTER key.
Setting Tab Stops.
Tabs position text at specific positions. They are used when you want to create a table, such that when you press the TAB key, the cursor goes to the specified position in the tab stops.
To set tabs;
- Click anywhere on the document where tabs are to start taking effect.
- Click on Type, then select Indents/Tabs.
- On the Tab ruler shown in the Indents/Tabs dialog box, click a tab-alignment icon (left, right, center, or decimal) for the first tab you want to set.
- Drag the new tab marker along the ruler to position the different tab stops at the desired points.
- If you want the tab leader, click the Leader button, then choose the type of leader you want.
- Choose Apply, then click OK.
Review Questions.
- (a). What is a Control palette?
(b). How would you use a control palette to format:
- Characters in a text
- Explain how you would:
- Calibrate rulers to measure in millimeters.
- Change the boldface and the font size of selected text at once.
- Differentiate between the following:
- Change case and drop cap.
- Kerning and tracking.
Page formatting.
This refers to formatting the whole page. It may include setting column guides, page numbering, adding headers and footers, etc.
Working with Non-printing guides & rulers.
Nonprinting guides are lines that help the user to position objects on a page, but do not appear in print.
There are 3 kinds of nonprinting guides:
- Margin guides,
- Column guides, and
- Ruler guides.
Margins
Margins are defined in the Document Setup dialog box when you first create a publication, and are applied to the Document Master page.
To change the Document Master margins use the File – Document Setup command.
Column guides
Column guides are non-printing lines that serve as boundaries for text you place within them.
A column is the area between the margins. Columns control the flow of text in text blocks that you place automatically and also help position text and graphics.
Ruler guides
Ruler guides are non-printing lines that help you align items or objects on a page accurately. However, they don’t control the flow of text.
To display or hide the margin, column, or ruler guides on the page:
- Click on View, then select the guide to display or hide. If an item has a tick, it means it is displayed.
To force objects you move or resize to align with the nearest guide:
- Click on View, then choose Snap to Guides.
COLUMN GUIDES.
Column guides help the user to divide a large page into columns that make the publication look more organized.
Columns are mostly used in designing large publications, newspapers, and journals.
Differences between margin guides and column guides.
- Margin guides are around the edges of the printable page, while column guides may split the page at the center.
- PageMaker marks margins with a blue line, but column guides are marked with pink coloured lines.
To set up columns on a particular page;
- Move to the page in which you want to set up the columns or move to the master page.
- Click on Layout, then select Column Guides.
To setup column guides separately in a publication with double-sided facing pages, select the Set Left and Right Pages Separately, then set different columns for each page.
- Type the number of columns you want on the page, and specify the space you want between columns (called the Gutter). If you are setting left and right pages separately, enter values for both pages.
- Select Adjust Layout if you want existing text and graphics on the page to adjust so as to align with the revised column setup.
- Click OK.
PageMaker will automatically create the specified number of columns, equally spaced (i.e., of identical widths), and fit them within the margins of the page.
To create columns of unequal size, drag the column guides using the Pointer tool to the positions you want.
Note. If the columns are set in a Master page, they will appear on all the pages of the publication.
Moving and locking columns.
Moving columns.
- To adjust column widths, simply drag the column guides.
The two lines forming the gutter between columns move together, and any text and graphics on the page will not be affected by dragging column guides.
Locking and unlocking column and ruler guides:
After setting up your columns, you can lock them in place to prevent accidental moving.
- Click on View, then choose Lock Guides.
Review Questions.
- (a). What are non-printing guides?
(b). Give three non-printing guides used in PageMaker.
- Explain how you would:
- Create different columns on the same page.
- Lock column guides to avoid accidental moving from the current position.
- What does the term Gutter mean in relation to column setting?
- Differentiate between margin guides and column guides.
Page numbering.
To print page numbers in a PageMaker publication, add a page-number marker (a special character) that keeps track of the order of pages in the publication and ensures that each page is numbered correctly at all times.
To add page numbers to a publication:
- Turn to a master page or to a publication page by clicking its icon.
- Using the Text tool, click the position on the page where you want the page number to appear.
- Press Ctrl + Alt + P.
On the master pages, a page-number marker (LM for a left master page, RM for a right master page or single page master) indicates where page numbers will appear.
- Use the Text tool to select and format the text as desired.
Changing the page number style:
Normally, PageMaker applies the Arabic page numbering style, i.e., 1, 2, 3 …
To change the style;
- Click on File, then choose Document Setup, then click Numbers
Select the numbering style you want to use, e.g., Arabic numerals, Roman numerals, or letters of the alphabet.
- Click OK.
Specifying the starting page number:
Pages are numbered starting from 1. To specify a different starting point;
- Click on File, then choose Document Setup.
- Type the starting page number in Start Page #. If the publication is part of a book, click Restart Page Numbering.
Moving between pages in a publication.
You can easily move from one page to another when you are working on a publication with multiple pages.
To move to a particular page;
- Click on Layout, then select Go To Page (or press CTRL+’G’).
- Type the page number you want to go to, then click OK.
To move to the previous page or the next page, press Page Up, or Page Down key. To jump to the first page, or last page, press Home or End key.
Adding new pages to a publication.
- Move to where you want to insert pages.
- Click on Layout, then select Insert Pages.
- Type the number of pages you want to add, and select a location to specify where the inserted pages should be placed, i.e., Before, After or Between the current pages.
- Click Insert.
Deleting/removing specific pages.
- Click on Layout, then select Remove Pages.
- Type the range of pages you want to remove, then click OK.
The specified pages together with their content will be removed.
Adding headers and footers to a publication.
A Header refers to a line of text such as a page number, date, or a company name usually printed on the top margin of each page in a document, while a Footer is a line of text printed in the bottom margin.
Note. You can use the same header and footer throughout the publication or use running headers and footers that indicate the content of each page.
Publications that require headers and footers are: dictionaries, telephone or address directories.
Defining consistent headers and footers.
To define a header or footer common throughout the publication;
- Click the master page(s) icon.
- At the top of the page, click where you want the header to appear, or at the bottom, click where you want the footer to be placed.
- Type the text that you want displayed on every page in your publication.
Defining running headers and footers.
- Using the Pointer tool, click to select the text block you want to use to create a header or footer.
- Click on Utilities, point to Plug-ins, then click Running Headers & Footers. A dialog box is displayed with a Preview page that helps you correctly position the header or footer.
- At the top of the sample page, select the master or publication pages whose guides you want to use for positioning purposes.
- Click or drag the Place icon to create a text block placeholder, and position it where you want the header or footer to appear on the text page.
- Use the nudge buttons or the Position and Width text boxes to finalize the placement and width of the selected placeholder.
The leftmost nudge buttons snap the placeholder to the nearest guide.
- In the Content list box, select the words that will be used as headers or footers, e.g., the 1st word in the First paragraph, then click Add.
- Under Apply To: select a page range that will determine which pages the selected running header will appear on.
To specify a contiguous or a discontinuous range, use the Range text box, e.g., “1, 3-6, 10” applies the header or footer to pages 1, 3, 4, 5, 6, and 10.
- To preview the running headers or footers before closing the dialog box, click the Preview
- Click OK.
Removing running headers and footers
To delete running headers and footers associated with an existing story;
- Select any text blocks in the story.
- Click on Utilities, point to Plug-ins, then click Running Headers & Footers.
- Drag the placeholder for the appropriate header/footer off the page, then click OK.
WORKING WITH GRAPHICAL OBJECTS
Adding graphics to a publication.
PageMaker provides three ways of adding graphics to a publication:
- Drawing lines, ovals, circles, squares, rectangles, etc on a page using the drawing tools.
- Importing pictures from other applications into a PageMaker publication using the Place
- Pasting all or part of a graphic from another publication using a Clipboard.
- Drawing using the Toolbox.
The toolbox has several graphic drawing tools.
Tool used to draw
Line tool a line at any angle.
Constrained tool a line at either 450 or 900.
Rectangle tool rectangle or a square.
Polygon tool polygons (many-sided figures).
Ellipse tool ovals or circles.
Note. To draw a perfect square or circle, hold down the SHIFT as you draw with the Rectangle or Ellipse tool.
- Importing graphics from other applications.
PageMaker allows a person to import pictures directly from another file or application by using a process called Placing.
In most cases, graphic files are created in graphical-based desktop publishers or picture editing software, and then imported into PageMaker.
To import a graphic:
- If you want to place the graphic in a frame, click to select the frame using the Pointer
- Click on File, then choose Place.
- Select the file you want to place, then click the Open
The cursor changes to become a loaded icon.
- Click anywhere on the pasteboard using the Pointer tool to place the new graphic.
- Pasting graphics from Clipboard.
- Select the graphic you want to move or copy.
- Click on Edit, choose Cut or
- In your publication, position the insertion point where you want to place the object.
- Choose Paste from the Edit menu, then grab the graphic from the Pasteboard and drag it to where you want it on the publication.
Note. Graphics can be pasted from publications like CorelDraw and Paint.
Formatting graphical objects.
Moving and resizing a graphical object
Once you create a graphical object, you can adjust its size, shape, or location.
To move a graphical object:
- Using the Pointer tool, click the graphic you want to modify to display the boundaries.
- Point anywhere inside the object, and then drag to another location.
To resize a text or graphical object:
- Using the Pointer tool, click to select the object.
- Point to the selection handles displayed at the corners of the object, and then drag to the required size.
Applying or changing stroke and fill
Once you create a graphical object, you can enhance it by applying stroke and fill.
A Stroke refers to a line style, while Fill refers to applying patterns such as shading or background colour to an object.
To apply fill;
- Using the Pointer tool, click to select the object you want to apply or change fill.
- Click on Element, then point to Fill, then select the fill pattern you want to apply.
To apply stroke;
- Select the object you want to apply or change stroke.
- Click on Element, then point to Stroke, then select the line style or thickness you want to apply for the line.
Note. To set the fill and stroke options, (e.g., to change the colour of Fill and line), click the Fill and Stroke command on the Element menu to display a dialog box.
Applying rounded corners to rectangles and squares.
- Select the rectangle or square whose corners you want to change.
- Click on Element, then select Rounded Corners.
- Select the corner style you want, then click OK.
Reshaping a polygon.
Once you draw a polygon, you can change it to another shape such as a triangle, pentagon, hexagon, or even a star.
- Select the polygon you want to reshape.
- Double-click the selected polygon. PageMaker displays reshape placeholders.
- Drag the vertical placeholders to the shape you want.
To set the number of sides or create a star;
- Select the polygon you want to reshape.
- Click on Element, then select Polygon Settings.
- In the Polygon settings dialog box, type the number of sides you want (from 3 to 100).
- To create a star, drag the scroll box to change the percentage value in the Star inset
A value of 0% means no star, while 100% represents a star whose vertices meet at the centre.
- Click OK.
Adding text into a text frame.
You can create text by using a Text frame. A Text frame is a graphical object used to create various shapes of text objects.
Text frames do not change height or width as you add or remove text.
Method 1:
- Draw a frame using any of the frame tools that defines the shape you want the text block to take, e.g., Rectangle frame, Ellipse frame, or Polygon frame.
-Or-
Select a drawn shape, click on Element, point to Frame, then choose Change to Frame.
- Click the Text tool, click in the frame, then type the text (or paste text from the clipboard).
Method 2:
- Select a text block, hold down the SHIFT, and then select an empty frame.
- Click on Element, point to Frame, then click Attach Content.
The text flows into the frame and the text block disappears.
Wrapping text around a graphical object.
Text wrap is controlling the flow of text over or around a graphical object. It helps in formatting an object allowing text to flow around it without obstructing it.
Wrapping determines how text behaves around an object. For example, you can make the text surround an object without displacing it.
To wrap text around an object:
- Select the object.
- Click on Element, then choose Text Wrap.
- Click the middle wrap option in the dialog box displayed.
- Specify a Text flow
The leftmost icon makes the text jump the object to the next page or column. The middle icon allows text to jump over the object and continue on the same page. The rightmost icon creates a rectangular text wrap around all the sides of the object.
- Enter standoff value for the boundary (standoff – the distance of the text from each side of the graphic).
- Click OK.
Grouping and ungrouping objects.
Grouping means combining several objects into one so that you can work with them as one single object.
Grouped objects can be formatted, rotated, resized, or moved as a single unit.
To group objects:
- Hold down the SHIFT key, and then click to select each of the objects you want to group using the Pointer
- Click on Element, then choose Group (or press CTRL + ‘G’).
To select an object within the group, press CTRL then click the object.
To ungroup objects:
- Click to select the group.
- Click on Element, then choose Ungroup.
Rotating an object.
Rotating an object means changing the angular placement of the object.
To rotate an object;
- Select the object.
- Select the Rotate tool from the toolbox. The pointer changes to a star.
- Position the star at a fixed point at the centre of the object.
- Drag the star away from the fixed point in the direction you want to rotate the object. To rotate at intervals of 450, press the SHIFT as you drag clockwise or anticlockwise.
- When the object is in the desired position, release the mouse button.
Cropping an object.
When you import a graphic from another program or publication, you can cut off unwanted parts of the graphic that you do not want to print starting from the edges.
To crop a graphic;
- Select the graphic that you want to crop to display the placeholders.
- Select the Cropping tool from the toolbox.
- Point to a selection handle, and hold down the left mouse button to turn the cropping tool into a double-sided arrow.
- Drag inwards until only the part of the graphic you want in your publication remains.
To move the graphic within its frame;
- Position the Cropping tool at the centre of the graphic, and hold down the left mouse button.
- When the hand appears, drag until you see the part you want to appear in your publication, then release the mouse button.
Locking objects.
You can lock individual objects in place in order to help preserve the design of your pages through all the stages of production.
You can change the attributes of a locked object provided the change does not affect the object’s size or position. For example, you can change a colour or fill applied to a locked object.
To lock or unlock an object;
- Select the object.
- Click on Element, then choose Lock Position (to lock). To unlock a locked object, choose Unlock.
Creating Drop shadows.
A Drop shadow is a copy of a graphic that is shaded black or another colour or given a shaded pattern. When dropped slightly to the left or right behind the original shape, it looks like a shadow.
Drop shadows are used to add dimension and emphasis to graphics.
- Draw the graphic, then fill the graphic with colour (use the Element menu – Fill command).
- Copy the graphic while it is still selected.
- Give the copied graphic a different darker shading and Send it to the back using the Element menu (Arrange command).
Deleting a graphic.
- Select the graphic you want to delete.
- On the Edit menu, choose Clear (or press Backspace or Delete key).
Using rulers to measure objects
In PageMaker, you can design page layouts and graphics that are exact in measurement as specified using the horizontal and vertical rulers.
Example; draw a triangle of height 5 cm and base 6 cm.
- Set the rulers to measure in millimeters.
- Drag and place ruler guides from the horizontal and vertical rulers to mark a rectangle area of 5 cm x 6 cm on the screen.
- Using the Polygon tool, draw a polygon shape in the guides.
- Select the polygon, click Element then choose Polygon Settings.
- In the Polygon settings dialog box, select 3 sides and then click OK.
- Finally, select the triangle and drag it to fit exactly inside the marked area.
Review Questions.
- (a). What is a Text frame?
(b). How would you convert a rectangular shape into a text frame so that you can place text in it.
- Give three methods that are used to transform an object.
- Explain how you would:
- Draw a hexagon.
- Rotate a triangle by 30 degrees.
- Lock an object in order to preserve your publication design.
- Import a graphic from another file into the publication using the Place command.
- Group objects so that you can manipulate them as a unit.
- (a). What is Text wrap?
(b). Give three ways you can wrap text on an object.
(c). Explain the concept of wrapping text around objects.
- Define the following:
- Object grouping.
- Line stroke.
- Explain why you would need to lock margins or objects in a publication.
- Differentiate between Fill and stroke.
PRINTING A PUBLICATION.
To print one or more copies of your publication;
- Click on File, then choose Print.
The Print dialog box appears in which you can specify the following:
- Printer: – select the printer that you wish to print to from the list of active printers installed in Windows.
- Copies: – type the number of copies you want printed per page.
- Collate: – if this box is checked, a complete copy of the publication or book is printed before printing the next copy.
- Reverse: – if selected, it will reverse the order in which your printer normally prints your pages.
- Under Pages:
- Choose All – to print all the pages in the active publication.
- Specify the range of pages you want to print in the Ranges box, if you do not wish to print the whole document.
- In the Print box, choose:
- Both Pages – to print all the pages specified under Ranges.
- Even Pages – to print all the even pages in your publication, or all the even pages specified under Ranges.
- Odd Pages – to print all the odd pages in your publication, or all the odd pages specified under Ranges.
- Print blank pages – selecting this option to print the blank pages in their proper position in the publication.
- Orientation: – determines the print orientation of your page. The ‘Tall’ icon prints your publication in Portrait mode, while the ‘Wide’ icon prints in Landscape mode.
Note. Select the same orientation you selected in the Page Setup dialog box.
- To specify the Paper size, Print quality, Paper type and other options that your printer will use, click Setup.
Click Print to start printing your publication using the print specifications you have selected.